
|
|
|
Business Block Header
To access the Business Block screen, select Reservations>Blocks>Business Block from the main menu. The Business Block Search screen appears. When the OPS<version number> Opera Sales and Catering license is active, select Business Management>Business Block from the main menu to display the Business Block Search screen. To create a new business block from the Business Block Search screen, select the New button to display the Business Block screen. To edit an existing business block, highlight your choice and select the Edit button.
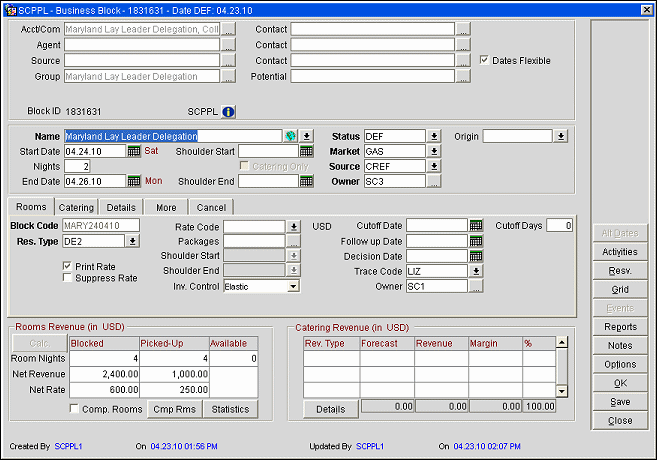
The business block Header is required for every block and contains basic information including the block code, the full name of the block, the first arrival and last departure dates, the default rate, market and source codes and the reservation type. The block code or block id will be the keys to accessing the block throughout the application.
If you created a block using a rate code in a currency other than your local currency, or selected a different currency in the room grid, the net room revenue and net rate are displayed in that selected currency and the picked-up revenue will be converted to that currency. The Multi-currency feature is available when the General>Multi-Currency application function is set to Y.
Important! When the appropriate View and Edit Profile permissions have been granted, it is possible in the Business Block screen to open the attached Account, Contact, Business Block or Potential record by double clicking on the name. Please note that a double click is only enabled if there is an actual value in the field.
Account/Company. Displays the Account/Company Profile attached to the business block. To add another Company, Travel Agent, or Source to this business block, click the ellipsis [...] button. When more than one account profile type is attached to the business block, the Primary account profile type is displayed in the business block header highlighted in yellow.
Note: By selecting a Travel Agent or Source for the Account/Company field, this impacts the Profile Production Statistics (profileproductivitystat) report by listing the selected travel agent or source as "Company" on the report.
Contact. Displays the Account/Company profile contact attached to the business block. To add another company contact to this business block, press the ellipsis [...] button next to that field. When more than one company contact is attached to the business block, the primary company Contact is displayed in the business block header highlighted in yellow. If the company contact selected has no relationship to the company account already associated with the Business Block, the contact's name will display in a red background.

Note: When the Reservations>Reservation Contact application function is set to Y, booking contacts are copied to the posting master for the booking. In addition, contacts are also copied from the PM to all reservations picked up for the booking.
Note: When a Contact Profile with Specials Preferences is attached to a Business Block Header, a message prompt is displayed when creating the PM Reservation asking the user if they would like to apply these Specials Preferences to the PM Reservation. When selecting Yes, the Specials Preferences will be added automatically to the Reservation, however they will not be added to any of the associated Profiles (i.e. Company, Group, etc.).
Agent. Displays the Travel Agent Profile attached to the business block. To add another agent to this business block, press the ellipsis [...] button. When more than one Agent is attached to the business block, the Primary Agent is displayed in the business block header highlighted in yellow.
Contact. Displays the Travel Agent Contact attached to the business block. To add another agent contact to this business block, press the ellipsis [...] button. When more than one agent contact is attached to the business block, the primary Contact is displayed in the business block header highlighted in yellow. If the agent contact selected has no relationship to the agent account already associated with the Business Block, the contact's name will display in a red background.
Note: When the Reservations>Reservation Contact application function is set to Y, booking contacts are copied to the posting master for the booking. In addition, contacts are also copied from the PM to all reservations picked up for the booking.
Source. When the Profiles>Source application function is set to Y, displays the Source Profile attached to the highlighted business block. To add another Source to this Business Block, press the ellipsis [...] button. When more than one Source is attached to the business block, the primary Source is displayed in the business block header highlighted in yellow.
Contact. Displays the Source Contact attached to the business block. To add another source contact to this business block, press the ellipsis [...] button. When more than one source contact is attached to the business block, the primary Contact is displayed in the business block header highlighted in yellow.
Potential. When the General>Potential application function is active the Potential field displays showing the Potential (revenue and room nights expected of a client during specific periods of time used as targets for comparison with the actual room nights and revenue generated from the client) attached to the business block. To add another Potential to this business block, press the ellipsis [...] button. Potentials can be used as "templates" for actual Business Blocks when the client is ready to book whereby many of the fields in the business block screen will be "defaulted" to the information provided in the Potential.
Group. Displays the Group Profile attached to the Business Block. To add another Group Profile to this business block, press the ellipsis [...] button. It is not possible to attach more than 1 group profile to a business block. A Group Profile will be automatically created and attached when the business block is saved if one has not already been attached by the user.
Block ID. This view-only field shows the system-generated block number.
Property Indicator. Select the ![]() button to access the Property screen. Please note that the name of the property where the Business Block is booked will display to the left of this icon.
button to access the Property screen. Please note that the name of the property where the Business Block is booked will display to the left of this icon.
Master Block?. When the application function Blocks>Master Sub Blocks is set to Y, select this check box to indicate this is a master business block. This option is only available when a New block is created.
Master Allocation. When the application function Blocks>Master Sub Allocations is set to Y, select this check box to indicate this is a master business block. This option is also available in single property but is only visible when a New block is created.
Dates Flexible. When the application function Blocks>Alternate Dates is set to Y, this option allows for the entry of an alternate set of dates or date ranges for which this block can be booked. See Alternate Dates for details.
Additionally, when the OPF<version number> Opera SFA license is active, alternate dates can be used as a means for suggesting date sets or date ranges on Leads either by SFA or the lead recipient. See Creating and Editing Business Blocks in SFA and Web Lead Reply for further details.
Sync. This check box is visible when the application function Blocks>Master Sub Blocks is set to Y and is checked by default when the application parameter Blocks>Synchronize Master Sub Blocks is set to Y. It determines if master and sub bookings should be synchronized (driven by changes on the master only); when the flag is checked, the linked sub-booking are View Only. This option is only visible when a New block is created.
Property. When the OPP MHT2 or OPS MHT2 Multi-Property license code is Active, the Property to which this business block belongs.
Note: Copying a booking with Alternate Dates will NOT copy the alternate dates. Also, when alternate dates exist for a booking, a lamp will display at the bottom of the Business Block screen. Click on the lamp to access to the alternate dates directly.
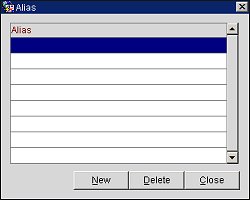
Name. Displays the name of the business block. By default if there is an Acct/Comp field populated this name will be copied to the Name of the business block. However, if the name of the Business Block is different from the Acct/Comp, then edit it by typing in the field. Select the down arrow to open the Alias window and add, view, or delete an alternative block name or alias. The alias name(s) can be used to search for the business block and multiple aliases can be entered in the Alias window and is available when the application parameter Blocks>Alias is set to Y. When an active OXI interface is present, multiple block alias names can be exchanged in the <blockAlias> tag of the allotment message as comma separated values. If the value of the XML tag <blockAlias> is NULL, Alias names will not be removed from a block header.
Start Date. A Calendar field that is prompting for the Start of this business block. This may not necessarily be the Arrival of the Guests in-house, but may include a set up day for Events. If the Start Date changes the room grid and events will be shifted based on the delta between the old start date and the new start date. If the number of nights is changed together with the start date, and the existing room grid will not fit in the new dates, the change is not allowed.
Note: When changing the dates of a Master Allocation, Sub Allocations the dates can only be changed to dates that would still accommodate any existing sub-allocation dates. For example:
Master Allocation dates 5/01/07 - 5/31/07 <- Departure date may be moved to any date in the future
Sub-Allocation 1 dates 5/05/07 - 5/15/07 <- Departure date may be moved back as far as 5/31/07
Sub-Allocation 2 dates 5/10/07 - 5/25/07 <- Arrival date may be moved to any date earlier that 5/10/07 but no earlier than the Master's Arrival date (05/01/07)
Sub-Allocation 3 dates 5/15/07 - 5/30/07 <- Arrival date may be moved to any date as far as 5/15/07 but no earlier than the Master's Arrival date (05/01/07)
Master Allocations are available when the application function Blocks>Master Sub Allocations is active. See Business Blocks Master Allocations and Business Block Sub-Allocations for more details.
Nights. Type the number of nights required for this business block. Remember it may not necessarily be the number of nights the guests are staying in-house. Changing this number will automatically change the End Date.
Note: The Blocks>Maximum Number of Block Days application setting, if specified, sets an upper limit on the number of nights that may be entered. If the Maximum Number of Block Days setting is left blank, the upper limit defaults to 365.
Note: When a booking is designated for Day Use (zero room nights) the Grid button is disabled on the Business Block Reservation screen. Conversely, bookings that already have inventory on the grid, will display an error message 'Unable to change Block dates – Inventory exists'.
When the number of nights is modified for a business block and a Deposit Rule has been applied for a non-zero amount, such as a Flat Rate, then the amount for the deposit will be unchanged. But if the Deposit Rule is setup for a percentage or nights and the number of nights for the block is changed, then the Deposit Rule amount will be recalculated.
End Date. A Calendar field calculated from the Start Date and Nights fields. If this field is incorrect you can change it and it will update the Nights field.
Catering Only. The Blocks>Catering application parameter controls the functionality of this check box in the following manner:
Note: If the OXI Delphi license code (OPX_DEL2) is active in PMS only installations, the Catering Only check box will be visible since Delphi may send catering only blocks to the PMS.
Shoulder Start/Shoulder End. (Available when the Blocks>Shoulder Dates application parameter is set to Y.) Once the block has been saved and marked as Elastic or Sell Limit in the Inventory Control field of the Business Block screen Rooms tab, the shoulder start and shoulder end date fields are visible and may be added to the block prior to the arrival date and/or following the departure date of the business block. These dates are shown in yellow type on the Rooms Grid. These 2 fields may be used to define a shoulder period start date and shoulder period end date. The start shoulder period will run from the Shoulder Start date until the start date of the business block. The shoulder end period will run from the end date of the business block to the Shoulder End date. The Blocks>Max Shoulder Days application setting allows you to restrict the number of shoulder days to a maximum number before the booking arrival date and after the booking departure date. A Reservation or Event may not be made for a date outside the Shoulder Start and Shoulder End Dates.
Status. A drop down list field where you may select the status of the overall booking, which controls the status of the blocked rooms. The status options available on this drop down list depend on the current status. The Status Definition table determines the "Starting Statuses" that have been configured via the Configuration>Reservations>Business Blocks>Status Codes. Codes with the Starting status check box marked are the only statuses that you will see when creating a new business block.
If the Blocks> Use Single Block Status application parameter is set to Y, a single status code is used for both the rooms and catering portions of a booking. In this case, the Status is not shown on the Catering tab, and the single status shown in the Header portion of the screen applies to the rooms and events. When the status is changed on the Header, all events having the same status are correspondingly changed. For example, if the Header status is changed from Pending to Definite, all Pending events will also be changed to Definite.
If the Blocks>Confirm Booking Status Change application parameter is set to Y, a message prompts you to confirm a change in the status.
If the booking status is changed to a Cancelled status, the cancellation number is recorded in the User Activity Log and user is prompted to enter a cancellation reason.
Note: The Status and the Status Update date display in the title bar of the Business Block screen, reflecting when the status what last updated and to which status the booking was updated.
Market. Select what market segment is to be attached to the business block. If the Reservations>Market Main Group application parameter is set to Y, you must select a market group and a market code within that group.
Source. Choosing from this single choice drop down list determines how you got this business block. Here you have the ability to qualify how this block came into the property (Sales Call, Trade Show, Cold Call, Referral).
Origin. Define the channel (GDS, Email, Web Site) where this business block originated.
Owner. This is defaulted to the Sales Manager that is the Primary owner of the Profile that is attached at the Acct/Comp level. If you wish to attach an additional owner or change the primary ownership click on the ellipsis button. If more than one Owner is attached, the primary owner will be displayed highlighted in yellow.
The following rules have been applied for defaulting the overall salesrep code on a new booking:
If account and contact have the same owner, it only defaults once.
Owner defaults as the BB Secondary Overall Owner.
If account and contact have the same owner, it only defaults once.
If account and potential have the same owner, it only defaults once.
Note: These scenarios work identically in S&C and SFA.
Type. Select the type of booking. Then use this type to search and run reports for a general overview of the type of business (Conference, Wedding, Exhibition) that is being booked. (This field appears when the Blocks application parameter Business Block Type is set to Y.)
Wholesale Block. When the OPO_<version number> RMS license code is active, select this check box to consider the business block as a wholesale block for revenue management block materialization forecasting. During the activation of ORMS, past and future blocks with more than 60 nights length of stay are automatically marked as Wholesale Blocks; you may unselect the check box here, if you don't want these blocks identified as wholesale.
Final Block. This check box is visible when the OPO_<version number> RMS license code is active and applies to both regular blocks and wholesale blocks. Select this check box to identify this block and its number of rooms actually sold as the number of rooms that ORMS will use for forecasting. This can be calculated before the cutoff date has been reached (see Business Block Rooms Tab) and on the cutoff date. In both cases, the forecasts take into account the rooms actually sold and those rooms that were released to other inventory. If this check box is not selected, then ORMS uses only the original sold block for the forecast and does not include the final amount of actual sold and picked up rooms.
Note: When moving business blocks, the move action will trigger an update of the rate restrictions based on the existing rate strategies (e.g. removing the block rooms from the count of the original date and adding them to the count on the new date). This applies to any system where rate strategies are active.
When moving or copying a booking to another date, dependent dates (i.e., Cutoff Date, Follow-up Date, Decision Date, Shoulder Dates, Catering Follow-Up Date, Catering Decision Date, and Rooming List Due Date) automatically shift earlier or later by the same number of days that the booking dates have shifted. The value of the new date fields will not, however, be less than the current business date (the current business date is used in this case), and if no date was specified for one of these fields in the original business block, the field will remain null (empty) in the moved or copied business block.
Note: An exception to this is selecting the Adjust Decision & Followup Date to New Arrival Date check box while copying the business block. See Block Copy for further details.
See Business Block Main Screen Painting Elements for details.
Begin Date Text. Displays the day of the week in which the business block begins. This field is usually screen painted beside the Begin Date field.
Catering Revenue. Label for the Catering Revenue table in the lower right hand section of the screen.
End Date Text. Displays the day of the week in which the business block ends. This field is usually screen painted beside the End Date field.
Net. Room Revenue label used in the Rooms Revenue table.
Net Rate. Net Rate label that is used in the Rooms Revenue table.
Room. Room Nights label used in the Rooms Revenue table.
Rooms Revenue. Title label for the Rooms Revenue table in the lower left hand section of the screen.
Total Forecast. Total for the Forecast column in the Catering Revenue table.
Total Margin. Total for the Margin column in the Catering Revenue table.
Total Margin Percentage. Total for the % column in the Catering Revenue table.
Total Revenue. Total for the Revenue column in the Catering Revenue table.
Tour Code Display. Field that displays the tour code for the business block.
See Also