
|
|
|
Quick Business Block Rooms Tab
To access the Quick Business Block screen, select Reservations>Blocks>Quick Business Block from the main menu. The Quick Business Block Search screen appears. When the OPS<version number> Opera Sales and Catering license is active, select Business Management>Quick Business Block from the main menu to display the Quick Business Block Search screen. To create a new Quick Business Block from the Quick Business Block Search screen, select the New button to display the Quick Business Block screen. To edit an existing business block, highlight your choice and select the Edit button.
The Rooms tab holds information related to sleeping rooms for the business block.
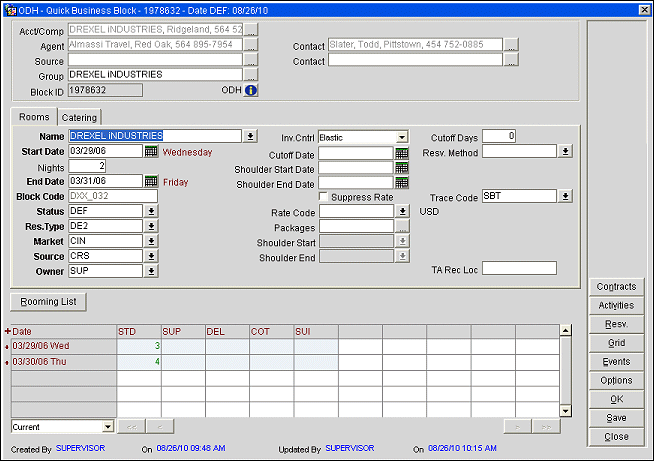
Name. A mandatory field. Enter the name of the Business Block. You might, for example, choose to use the Account or Group profile name. When the Block>Alias application function is set to Y, click the down arrow to enter an alias name for the block. The alias name can also be used to search for the block.
Start Date. Type the date directly or select from the calendar. Start Date can be the Group arrival date or the date of the first Catering event.
Nights. The number of nights spanned by this business block. Remember that it may not necessarily be the number of nights the guests are staying in house.
End Date. Automatically calculated from the Start Date and Nights fields. However, if this field is incorrect you can change it and it will update the Nights field.
Block Code. A default code generated based on what has been defined in the Blocks>Default Block Code Template application setting. This field is also editable and can be any combination of letters and numbers. This should be a unique sequence of characters identifying this Business Block.
Status. The Business Block main status. When creating a new business block, only statuses defined as starting statuses will be available in this list of values.
Note: The Status and the Status Update date display in the title bar of the Business Block screen, reflecting when the status what last updated and to which status the booking was updated.
Res Type. Select the reservation type for this business block. This reservation type will automatically propagate to all reservations created for this block.
Market. Select the down arrow to choose the market code for this business block.
Source. Select the down arrow to choose the source for this business block.
Owner. Select the down arrow to choose the sales manager owner of this business block.
Inv. Ctrl (Elastic/Non-Elastic). The Elastic check box is visible if the Blocks>Elastic Block parameter is set to Y. If this box is marked, the business block can be "stretched" to accommodate reservation demand over and above the number of allotted rooms given that the hotel still has availability. If the Blocks>Sell Limits application function is set to Y, this field becomes a drop down list of values. You may select either Non Elastic, Elastic or Sell Limits. If Elastic or Sell Limits are selected, you may set a rate for Allotments and Begin and End Shoulder periods, as applicable, see Rate Code Select for more details. You may set the shoulder period start and end dates on the block header. See Business Block Header for details.
When the application function Rooms Management>Overbooking is set to N, it is NOT possible to overbook a room type within the block. Attempting to change the booking status of a booking to deduct-from-inventory and one of the room types has more rooms blocked than physically exist in the property, will result in a message that indicates not enough rooms are available for that room type on the house level. It is not possible to override this message. The same also applies when attempting to increase the number of rooms above the house level on a block that is already on a deduct-from-inventory status.
Cut Off Date. A date field. Use the attached calendar to indicate when this Business Block will be cut off. After this date no more reservations may be made against this Business Block for the entire date range. Any sleeping rooms not picked up by the group will be released.
Shoulder Start/End Date. Shoulder dates represent the number of days a group can either arrive early or check out late.
Suppress Rate. When this selection is checked, Opera will not display the rate amount on the guest reservation, guest folio at checkout, confirmation letters, etc. When the Rates>Suppress Rate application function is set to Y and a rate code has been selected as a suppress rate, instead of populating and displaying the rate amount an SR displays in the field everywhere the rate amount should display.
Rate Code. Select the down arrow to choose the rate code(s) for which the individual reservations for this block are eligible. The Rate Code field is mandatory if the Block>Rate Code Mandatory application function is set to Y.
You may select multiple rate codes when the Blocks>Multi Block Rates application parameter is set to Y. If multiple rate codes are selected, the background of this field is yellow. Additionally, the Rate Codes indicator lamp is displayed. If you select one or more rate codes here, one rate code must be selected as the primary rate code. The primary rate you select will be displayed in this field and carried over to the Room Grid. If the Elastic check box is selected, or if the Inventory Control value is Elastic or Sell Limits, you may select rate codes to apply to Allotments and Begin and End Shoulder periods, as applicable. See Select Rate Codes for details.
Packages. Select the down arrow to display the Packages screen. Any selected package elements for the business block will automatically copy to the individual reservations attached to this business block. If packages are attached to the rate code, a yellow background appears in this field. Packages attached to the rate code cannot be edited or deleted from the packages screen. Only the packages that cover the dates of the reservation are displayed in the Packages list of values.
When a Package is attached to a reservation and the stay dates are updated and fall outside of the start and end dates of the Package, then a message is displayed stating "An attached package does not have package details associated for this time period." After closing the message, the cursor is taken back to the Nights field and the number of nights is changed back to the reservations original amount.
Cut Off Days. A numeric field. If the Cut Off Date field is empty, you may enter a value in this field. Instead of fixing one date to release all rooms if they have not been picked up, Cut Off Days sets that fixed number of days in advance of each night to release rooms that have not been picked up for that night only. Cut Off Days is a rolling number of days remaining before cut off for each night of the Business Block.
Note: Both the Cut Off Date and Cutoff Days fields will only be visible when the Blocks>Cutoff parameter is set to Y.
Resv. Method. Select this option to choose a reservation method from the list of values.
Trace Code. Select a Trace code that specifies standard Activities to be associated with this booking.
Control Centrally. Visible when a business block was created in ORS and is exported into PMS. This procedure can only be done one time for the block. In PMS, once the Control Centrally check box is unselected and a save is performed, the Control Centrally option does not display on the screen anymore and can be updated as a normal block is. The business block can, however, still be modified from ORS using the View Only override functionality.
TA Rec. Locator. Travel agent record locator on the reservation. Available when the Reservations>TA Record Locator application parameter is set to Y.
Note: When moving business blocks, the move action will trigger an update of the rate restrictions based on the existing rate strategies (e.g. removing the block rooms from the count of the original date and adding them to the count on the new date). This applies to any system where rate strategies are active.
When moving or copying a booking to another date, dependent dates (i.e., Cutoff Date, Follow-up Date, Decision Date, Shoulder Dates, Catering Follow-Up Date, Catering Decision Date, and Rooming List Due Date) automatically shift earlier or later by the same number of days that the booking dates have shifted. The value of the new date fields will not, however, be less than the current business date (the current business date is used in this case), and if no date was specified for one of these fields in the original business block, the field will remain null (empty) in the moved or copied business block.
Note: An exception to this is selecting the Adjust Decision & Followup Date to New Arrival Date check box while copying the business block. See Block Copy for further details.
The Rooms Grid section of this screen provides various views of the Rooms information related to this business block. Select the view you wish to see using the drop down list in the lower left corner of the screen.
The Sales and Catering room types (if the OPC<version number>license is active) and corresponding PMS room types are listed in the column headers, with the related number of rooms per day shown for each room type. See Room Grids for details.
To create reservations for this business block, select the Resv. button. See Business Block Reservations for details.
If the Blocks>Family Block application parameter is set to Y, the Rooming List button is available once the quick business block status becomes Definite. Select this button for a shortcut method for creating reservations for this quick business block. An abbreviated Rooming List screen appears. See Group Rooming List for details.
Contracts. Available when the Blocks>Business Block Contracts application parameter is set to Y. Select this button to send select S&C reports via the fax and email delivery methods. See S&C Contract Sending for details.
Activities. This option launches the Activity Search screen. See Searching for an Activity for more details on how to create, modify or delete activities for the selected Business Block.
Analyze. (Available when the ORMS license code is active: OPO_<version number>, OPK_<version number>, or OPH_<version number>.) Select this button to view a group quotation for the block. See RMS Group Quotation. The Analyze button becomes enabled after creating or editing a block, and after the block details have been saved. Please note that if the Forecast Processor is not running, the Analyze button is disabled (gray) even though data has been entered. The availability of the block is based on the Block Summary table, which is dependent on the Forecast Processor. In that case, start the Forecast Processor and re-query the block - the Analyze button becomes available.
Reservation. This option launches the Room List for the current block. From here it is possible to create, modify and delete one or multiple reservations in the block. See Room Grid Reservation for more details.
Events. Display the Event Search screen where events associated with the block are listed. (See Searching for an Event for details.) The Events button is only available if the Attendees field on the Catering tab is not blank (null).
Options. This launches the Business Block Options menu where such functions as Add a PM, Item Inventory, Notes and so forth can be accessed for the selected Block. See, Business Block Options for a complete listing of the available functions.
Note: When the General> Enhanced Options Management application parameter is set to Y, you have another way of quickly accessing options without selecting the Options button to open the Options menu itself. You can press Ctrl+T to display the blue Option field. ![]()
To view all the available options in alphabetical order, scroll through the options list by selecting the Up and Down arrow keys. Press Enter to select the displayed option and open the corresponding option screen. Or, instead of scrolling through the options list, type the first three letters of the desired option. The corresponding options screen appears. (For example, type c-a-n for Cancel.)
You may also enter the first letter of the desired option and all options beginning with that letter will appear in alphabetical order as you scroll. To scroll, use the arrow keys or repeatedly press the beginning letter key. For example, if you typed a-a-a-a you might scroll through the options of Accompanying, Add on, Agent/Company, Alerts. Press Enter to open the desired option.
See Also