
|
|
|
Menu Item Configuration - Menu Item Name Grid
Select Edit button from the Menu Item Configuration screen Menu Item Name grid (Configuration>Catering>Menu Item Maintenance) to display the Menu Item Name screen.
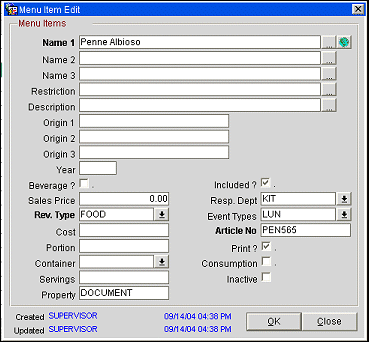
Provide the following information and select the Save button.
Name 1, 2, 3. Enter the menu item name as you want it to appear on all documents and contracts. Three lines are available so you will not need to use abbreviations. If you wish to insert a line break at a specific point, move to the next line. Remember to use upper and lower case and check your spelling.
Restriction. A free-typing field. Use this field to specify any limitations that apply to this menu item. This field will not be printed on any standard documents. It is for information only.
Description. A free-typing field. Use this field to supply additional information about the menu item such as its composition. This field will not be printed on any standard documents.
Origin 1, 2, 3. These fields are only used to provide additional explanation for beverage items, mostly for wines. Enter information such as origin, quality or region for reference by your team members who need this information.
Year. A numeric field. Mostly used for wines or any beverages where vintage is important.
Beverage?. A check box. Select this check box to classify the menu item as a beverage. It is classified as food if left blank.
Included. Select this check box to indicate that this menu item is usually included in the total price of a Standard Menu it is attached to. If the box is not checked, it should be charged separately. Typically, most beverages are not included in a menu price as they are charged on consumption basis, whereas food items are mostly included. If this option is selected, the Consumption check box is not available.
Bookable via Web Site. This check box will only display when the license codes Webservices Sales & Catering WCS_XXX or the Webservices Conference Center WCC_XXX are active. Select this option to designate the configured menu item as bookable via the web site.
Note: Selection of this flag is also inherited from the associated Menu Item Class. If the item being configured is assigned a menu item class that has this flag selected, the menu item will also have this flag selected by default. If the menu item being configured is assigned to a menu item class that does not have this flag selected, the flag will not be available on the menu item.
Sales Price. A dollar field used to specify the dollar value of this menu item if it were to be sold separately (if not included in a menu). In order to be able to compare items that might be exchanged against each other within a menu it is good practice to update this field for most menu items, even if they are seldom used or never sold separately from the menu in which they are contained.
Responsible Department. A multi pick box asking you to select the appropriate department within the hotel's Food & Beverage structure that either provides / organizes this item or needs to know that this item has been booked for a certain function. If values have been selected for this field in the Menu Item Class, the Menu Item will be limited to only those choices.
Revenue Type. A pick box asking you to select the revenue type that should receive the accumulated revenue from this item. Typically, this would be FOOD for food items and BEVERAGE for beverage items. Please refer to your Operational Standards for any further explanation.
Note: You may change the revenue type associated with a menu item while the item is attached to a menu. The event revenue calculations are automatically updated as necessary.
Event Types. A multi pick box asking you to select the event type(s) for which this item is typically booked. This will facilitate finding items for menus that are served for specific event types only. If values have been selected for this field in the Menu Item Class, the Menu Item will be limited to only those choices.
Cost. A dollar field used to specify the cost (pre-sales) figure for each menu item as provided by the Food & Beverage department. This will facilitate the calculation of profit / loss margins on various screen displays and reports.
Article Number. An alpha/numeric field used, where possible, to associate an article number with each menu item. Article numbers can make searches for specific menu items faster when using the Quick Insert feature during the booking process.
Portion. A free- typing field. Provide the description of the type of portion this item is prepared and served in.
Print. This check box determines if this item should be printed on internal and external documents — in which case it should be marked — or on internal documents only, in which case it should not be marked.
Container. This field is for beverage menu items and denotes the container type this menu item is served in. Food Menu Items will typically not include this field.
Servings. This field indicates how many servings the menu item contains as entered and sold here. For a typical menu item that is included as part of a standard menu the serving would usually be 1.
For Beverage Menu Items enter the number of servings that are obtainable from the container that has been specified above.
For example, if wine is included in a menu and the menu is booked for 40 people, the system will automatically calculate that 10 bottles of wine are needed and attach them to the event with that amount rather than 40. Other revenue, profit and loss calculations are also based on this entry. See also further explanations on the standard menu help, revenue grid explanations.
For Food Menu Items, if this single item is a 'family' or 'large' dish that is meant to serve a specific number of people, you need to specify the number of people that this item is catering for.
Consumption. Select this check box if this item is usually charged on an "as-consumed" basis. If this option is selected, the Included check box is not available.
Inactive. Select this check box to make the menu item inactive. Unselect this check box to make the menu item active. Inactive menu items are not available to be booked for a catering event; however, if already attached to an event prior to being made inactive, an inactive menu item will not be de-attached from the event and will continue to print on BEOs, Pro-forma reports, and Menu reports (except configuration reports e.g., Item List report, Item List Translation report, and Menu Item List report).
If the menu item is attached to a composed menu, upon selecting the Inactive check box you are prompted, "This Menu Item will be unattached from Composed Menus. Do you want to continue?" Reply Yes to remove the menu item from any composed menus where it appears and flag the item as inactive. Reply No if you do not wish to remove the menu item from any composed menus where it appears; the menu item will not be flagged as inactive.
Property. Read-only field showing the property to which this menu item is attached.
See Also