Creating a Composed Menu
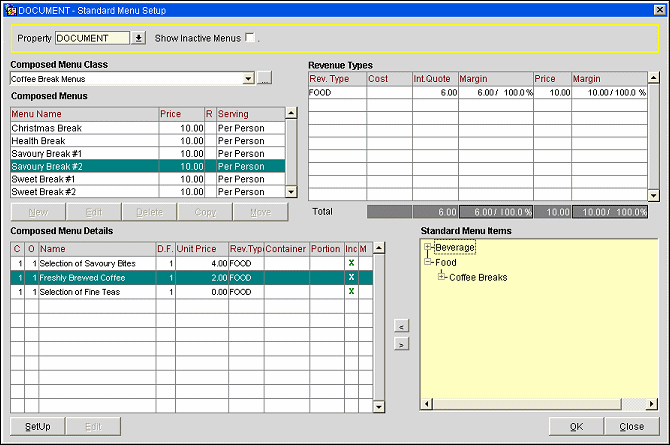
To access the Composed Menu screen, select Configuration>Catering>Standard Menu Setup. The Menu Composition screen appears.

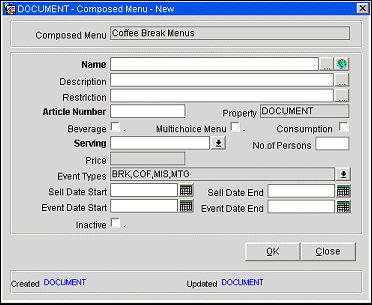
Select a Composed Menu Class in the Composed Menu Class grid. Select the New button under the Composed Menus grid. The Composed Menu - New screen appears.

Note: When the license codes Webservices Sales & Catering WCS_XXX or the Webservices Conference Center WCC_XXX are active, an additional flag 'Bookable via Web Site' is available for selection on the Composed Menu - Edit or Composed Menu - New screen. Selection of this flag will enable the configured item to be available for booking via the website. Selection of this flag is also inherited from the associated Menu Class. If the menu being configured is assigned to a menu class that has this flag selected, the composed menu will also have this flag selected by default. If the menu being configured is assigned to a menu class that does not have this flag selected, the flag will not be visible.
Provide the following information and select the OK button.
Name. Enter the name of the new menu. This will appear on the Banquet Event Order and other reports.
Description. A free-typing field for an additional description of the menu; a helpful internal tool to ensure that the right menu is sold to the right client.
Restriction. A free-typing field used to specify any restrictions placed on this menu, including attendees, lead time or seasonal restrictions.
Article Number. A free-typing field for the unique alphanumeric code used for the quick insert functionality when creating the Banquet Event Order.
Property. A display field. If the multi-property version is installed, the property with which this menu is associated.
Beverage. A check box that should be selected if the menu is composed of Beverage menu items only, such as an Open Bar. For informational purposes only.
Multi-Choice Menu. A check box. When selected, this feature allows the hotel to create a composed menu with choices of starters, main courses, desserts, and so on — all having the same Sell price. Then, during the booking process, the user can choose one of the existing multi-choice menus online, while consulting with the client. There is no need to create a separate composed menu for each possible combination of menu items. (See Multi-Choice Menu for details.)
Consumption. A check box that should be selected if the menu is sold on a "consumption" basis, that is, a la carte. This means that the item is sold separately and there is no global menu price for the item. If this box is checked, all Menu Items attached to the Menu will be on consumption basis. If this box is Off, most of the Menu Items will be included in the Menu price.
Serving. A menu can be served "per person" or "per table". If you choose "per table" then you must indicate the number of people to a table. Calculation of the Internal Quote and the Cost will differ for a per person menu and a per table menu.
Number of Persons. If "per table" was selected for Servings, indicate here the number of persons at a table.
Price. A display field. You cannot enter the price of the Composed Menu here. This will be calculated for you in the Revenue Types Section.
Event Types. A multi choice pick box. This will default the Event Types that were chosen at the Composed Menu Class level. To make any changes (remove or add) mark or un-mark the events in the pick box.
Sell Date Start/End. Enter the start and end dates of the period when this menu may be sold.
Event Date Start/End. Enter the start and end dates of the period when this event must take place in order to use this menu.
Inactive. Select this check box if the menu is no longer available. Inactive menus are not available to be booked for a catering event; however, if already attached to an event prior to being made inactive, an inactive menu will not be de-attached from the event and will continue to print on BEOs, Pro-forma reports, and Menu reports (except configuration reports).
Created. Displays the user name, date and time that this menu was created.
Updated. Displays the user name, date and time that this menu was updated.
Once you select OK to close the Composed Menu screen, focus returns to the Menu Composition screen where you may now select the Composed Menu Details.

Highlight standard menu items in the Standard Menu Items Tree and use the < button (or press Alt + L) to include the item in the Composed Menu Details list. As they are selected, items will disappear from the tree listing as a precaution so you don't choose them again for this menu. The Setup button allows you to add new Menu Items to the tree. The Edit button allows you to set and change Menu Details for the Menu Item. (See Menu Item Details for more information.)
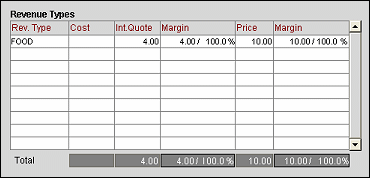
When you have selected the Food and Beverage items to be included in the menu, you may work with the Revenue Types grid. This grid is automatically populated based on the Menu Items you have selected.

In order to give this menu a price you must enter the selling price per Revenue Type in the Price column. This will give you a total Price on the last row on the grid.
Select the OK button to save and close this screen.
Revenue Type. The Revenue Type code for Revenue Types included in this menu.
Cost. The total cost of Menu Items per Revenue Type.
Int. Quote. The total sales price per Revenue Type of all the Menu Items that are marked as "Included" within this menu.
Margin. The variance between the Cost and Int. Quote columns in a dollar value and a percentage value.
Price. Blank when the menu is being created. This is a writable field where you may enter the selling price of the Menu Items of this Revenue Type contained in the menu.
Margin. After you have enter the selling price, this field will be populated with the variance between the Cost and selling price in a dollar value and a percentage value.
Totals. Total of each column.
See Also