Contact Main Tab
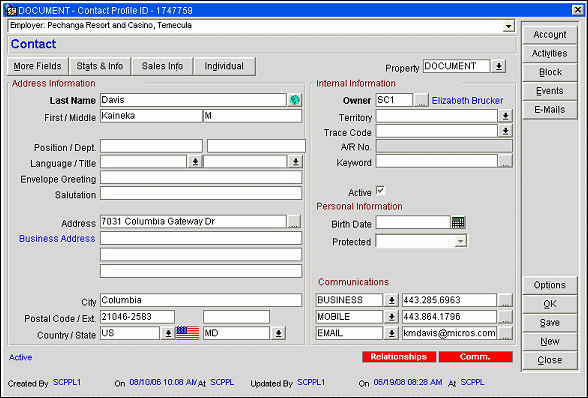
The Contact tab becomes active when the Contact check box is selected on the Profile screen for an individual profile type. This screen includes information related to the individual's business relationship with one or more accounts. A contact profile can also be created directly from within an account by selecting the ellipsis button next to the Contact field on the Business Block screen. (See Business Block Screen and Quick Profile for details.)

Lamps (indicators or notations) may appear in the lower part of the screen to alert you about information that pertains to the contact. See Indicator Lamps for a complete list and details.
The field at the top of the Contact screen shows the primary account with which the contact is associated. If there are multiple accounts, select the drop down arrow to see a list.
Note: The contact profile and the individual profile share Address Information and Communications information.
Property. Select the down arrow to choose the property for which you wish to see this profile's property-specific information. Property- specific information includes details such as Last Room, Last Rate, and Last Visit. Rate Code and AR Number may or may not be property- specific, at each property's option. Your login property is displayed by default. (This feature is available if the OPP MHOT Multi- property add-on license is active.)
Last Name. The surname or last name of the contact. Ensure upper and lower case is used appropriately and the spelling is correct.
First/Middle Name. The first or given name of the contact. Optionally, you may enter a middle name or middle initial in the field to the right. Ensure upper and lower case is used appropriately and the spelling is correct.
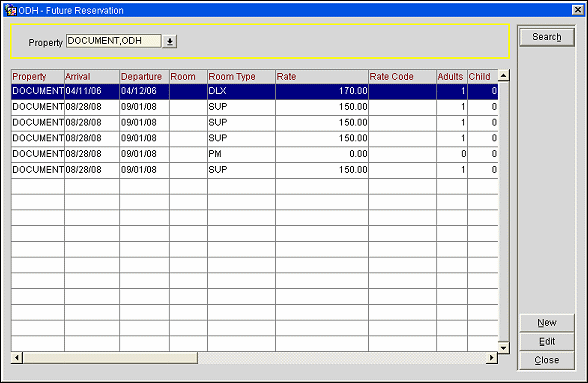
When editing the last or first name of the profile and that guest has future reservations, then the following screen is displayed to confirm that you want to modify the name associated to all of the future reservations.

Select the OK button to change the name of the guest associated to all of the listed reservations. Selecting the OK button will display a confirmation prompt. Select Yes to make the changes or no to cancel them.
Position/Department. The position or job title of the contact. To the right you may enter a department or division of the company with which the contact is associated.
Envelope Greeting. The way you address the contact on a mailing label or the outside of an envelope.
Note: In S&C, when the application parameter Profiles>Override Envelope Greeting is active, this field can be manually modified and changes made to the Title and/or Name fields will reflect in the Envelope Greeting field. When inactive, no changes can be made to this field, nor do changes made to the Title or Name fields get updated here.
In ORS, when the application parameter Profiles>Override Envelope Greeting is active, this field is refreshed each time the title is changed.
Salutation. The form of address used for this contact at the beginning of a letter.
Note: In S&C, when the application parameter Profiles>Override Salutation is active, this field can be manually modified and changes made to the Title and/or Name fields will reflect in the Salutation field. When inactive, no changes can be made to this field, nor do changes made to the Title or Name fields get updated here.
In ORS, when the application parameter Profiles>Override Envelope Greeting is active, this field is refreshed each time the title is changed.
Address Type. A letter indicates the type of address displayed (for example, B for Business address, L for Billing address, etc.).
Address Information. Enter the contact's address (mailing address, city, postal code and extension, country, and state). You may select the ellipsis button to open the Address list to create multiple addresses. (See Addresses for details.) If multiple addresses are created, select one as the primary address. The primary address displays on the Profile screen with the address type (shown in blue: for example, H = Home, B = Business, O = Other, S = Shipping) next to it. The default primary address type is set by the Profiles>Individual Address Type application setting.
Address. Enter the street address.
City. Enter the city portion of the address.
Postal Code. POstal code portion of the address.
State/Province. Select the down arrow to choose the state or province portion of the address, if applicable.
Country. Select the down arrow to choose the country portion of the address. If an ISO country code is associated with the country code you select here, the appropriate national flag image will appear next to the Country field and list of values down arrow, if this option has been configured (see Countries for details).
Note: If the Profiles >Quick Address application function is set to Y, entering the Country and the Postal Code information will autofill the State and City fields for US and selected other addresses.
Note: UDF fields can be screen-painted onto both the main and more fields tabs or the Accounts and Contacts screen via the Configuration>Setup>Screen Design>Screen Painter utility.
Owner. Sales manager responsible for this contact. Open the sales manager drop down list and select a sales manager code. Sales manager codes are defined by each property or property chain. The description of the code appears to the right of the field. See Ownership for details. (This feature is available when the General>Owner application parameter is set to Y.)
Territory. (This feature is available when the OPS <version number> Sales & Catering license code is active.) Select the down arrow to choose the sales territory to which this contact belongs. Territory codes are defined by each property or property chain. See Territory Codes for details.
Trace Code. (This feature is available when the OPS <version number> Sales & Catering license code is active.) Select the down arrow to choose a trace code for this account. Traces may be used to automatically generate activities based on defined conditions, such as a change to a specific profile data field. See Traces Definition for details.
AR Number. (This feature is available if the OPP<version number>Opera PMS license is active.) An accounts receivable number, if one has been assigned to this contact. (Select AR>Account Maintenance to add an AR account to a profile.)
Central AR No. (This feature is available if the OPR <version number> ORS license code is active.) Accounts receivable number assigned to this profile at the CRO level.
Active. Select this check box to indicate whether this contact profile is active or inactive. The default is active. If this contact becomes inactive, or if the account with which the contact is associated becomes inactive, un-check this box. Generally, contacts should be made inactive rather than being deleted. Turn contacts inactive, for example, when their account turns inactive or when they are no longer responsible for hotel bookings at their company. When contact is inactivated, a reason field is displayed and it is mandatory that the user enters a reason, from the LOV, as to why the contact has been inactivated.
Note: When an account is inactivated, all of the primary accounts, setup as a relationship, will also be made inactive.
Birth Date. The contact's date of birth. Enter a date or select a date using the calendar tool.
Communications
Use these fields to enter telephone numbers, email addresses and/or web addresses for the profile. Select the down arrow to choose the type of communication (e.g., Home Phone, Business Phone, Cell Phone, Fax, Email, Web, etc.). Then type the address in the field to the right. To add multiple communication addresses of a type (e.g., two business phone numbers or two email addresses), select the ellipsis button. Only one communication address belonging to each communication role (i.e., phone, fax, email and web page) may be designated as a primary communication address. For example, even though there are three business and home voice phone numbers for an individual, only one can be the primary phone number if all are assigned to the phone role. (See Communication Information for details on roles and primary communication addresses.)
Double click on an email address to open the Email Activities screen.
Note: The Opera user wishing to open this screen must have an email address associated with their Employee profile.
See Also