|
|
|
AR Account Maintenance
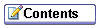
To access the Account Maintenance screen, highlight the account record in the AR Account Search screen search results grid (or, to access multiple accounts, mark the accounts you wish to open with an X in the X column). Then select the Select button. The Account Maintenance screen appears. Select the tabs along the bottom of the screen to access the individual accounts selected from the AR Account Search screen.
Note: The following system behavior is employed for security reasons when working with this screen: Assume that the Account Maintenance screen is opened by user 1 (who has a valid cashier ID). User 1 then logs out using the F8 Quick Key from the Account Maintenance screen. Further assume that user 2 (who does not have a valid cashier ID) logs in to continue from where user 1 left off. All previously opened screens will be immediately closed and user 2 will be required to start any activity from the beginning.
The account number and account name are shown above the grid in large blue type so that you can be certain which account you are viewing and managing.
The view-only Account Balance field shows the total open amount for all invoices belonging to this account.
The view-only Total Selected field beneath the grid shows the total open amount for all selected invoices (i.e., for all invoices marked with an X in the X column).
If a Fixed Rate applies to the account, then a Fixed Rate indicator lamp is displayed in the bottom left portion of the screen and this lamp can be clicked on to display the Fixed Rate screen.
Use the following search criteria to filter the invoice list in the search results grid.
From Date/To Date. Enter the range of dates for the invoices you wish to find.
Folio No. The full folio number or the first part of the folio number you wish to find.
Invoice No. The full invoice number or the first part of the invoice number you wish to find.
Statement No. Available when the AR>Statement Numbering application parameter is set to Y. Enter the system-assigned statement number associated with the invoice(s) you wish to find.
Fiscal Bill No. Available when the Cashiering> Fiscal Folio Printing and Cashiering>Display Fiscal Bill Number application parameters are set to Y. Enter the fiscal bill number of the folio you wish to find.
All/Open. Select the radio button that indicates the type of invoices you wish to find:
All. Display all invoices regardless of whether they are open invoices (those having a non-zero balance) or zero balance invoices; also display all payments.
Open. Display only open invoices (those having a non-zero balance).
Payments Only. Select this check box if you wish to display only payments applied to the account.
Unbilled. Available when the AR>Statement Numbering application parameter is set to Y. Select this check box if you wish to display only those invoices that do not have a statement number associated with them.
Printed. Available when the AR>AR Invoices Printed Check Mark application parameter is set to Y. Select this check box to search only for invoices that have been included as line items on successfully printed statements.
Not Printed. Available when the AR>AR Invoices Printed Check Mark application parameter is set to Y. Select this check box to search only for invoices that have not been included as line items on successfully printed statements.
Select the Details button to see a view-only summary of the AR account details. On the left, the account name and address are shown. In the center, the account number, account type and account contact information are provided. (This information can be edited on the Setup Account screen.) To the right is a breakdown of the account balance by each of the aging periods set up for your property. (See Aging for details.) The account number and total account balance are shown just above the search results grid.
Mark an X in the X column to choose the invoices to which you wish to apply those functions that apply to multiple invoices (such as Compress and Unlink). You may use the All and None buttons to select all invoices or to un-select all invoices.
The search results grid shows the activity (invoices and payments) for the account. Function buttons along the right edge of the screen can be applied to the invoices and payments you select from the grid.
New. Add a new invoice to the AR account.
Note: When the OPV_<version number> Opera Vacation Ownership System license and the Ownership>Auto Invoice Creation application function and Ownership>Period Invoice Days application setting are active, invoices can be automatically created during the night audit process for larger properties or owners with multiple rooms.
Edit. Display the Edit Postings screen for the invoice or payment highlighted in the search results grid. This screen shows the details of the invoice or payment, and allows you to edit the reference and supplement information. From the Edit Postings screen you may also access the profile to which the invoice or payment is attached. (This button is not available for closed invoices.)
Invoice. Display the Invoice Details screen. View and manage the invoice details for one or more invoices selected in the search results grid. From the Invoice Details screen you may add new postings to the invoice, edit transaction details, adjust postings based on transaction codes, print the invoice, or access the profile to which the AR account is attached. When the Profiles>Restrict Profile Name Change After Folio Creation application parameter is set to Y, the Profile name can't be modified after a folio or invoice has been generated for the Payee and/or Guest.
Payment. Make a payment on one or more selected invoice(s). Apply credit to the account at large, to one or more specific invoices, or to the oldest invoices. The Payment button is active only when there is an open amount on at least one of the invoices you choose.
Compress. To combine two or more invoices into one invoice, mark the invoices you wish to combine with an X in the X column and select Compress. You might use this feature, for example, to combine several invoices that are for small amounts. Once an invoice is compressed, you may not post additional charges to the invoice or make adjustments to the transactions on the invoice.
Unlink. Available when the AR>Statement Numbering application parameter is set to Y. The selected invoice (or, if multiple invoices are selected, all the chosen invoices) must be associated with a statement number in order for this button to be available. Disassociate the selected invoice(s) from the statement with which they are associated.
Options. Display the Account Posting Options menu.
When the General> Enhanced Options Management application parameter is set to Y you have another way of quickly accessing options. You can press Ctrl+T to display the blue Option field.

To view all the available options in alphabetical order, scroll through the options list by selecting the Up and Down arrow keys. Press Enter to select the displayed option and open the corresponding option screen.
Or, instead of scrolling through the options list, type the first three letters of the desired option. The corresponding options screen appears. (For example, type c-a-n for Cancel.)
You may also enter the first letter of the desired option and all options beginning with that letter will appear in alphabetical order as you scroll. To scroll, use the arrow keys or repeatedly press the beginning letter key. For example, if you typed a-a-a-a you might scroll through the options of Accompanying, Add on, Agent/Company, Alerts. Press Enter to open the desired option.
Invoices and/or payments are displayed based on your search criteria. The following information is available in the search results grid:
X. An X in this column indicates that the record is selected for an AR account maintenance function. Click in the X column to select the record. Or you may select the record by highlighting it and selecting the spacebar. If you are choosing only one record for a function, you may simply highlight the record without placing an X in this column.
+. A plus sign (+) in this column indicates that two or more invoices have been compressed. Click the + to display the individual invoices. When you do so, the + changes to a -. Click the - to "roll up" the display of individual invoices. (See Compress Invoices for details.)
Date. Date when the invoice was created or the payment was made.
Name. In the case of invoices, the name that appears on the folio. In the case of payments, the payment method. Payments are prefixed by an asterisk for easy identification. In addition, the asterisk makes it possible for you to click on the Name column heading to display all payment entries followed by all invoice entries for easy review.
Folio No. Folio number of the folio covered by this invoice. A folio number will not appear for compressed invoices, for payments, or for old balances.
Invoice No. Invoice number assigned by Opera when the folio is transferred to AR or when a new invoice is created in AR. Payments do not have an invoice number assigned.
Statement Number. Available when the AR>Statement Numbering application parameter is set to Y. The most recent system- assigned statement number associated with this invoice.
Note: The sample_statement_numbering report form must be used when implementing the AR Statement Numbering feature. Use of this form for statement printing is required in order for Opera to assign sequential numbers to statements and to properly display statement numbers in the Statement field on the Account Maintenance screen.
Fiscal Bill No. Available when the Cashiering> Fiscal Folio Printing and Cashiering>Display Fiscal Bill Number application parameters are set to Y. The fiscal bill number of the folio.
Amount. Amount of the invoice or payment.
Open. Balance remaining on the invoice (amount minus paid).
Paid. Total amount paid. (This amount encompasses all payments against this invoice.) For invoices, this is a negative number. For payments, this is a positive number.
Currency. For invoices, the code for the Preferred Currency selected for the profile to which the account is attached. For payments, the code for the currency in which the payment was made.
Adjusted. An X in this field indicates that this invoice or payment was adjusted. See Adjust Postings for details.
Transferred. An X in this field indicates that the invoice or payment has been transferred to another account. Use the Edit option from the right- click Quick Menu to display the Edit Postings screen. The Invoice Reference field on the Edit Postings screen shows the account to which the invoice was transferred. (See Transfer for details.)
Age. The age of the invoice in days.
Note: When multiple invoices are compressed, the age shown applies to the compressed invoice. Once invoices are compressed, age information is no longer tracked for the individual invoices.
Supplement. Additional information regarding the invoice or payment.
Reference. Invoice or payment reference information. For payments, the credit card number used for the payment. A POS check number may also appear here.
Red Indicator lamps can be displayed at the bottom of the screen, if the ar account meets certain criteria. For example, if a Fixed Charge applies to the selected account, then a Fixed Charge lamp is displayed. See Indicator Lamps for details.
You can right-click with your mouse on any entry in the AR Account screen search results grid to display the Quick Menu. This feature allows you quick access to the most used AR Account functions.
Edit. To display the Edit Postings screen for the invoice or payment highlighted in the search results grid, select this option. This screen shows the details of the invoice or payment, and allows you to edit the reference and supplement information. From the Edit Postings screen you may also access the profile to which the invoice or payment attached. The Edit option has the same function as the Edit button. (This option is not available for closed invoices.)
Uncompress. To un-combine two or more invoices that have been compressed into one invoice, highlight the compressed invoice and select Uncompress. You may only uncompress an invoice on the same business date on which it was compressed. Thereafter, the details are still available in view-only mode, but the invoice cannot be uncompressed. (See Compress Invoices, below, for details.)
Unapply. To unapply one or more payments made to an invoice on today's business date, highlight the invoice to which the payment(s) were applied and select this option. Payment may then be applied to another invoice. (See Apply Payment, below, for details.)
Reverse Payment. To "undo," or reverse, a payment that has been applied to the account on today's business date, highlight the payment you wish to reverse and select this option. A reverse posting transaction will be added to the account. (See Apply Payment, below, for details.) Reversing a payment voids the payment so that is does not show as having been posted. This option is not available if a payment has not been applied to the account.
First. Scroll the grid to display and highlight the first entry in the AR Account screen search results grid.
Last. Scroll the grid to display and highlight the last entry in the AR Account screen search results grid.
Note: An AR account may be flagged for some reason (see Flagging an AR Account for details). If you attempt to create a new invoice for a flagged account, or if you attempt to edit an invoice belonging to a flagged account, the following message appears: "Account <name> has been flagged <description>. Do you wish to continue?" Respond Yes to continue. Respond No if you do not wish to proceed with the invoice. How flagged accounts are handled is determined by your property.
Use the Compress feature to combine two or more invoices into one invoice. You might use this feature, for example, to combine several invoices that are for small amounts into one invoice.
Note: Once an invoice has been compressed, you may not add new postings to the invoice nor may you adjust transactions on the invoice.
Note: You may not compress invoices that include postings for the current business date. You also may not compress invoices that have been paid, either partially or in full.
Note: The Payment button is not available for the detail invoices of a compressed invoice. Payment may only be applied to the top-level "master" invoice.
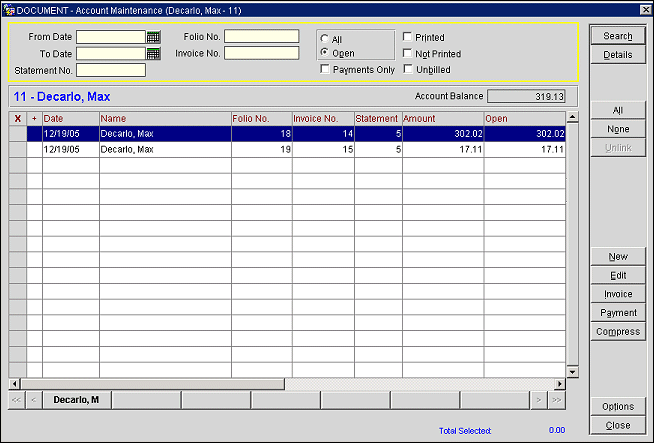
To compress two or more invoices, mark the invoices you wish to combine with an X in the X column of the Account Maintenance screen and select the Compress button. The Compress Invoices screen appears, showing the account name and total amount of the compressed invoices. The screen provides fields for you to add reference and supplement information, if you wish. Click OK to compress the invoices.
When you combine two or more invoices into a single invoice, the combined entry is assigned a new invoice number on the Account Maintenance screen. The new entry reflects the total amount of the compressed invoices. A plus sign (+) appears in the + column to the left of the new entry. Click on the + next to the entry to "roll down" the individual invoices that were compressed. When you do so, the + changes to a minus sign (- ). Click the - to again "roll up" the display of individual invoices that were compressed.
In Opera when compressing invoices in Accounts Receivable, the compressed record will hold the most recent date of all records that are compressed, i.e. :
01/01/04 Invoice 10 100.00
01/05/04 Invoice 100 400.00
05/01/04 Invoice 1000 500.00
On 05/31/04 the above records are compressed and a new record created is created:
05/01/04 Invoice 2000 1000.00 (compressed record) Which carries the date of the youngest invoice included in the compression.
The Current business date is now 06/01/04
When running the aging report for the current business date (06/01/04) Opera knows that it can take the posting transaction and details as shown on the account as these are exactly as the accounts stands and does not need to even consider what might have been the case if it was a date in the past and therefore references a compressed transaction with the date of the transaction i.e. in our example 05/01/04.
However if a user chooses to select the aging report for a date in the past, Opera has to go back and look at the physical transactions/details for the date selected which must reflect exactly what was the aging of the account at that time i.e. postings existing on the account today may have no bearing on the aging at that time. This means for aging in the past Opera has to ignore compressed transactions.
This means that amounts reflected in the aging buckets for past date could be entirely different for reasons such as compressions, payments made against the account outside of the aging date range selected for the report, all of these are valid situations as you are requesting to look at what the account looked like at that time, not what the account reflects today.
To reverse the compress action, highlight the compressed invoice and right-click to display the Quick Menu. Select Uncompress. You may only uncompress invoices that were compressed on the current business date.
Note: When Country Mode = ITALY, the compress action cannot be reversed, regardless of the business date.
Note: If you have applied payments to the compressed invoice, you must unapply the payments before you can uncompress the invoice. To unapply payments, highlight the compressed invoice and right-click to display the Quick Menu. Select Unapply. (See Applying Payments, below, for details.)
To add a new invoice to the AR account, select the New button from the Account Maintenance screen. The New Invoice screen appears.
Note: Note: When the OPV_<version number> Opera Vacation Ownership System license and the Ownership>Auto Invoice Creation application function and Ownership>Period Invoice Days application setting are active, invoices can be automatically created during the night audit process for larger properties or owners with multiple rooms.
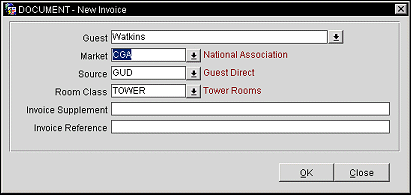
The screen shows the name of the AR account to which the new invoice is being added. The following fields are available:
Guest. Select the down arrow to choose the name to be attached to the invoice. By default, the name on the AR account appears in this field. If you change the name, the Profile Search screen prompts you to select the name from existing profiles or to create a new profile.
Market. The market code for this invoice. Select the down arrow to change the market code.
Source. The source code for this invoice. Select the down arrow to change the source code.
Room Class. The room class for this invoice. Select the down arrow to change the room class. Available when the General>Room Class application function is set to Y.
Note: If default market code, source code, and/or room class have been set up in the AR application parameters settings (Default Market Code, Default Source Code, Default Room Class), these defaults will be displayed in the Market, Source, and Room Class fields. The default values may be changed.
Invoice Supplement. Supplemental information regarding the invoice.
Invoice Reference. Invoice reference information.
Add or change information as necessary. To proceed, select the OK button. The Transaction Posting screen appears. Use this screen to enter the details of the transaction you wish to post to the new invoice. This screen is discussed in detail in Posting Transactions.)
When you have posted the transaction(s), you are given the opportunity to print an invoice before returning to the AR Account screen.
To view the invoice details for an invoice, highlighted the entry in the search results grid (or, to access multiple invoices, mark the invoices you wish to open with an X in the X column) and select the Invoice button. The Invoice Details screen appears. From the Invoice Details screen you may:
Note: The Post, Edit, Adjust and Transfer buttons are not available for closed invoices. The buttons are also not available if the AR>AR No Modify Invoice application parameter is set to Y.
Note: The Adjust button and the Transfer button are not available if the Cashiering>Folio No Reprint application parameter is set to Y.
You may also print the invoice (select the Folio button), or access the profile for the guest (select the Profile button).
Note: The Folio button changes to Report when you have highlighted a credit invoice.
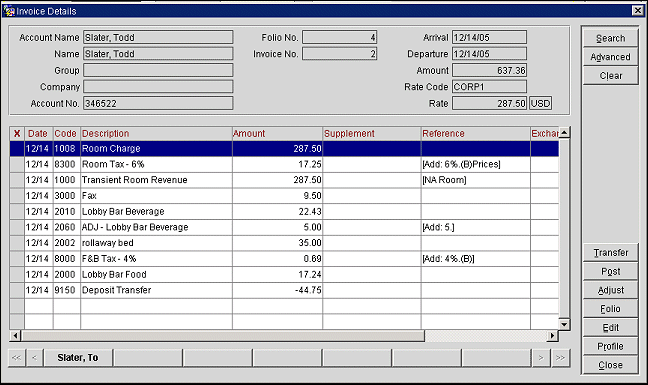
The Invoice Details screen header fields provide the following View only information:
Account Name. The AR account name on the account being accessed.
Name. Payee name on the reservation.
Group. Group profile, if any, attached to the reservation.
Company. Company profile, if any, attached to the reservation.
Account No. The AR account number.
Folio No. The folio number assigned by Opera to this bill.
Invoice No. The invoice number.
Fiscal Bill No. (Available when the Cashiering> Fiscal Folio Printing and Cashiering>Display Fiscal Bill Number application parameters are set to Y.) The fiscal bill number of the folio.
Arrival. Arrival date of the reservation.
Departure. Departure date of the reservation.
Amount. The total amount of the invoice.
Rate Code. Rate code for the reservation.
Rate. The nightly room rate, including the currency.
The grid shows the transactions for the invoice. Function buttons can be applied to the transactions you select from the grid.
At the bottom of the screen are tabs that permit you to switch among the invoices you selected from the AR Account screen. Click on a tab to display the invoice details for that AR account invoice.
By default, all invoice entries are displayed in the Invoice Details grid. Select the Advanced button to display the following search options which allow you to filter the display. Make your entries and select the Search button. Use the Clear button to remove all search criteria.
Date From/Date To. To display postings for a range of dates, specify the start date in the Date From field and the end date in the Date To field.
Transaction Code. Select the down arrow to choose the transaction codes for which you wish to display postings.
Transaction Code Subgroup. Select the down arrow to choose the transaction code subgroups for which you wish to display postings.
Check Number. Enter the check number to search for postings associated with that check.
Cashier Number. Select the down arrow and choose the cashier ID to search for postings made by that cashier.
Remarks. Enter text in this field to search for postings having that text in the Remarks field.
Reference. Enter text in this field to search for postings having that text in the Reference field.
The fields shown in the grid provide the following information:
X. An X in this column indicates that the record is selected for an invoice details function. Click in the X column to select the record. Or you may select the record by highlighting it and selecting the spacebar. If you are choosing only one record for a function, you may simply highlight the record without placing an X in this column.
Date. Date the posting took place in the short date format defined for this property.
Code. Transaction code. Each type of transaction has a unique code that identifies it and determines how it is handled by Opera's internal accounting routines. When a posting is composed of more than one transaction (for example, when tax is automatically generated and added to a food and beverage charge), a separate transaction code may apply to each component, or "line item," of the posting.
Note: The transaction code used for transfers from Front Office to AR is set by the Cashiering>AR Settle Code application setting. The transaction code used for old balances added to an account is set by the AR>AR Bal Trx Code application setting.
Description. Description of the transaction code. If a Check Number applies to the transaction, that number follows the description. (Check Numbers may have been entered manually when the charge was posted, or they may be generated automatically by a POS transaction.)
Amount. Amount of the transaction. Net amounts and taxes are shown separately. For rolled-up transactions (where a plus sign appears in the Code column), the Amount is the total of all line item transactions, including applicable taxes. Double-click on the plus sign to see the individual transaction net amounts.
Supplement. Additional information regarding the transaction.
Reference. Transaction reference information. This field may also include any automatically generated taxes for the previously listed transaction.
Exchange Rate. If a foreign currency was used for this transaction, the then-in-effect exchange rate between the foreign currency and the local currency.
Cashier. The Cashier Name of the Opera cashier handling the transaction.
User. The User Name of the Opera user handling the transaction.
Time. The time when the transaction took place.
Group. The transaction code group to which the transaction code for this transaction belongs.
Subgroup. The transaction code subgroup to which the transaction code for this transaction belongs.
Market. The market code for this transaction. By default this is the market code associated with the reservation. If this posting was posted by AR, this is the market code assigned at the time the invoice was posted by AR.
Source. The source code for this transaction. By default this is the source code associated with the reservation. If this posting was posted by AR, this is the source code assigned at the time the invoice was posted by AR.
Room Class. Available when the General>Room Class application function is set to Y. The room class for this transaction. By default this is the room class associated with the reservation. If this posting was posted by AR, this is the room class assigned at the time the invoice was posted by AR.
You can right-click with your mouse on any entry in the Invoice Details screen search results grid to display the Quick Menu. This feature allows you quick access to the following functions.
Edit. To display the Edit Transaction Details screen for the transaction highlighted in the search results grid, select this option. From this screen you may edit the reference and/or supplement information for a transaction on the current invoice. See Edit Transaction Details, below, for more information.
Delete. Use this option to delete transactions posted on the current business date.
POS Check Details. POS check number and transaction details. Available for transactions posted through the POS interface. Details may be printed.
To add new postings to an invoice, even invoices with a No Show or Checked Out status, select AR>Account Maintenance. On the Account Search screen highlight the account for which you wish to add a new posting. Select the Select button. From the Account Maintenance screen, highlight the invoice to which you want to add a new posting and select the Invoice button. The Invoice Details screen appears. Select the Post button. The Transaction Posting screen appears. Use this screen to enter the details of the transaction you wish to post. (This screen is discussed in detail in Posting Transactions.) Even if a reservation has a status of No Show or Checked Out, postings can be added or adjusted until the invoice is closed.
Once transactions are posted, the amount of a posting can be changed (increased or decreased) by using the Adjustment feature. Postings made on or before the current business date can be adjusted. (Non-essential information such as the transaction Reference and Supplement may be changed at any time via the Transaction Edit feature. (See Edit Transaction Details, below.)
To make flat-amount or percentage changes to invoice transactions based on transaction codes (and/or routing code if the Cashiering>Routing application function is set to Y), select AR>Account Maintenance. On the Account Search screen highlight the account for which you wish to make an adjustment. Select the Select button. From the Account Maintenance screen, highlight the invoice to which you want to make the adjustment and select the Invoice button. The Invoice Details screen appears. From the Invoice Details screen, select the Adjust button. The Adjust Transaction Codes Postings screen appears.
Note: The AR>Adjustment Allowance application setting determines how long charges remains open to adjustment. The Adjust button on the Invoice Details screen is unavailable if there are no charges on the invoice remaining open to adjustment. In addition, the AR>No Modify Invoice application parameter must be set to N, and the Cashiering>Folio No Reprint application parameter must be set to N for adjustments to be made.
![]()
See Adjustments for details on making adjustments using this screen.
To edit the reference and/or supplement information for a transaction on the current invoice, highlight the transaction on the Invoice Details screen grid and select the Edit button (or select the right-click Quick Menu Edit option). The Edit Transaction Details screen appears.
![]()
The screen shows the following view-only information:
Room. The room number assigned to the guest. If this transaction was posted following guest check out, this field will be empty.
Name. The name of the guest to whose bill the transaction was posted.
Code. The transaction code for this posting. to the right is the description of the code.
Price. Unit price of the item posted. Currency code appears to the right.
Quantity. Quantity of the item posted.
Amount. The total amount of the posting (Price x Quantity).
Cashier. The Opera Cashier Name of the cashier who posted this transaction.
Folio No. The folio number of the currently selected invoice.
Arr. Code. Select the down arrow to choose a folio arrangement code. The arrangement code may be used to organize charges on the folio into property-defined categories.
Posting Date. The date and time the transaction was posted to the guest's account. Opera advances the business date only after the completion of the Night Audit; this means that there may be some charges made after midnight which show the previous day's date as the Posting Date.
Revenue Date. The date when the revenue associated with this transaction was recorded into the property's accounting system. This normally happens when the Night Audit is run.
In order to explain the relationship between posting date and revenue date, consider this example. If the guest has a package allowance associated with their reservation, but does not use it until 2 days after check in, the Posting Date is the date the package item was actually used and posted to the guest's bill. The revenue date is the date of check in.
Article. If the transaction coders several items, the items included in this transaction.
Credit Card No. Credit card number if payment is made by credit card.
Expiry Date. Credit card expiration date, if payment is made by credit card.
The following fields may be edited:
Supplement. Additional information regarding the transaction.
Reference. Transaction reference information. This field may also include a notation of any automatically generated taxes for the transaction.
Check No. If POS check is associated with the transaction, the check number.
Covers. If POS check is associated with the transaction, the number of covers (persons served).
The Transfer Charges feature is available when the AR>AR Postings Transfer application parameter is set to Y. In addition, the AR>No Modify Invoice application parameter must be set to N, and the Cashiering>Folio No Reprint application parameter must be set to N. This feature works in conjunction with the default AR application settings Default Individual Account Type, Default Group Account Type, Default Company Account Type, and Default Travel Agent Account Type.
You may transfer one or more charges from a selected AR account to another AR account. The "source" AR account's balance is decreased by the amount equaled to the postings that are transferred to the "target" AR account. The charge(s) appear on the target invoice associated with the same transaction code(s) as on the source invoice.
The following transfer options are offered:
Keep in mind the following when transferring individual charges:
On the Invoice Details screen, mark the charge(s) you want to transfer with an X in the X column. Select the Transfer button.
Note: The Transfer button is available when the AR>Transfer AR Postings permission is granted.
The Transfer Type screen appears. The current AR account number and the name of the account holder are shown in the lower part of the screen.
![]()
The following information is included on this screen.
Select an Existing Invoice/Create a New Invoice. If you wish to transfer the selected charge(s) to an existing invoice belonging to another AR account, choose Select an Existing Invoice. If you wish to transfer the charges to a new invoice that will be created to receive them, choose Create a New Invoice.
Existing AR Account/Create AR Account. If you wish to transfer the selected charge(s) to an invoice belonging to an existing AR account, choose Existing AR Account. If you wish to transfer the charges to a new invoice belonging to a new AR account, choose Create AR Account. (If you choose Create AR Account, Create a New Invoice is automatically selected.)
To Account. Available when you select Existing AR Account. Select the ellipsis to display the AR Account Search screen. Choose the AR account to which you wish to transfer the charge(s). (Alternatively, you may do a quick search by entering an account name (whole or part) in this field and then selecting the down arrow.) The account number and account holder's name appear in the lower right part of the screen.
Choose the account to which the charge(s) are to be transferred from the AR Account Search screen. From the AR Account Maintenance screen, select an available invoice as the target for the transferred charge(s) and press the Select button. (Only Open invoices that are not compressed are available for selection. If no invoices are available, you must close the AR Account Maintenance screen and return to the Transfer Type screen where you may choose the Create a New Invoice radio button.)
Note: When transferring charges, Opera checks to see if any payments were applied to either the source or the target invoice. If such payments are found, they will be un-applied on both the source and target invoices. You must manually re-apply payments as appropriate. If an automatic statement number has been applied to either the source or target invoice (available when the AR>Statement Numbering application function is set to Y), a message prompts you to first unlink the invoice and retry the transfer.
When you create a new AR invoice to receive the transferred postings, Opera automatically creates the new invoice and the transferred charges are posted to it.
The Profile Search screen allows you to select the profile for which you wish to create a new AR account. When you select OK to continue, an AR account is created using the account type defaults for the property (see AR Account Setup). Opera automatically creates the new invoice and the transferred charges are posted to it.
Select the Transfer button to transfer the selected postings from the source account to the target account. You are prompted to generate a new folio for the target account showing the transferred charge(s). When the source Account Details screen redisplays, the transferred charge(s) are shown as being reversed and "Charge Transfer" is noted in the Supplement field.
To apply payments to an invoice, highlight the invoice on the Account Maintenance screen and select the Payment button. The Payment button is only available when you select an invoice having an outstanding balance.
The Payment screen appears, with the Amount field showing the amount of the invoice you selected.
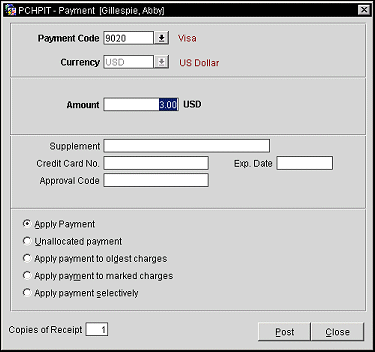
The Payment screen displays the following fields, depending on the method of payment.
Payment Code. The transaction code for the method of payment being used. Select the down arrow to display the Payment Code list of values. Options typically include:
Note: When the credit card interface has the Enable Resend check box selected in its configuration (see Understanding the General Tabbed Area for details), if a credit card payment fails to post to Opera because of a disruptive event, such as a session disconnect or an error occurred before the posting could be made, and the settlement was sent to the interface, then Opera will check on the posting when the reservation is accessed again. When the reservation is accessed, Opera searches for any payments that were sent to the interface, but not posted to Opera. These postings will then be resent to Opera from the interface.
An AR Posting is checked if it is pending or not from the following different points in Opera:
- Accessing an AR Account on the Account Maintenance (ARPOSTDET) screen.
- Prior to generating an AR Reminder for an account from the Generate AR Reminders (ARREMINDER) screen.
- Prior to generating an AR Statement for an account on the Statement (ARBATCH) screen.
(Your complete list of payment types is configured in Configuration>Cashiering>Payment Types.)
The description of the code displays to the right of the field.
Currency. The currency code for the currency being used to pay the account. The local currency for this property is shown by default. The description of the currency code displays to the right of the field. For cash or check payments you may select a new currency from the Currency list of values. For payment methods other than cash or check, or if the Cashiering>Foreign Currency Handling application function is not enabled at this property, this field may not be changed.
Amount. Enter the amount of the payment in the currency selected in the Currency field. If a currency other than the local currency is selected for payment, the exchange rate between the selected foreign currency and the local currency is displayed to the right of the amount.
Supplement Info. Enter a comment relevant to the payment being entered.
Credit Card No. For credit card payments, enter the credit card number. The default is the credit card number provided on the AR account profile. You may enter a different credit card number, if you wish. Opera verifies that the number you enter is valid.
Note: If the General>Mask Credit Card Number application parameter is set to Y, credit card numbers and expiration dates are masked.
Expiry Date. For credit card payments, enter the credit card expiration month and year. The default is the credit card expiration date provided or the credit card on the AR account profile.
Approval Code. Displayed when the Online Credit Card Settlement is active for credit cards and the AR>External Auth CC AR Payment application function is active. The Approval Code field allows a user to enter a manual authorization code for the credit card payment. If a code is entered here, it is then sent along with the payment information to the bank for processing and will not require additional authorization when posting the payment.
Reference. Enter any reference information relevant to the payment being entered. This field is not available when the Payment Code is selected as a credit card type.
The following options are available for applying payments to an account. Provide the requested information and select Post to post the payment.
Apply Payment. This option is selected by default. The amount will be applied to the invoice highlighted on the AR Account screen.
Unallocated Payment. Apply credit to the account at large. For information on later applying these payments, see Applying Unallocated Payments, below.
Apply Payment to Oldest Charges. The payment will be applied to whichever outstanding invoice has the earliest date. If the amount of the payment is greater than the outstanding amount of the oldest invoice, the remainder of the payment will be applied to the next oldest invoice which has an outstanding balance, and so on, until the payment is completely allocated. Any remaining payment amount will be credited to the account as an unallocated payment.
Apply Payment to Marked Charges. This option is automatically selected if you marked two or more invoices to which to apply the payment prior to selecting the Payment button. The payment will be equally divided among the invoices you marked. When you select more than one invoice for payment, the total outstanding for all selected invoices is shown in the Payment screen Amount field. If the amount is changed to less than the total of all selected invoices, the payment will be applied to the greatest outstanding balance. If there is any part of the payment remaining after the greatest outstanding balance is paid, it will be applied to the next largest outstanding balance, and so on. If the payment is larger than the total outstanding balance on the selected invoices, the remainder will be applied to the account at large.
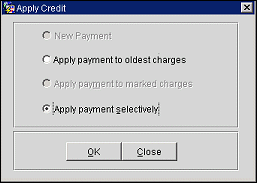
Apply Payment Selectively. This option lets you see a list of open invoices so that you can select those to which you wish to apply payment, and the applicable portion of the payment. See Applying Payment Selectively, below.
Copies of Receipt. The Cashiering>Print Receipt application setting determines the options available to you for printing receipts. The settings are:
Always - (This is the default.) Always create and print a receipt. The Copies of Receipt field allows you to specify the number of copies of the receipt you wish to print. The default is 1. When you select the Post button, the payment is posted and one or more receipts are printed.
Note: If the Cashiering>Print Receipt application setting is set to Always, a payment receipt will not be generated for payments made to the direct bill Payment Code (that is payments associated with the transaction code specified by the Cashiering>AR Settlement Trn Code application setting).
Ask To Print - You have the option of printing or not printing a receipt. If you wish to print one or receipts, enter the number of copies in the Copies of Receipt field. The default is 1. When you select the Post button, you will be prompted to indicate whether you wish to print a receipt. Select Yes or No. The payment will be posted and, if you responded Yes to the Print prompt, one or more receipts will be printed.
Do Not Print - Never print a receipt. The Copies of Receipt field will not appear on the screen. When you select the Post button, the payment is posted but no receipt is printed.
Note: Payment receipts can be printed in the guest's language as specified on the guest's profile if the General>Profile Language application function is set to Y. You must also have set up payment receipt reports in the appropriate languages and associated each with a language (see System Configuration>Setup>Report Setup).
You are given an opportunity to apply payments to invoices selectively when you are applying new payments to the account; or when you are applying existing unallocated payments to specific invoices (see Applying Unallocated Payments, below).
In either situation, the Apply Credit Selectively screen appears.
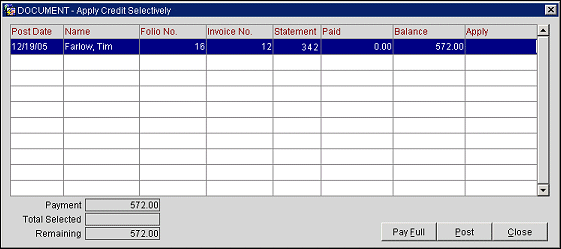
The screen shows the following information:
Post Date. The date when the invoice was posted.
Name. The guest in whose name the reservation was made.
Folio No. Folio number.
Invoice No. Invoice number.
Statement. Statement number. Available when the AR>Statement Numbering application function is set to Y.
Paid. The amount paid on the invoice to date.
Balance. The outstanding balance on the invoice.
Apply. Highlight the invoice record to which you wish to apply payment and directly enter the amount you wish to apply to the invoice in this field. As you enter amount(s) in the Apply field for each invoice, the following fields in the lower part of the screen track the allocation of the payment:
Payment. The total amount of the payment being applied to invoices.
Total Selected. The total amount of the payment applied to invoices so far.
Remaining. The amount of the total payment remaining to be applied.
If the remaining amount is sufficient to pay the invoice in full, the Pay Full button becomes available when that invoice is highlighted. Select this button to enter the full amount of the highlighted invoice in the Apply field.
When you are finished allocating the payment to one or more of the listed invoices, select the Post button. Any portion of the payment not applied to an invoice will remain as an unallocated payment.
Unallocated payments or unallocated portions of payments continue to be displayed on the Account Maintenance screen. If the AR >Unallocated Payment on Reminder application parameter is set to Y, unallocated payments will be shown as credits reported to account holders on reminder letters.
If the account includes unallocated payments, you may apply those payments to selected invoices or to the oldest invoice(s).
If you wish to apply one or more unallocated payments to a specific invoice, mark both the unallocated payment(s) and the invoice with an X in the X column of the Account Maintenance screen. When you select the Payment button, the payment or payments are immediately applied to the selected invoice. If the total payment applied is greater than the outstanding balance of the invoice, an unallocated payment will remain, containing the overage.
If you wish to apply an unallocated payment to more than one selected invoice, or if you wish to apply an unallocated payment to the oldest invoice(s) (when doing this, only one unallocated payment may be applied at a time), mark the payment you wish to allocate from the Account Maintenance screen. Select the Payment button. The Apply Credit screen appears.
The following options are available. Make a selection and click OK to proceed.
Apply Payment to Oldest Charges. The unallocated payment will be applied to whichever invoice has the earliest date. If the amount of the payment is greater than the outstanding amount on the oldest invoice, the remainder of the payment will be applied to the next oldest invoice which has an outstanding balance, and so on.
Apply Payment Selectively. Select this option if you decide to apply the payment selectively to one or more invoices. (See Applying Payment Selectively, above.)
To unapply one or more payments made to an invoice on today's business date, highlight the invoice to which the payment(s) were applied and select the Unapply option from the Account Maintenance screen right-click Quick Menu. The Unapply screen appears.
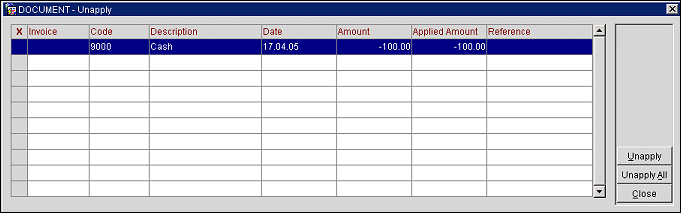
Select the payment(s) you wish to unapply. If you are unapplying one payment, you may highlight that payment then select the Unapply button. To unapply two or more payments, click in the X column to mark the payments you wish to unapply, then select the Unapply button. To unapply all payments listed on the Unapply screen, select the Unapply All button.
The following fields are available on this screen:
X. An X in this column indicates that the payment is selected to be unapplied. Click in the X column to select the record. Or you may select the record by highlighting it and selecting the spacebar. If you are choosing only one record for a function, you may simply highlight the record without placing an X in this column.
Invoice. The number of the invoice to which the payment was applied, if applicable.
Type. How the payment was entered into the Opera system. (O = Old Balance Entry; P = Posting; CO = Check Out; ECO = Early Check Out).
Transaction Code. The transaction code for the payment method.
Description. Description of the payment method transaction code.
Posting Date. The date on which the payment was posted.
Amount. The amount of the payment.
Applied Amount. The amount of the payment applied to the current invoice. (The payment may have been split between invoices, with only part being applied to the current invoice.)
Reference. Reference information for this payment. The credit card number appears here if a credit card was used for payment.
Once unapplied from the current invoice, the payment may be applied to another invoice, left as an unallocated payment, or transferred to another account.
To "undo" a payment that has been applied to the account, select the Payments Only check box on the Account Maintenance screen to search for and display payments made to the account. Mark the payment you wish to reverse with an X in the X column and select the Reverse Payment option from the Account Maintenance screen right-click Quick Menu. A reverse payment transaction will be added to the account.
The Edit Postings screen shows the details of an invoice or payment, and allows you to edit the reference and supplement information. From the Edit Postings screen you may also access the profile to which the AR account is attached. To display the Edit Postings screen for an invoice or payment, select AR>Account Maintenance. From the AR Account Search screen, highlight the account for which you wish to edit postings and select the Select button. The Account Maintenance screen appears. Select the invoice for which you wish to edit postings and select the Edit button. The Edit Postings screen appears.
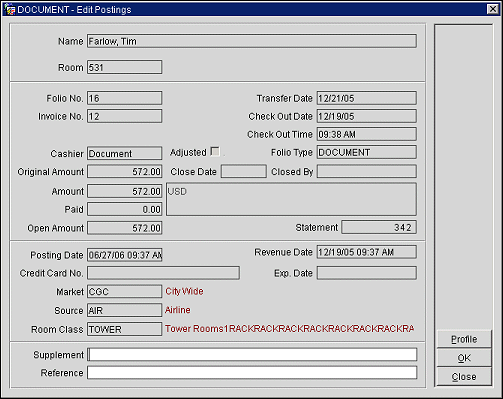
The screen shows the following view-only information:
Name. The payee name on the reservation. For a compressed invoice, the name of the guest on the last-selected invoice being compressed into this invoice.
Room. The room number assigned to the reservation. If this is a new invoice initiated by AR, or if this is a compressed invoice, this field will be empty. This field is blank for payments.
Folio Number. The folio number of the folio covered by this invoice. A folio number will not appear for compressed invoices, for payments, or for old balances.
Invoice Number. The invoice number of the currently selected invoice. This field is blank for payments.
Transfer Date. The date when this invoice was transferred from Front Office to AR.
Check Out Date. The check out date on the reservation covered by this invoice. A check out date will not appear for new invoices initiated by AR or for compressed invoices. This field is blank for payments.
Check Out Time. The check out time on the reservation covered by this invoice. A check out date will not appear for new invoices initiated by AR or for compressed invoices. This field is blank for payments.
Fiscal Bill No. (Available when the Cashiering> Fiscal Folio Printing and Cashiering>Display Fiscal Bill Number application parameters are set to Y.) The fiscal bill number of the folio.
Cashier. The Opera Cashier ID of the Opera user who handled the payment or invoice activity.
Adjusted. This check box is selected if the amount of the invoice has been changed by either posting new charges to the invoice or by posting an adjustment to existing amounts.
Folio Type. Credit bill folio type. This column appears when the Folio History screen is accessed from within AR and the Cashiering>Credit Bill application parameter is set to Y.
Original Amount. The amount of the invoice or payment before adjustments, if any, were made. The currency appears next to the original amount.
Amount. The amount of the invoice or payment after adjustments, if any, were made.
Paid. The amount paid. In the case of invoices, this amount is a running total of payments made.
Open Amount. For invoices, the remaining amount outstanding. Zero appears here for payments.
Statement. The Statement number associated with the currently selected invoice. Available when the AR>Statement Numbering application function is set to Y.
Close Date. If the invoice is closed, the date when it was closed. (Available if the AR>Close Invoice application parameter is set to Y.)
Note: The Profile button is unavailable for closed invoices. When an invoice is closed no further changes can be made to the invoice; this also means that you can no longer edit the associated profile.
Closed By. If the invoice is closed, the user ID of the person who closed the invoice. (Available if the AR>Close Invoice application parameter is set to Y.)
Posting Date. The date and time the invoice or payment was posted to the guest's account.
Revenue Date. The date when the revenue associated with this invoice or payment was recognized by the property's accounting system. This normally happens when the Night Audit is run.
Credit Card No. Credit card number if payment was made by credit card.
Exp. Date. Credit card expiration date if payment was made by credit card.
Market. The market code for this invoice. This is the market code assigned to the reservation, or for new invoices initiated by AR, the market code assigned on the New Postings screen (see Add New Invoice to the AR Account, below). For a compressed invoice, the market code on the last-selected invoice being compressed into this invoice. For payments, this field is blank unless the payment was added through Configuration>AR>Old Balances.
Source. The source code for this invoice. This is the source code assigned to the reservation, or for new invoices initiated by AR, the source code assigned on the New Postings screen (see Add New Invoice to the AR Account, below). For a compressed invoice, the source code on the last-selected invoice being compressed into this invoice. For payments, this field is blank unless the payment was added through Configuration>AR>Old Balances.
Room Class. The room class for this invoice. This is the room class assigned to the reservation, or for new invoices initiated by AR, the room class assigned on the New Postings screen (see Add New Invoice to the AR Account, below). For a compressed invoice, the room class on the last-selected invoice being compressed into this invoice. For payments, this field is blank unless the payment was added through Configuration>AR>Old Balances.
Note: Cutover balances and payments entered through Configuration>AR>Old Balances will show the market code, source code, and room class specified at the time the cutover balance or payment was entered.
The following fields may be edited:
Invoice Supplement/Supplement. The Invoice Supplement (Supplement for payments). Use this field for supplemental information.
Invoice Reference/Reference. The Invoice Reference (Reference for payments). Use this field for reference information.
![]()
The distinction between a folio number, a bill number, and an invoice number requires some explanation.
The piece of paper a guest receives upon checkout is often referred to as a folio. This folio has a unique number on it that is commonly known as the folio number. Opera assigns this number automatically to the folio upon generation and this number will be different for each folio generated for the guest's stay (depending on the Cashiering>Fixed Bill Number application parameters).
What the Opera user calls a folio number is, internally for Opera, a bill number (or more correctly, the BILL_NO). This is because "folio number" has a special meaning, internally, for Opera. Internally, a FOLIO_NO is a unique number assigned to the financial transactions for a given reservation. The FOLIO_NO is assigned at check-in and it remains the same for every financial transaction belonging to the reservation throughout the duration of the stay. The FOLIO_NO is used for internal tracking purposes and users never see or need to know it.
Finally, the term "invoice number" (specifically, the AR invoice number) refers to the unique identifier assigned by Opera to cover one or more guest folios that are transferred to an AR account. This number is the same for users and for Opera's internal processes, where it is called an INVOICE_NO.
![]()
Show Me
See Also