|
|
|
Item Inventory Setup - Items
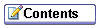
The Item Name grid on the Item Inventory Setup screen shows the individual items that belong to the item class highlighted within the Item Class grid. You may add new items and edit existing items starting from this grid. (The Item Inventory Setup screen displays when you select Configuration> Reservations> Item Inventory Setup.
The following information is displayed in the Item grid.
Item Name. Name of the item.
Revenue Type. Revenue type for this item. Only available when the OPS<version number> Sales & Catering application license is active.
External. A mark in this column indicates that this item must be ordered from a third-party company. Only available when the OPS<version number> Sales & Catering application license is active.
Quantity. Number of physical items in inventory.
Web. An X in this column indicates that the code is bookable via web site. Available when the Webservices Sales & Catering WCS_XXX or the Webservices Conference Center WCC_XXX license code is active.
Seq. Display sequence number which determines the position of the item in lists of values.
Item Pool Code. When the Reservations>Item Inventory Pool application parameter is set to Y.
Important! Be sure to configure Revenue Types before you attempt to configure items because a revenue type must be specified for each item.
To add a new item, click anywhere in the Item Name grid and select the New button. To edit an item, double-click on the item you wish to modify or highlight the item and select the Edit button. The Item - New screen or the Item - Edit screen appears.
Note: When the license codes Webservices Sales & Catering WCS_XXX or the Webservices Conference Center WCC_XXX are active, an additional flag Bookable via Web Site is available for selection on the Item - Edit or Item - New screen. Selection of this flag will enable the configured item to be available for booking via the website. Selection of this flag is also inherited from the associated Item Class. If the item being configured is assigned an item class that has this flag selected, the item will also have this flag selected by default. If the item being configured is assigned to an item class that does not have this flag selected, the flag will not be available on the item.
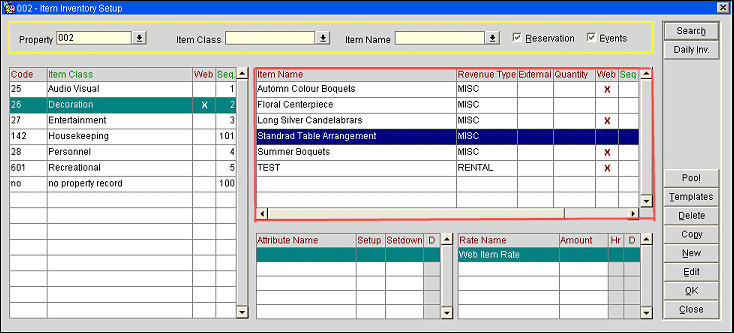
Provide the following information and select OK to save your entries. Select the Attributes or Rates button to manage item attributes and rates.
Note: The Rates and Attributes features are available only when the OPS<version number> Sales & Catering application license is active and when the class to which the item belongs is designated S&C. (See Item Classes for details.)
Note: When a property has the OPX_GAS Opera Xchange For Generic Activities add-on license code active, an Activity check box and an Activity button will be displayed on the Item - New/Edit screen. When the Activity check box is selected, the Activity button will become available and can be selected to open the Activity Setup screen, which is used to setup and link an activity to the item.
Item Name. The name of the item.
Note: When the OPS <version number> Sales & Catering license is active, this name prints on the Banquet Event Order; therefore, use upper and lower case and the exact terminology you wish the customer to see.
Description. Any additional description required for this item. Double click on this field to open a text editor that allows you to review/edit the complete description. Up to 2000 characters are allowed.
Display Seq. Number which determines the position of the item in lists of value.
Item Pool. When the Reservations>Item Inventory Pool application parameter is set to Y, this field is a view-only reference field that displays the Item Inventory Pool that the item is associated to. See Item Inventory Pool for details.
Item Code. Item code. A unique code is provided automatically. This entry will be used for Quick Insert of an item when creating the BEO and is referenced when selecting the Item for a reservation. Field automatically defaults for a new item, but you may edit this field if you like.
MeetingMatrix Object. If the OPS MM MeetingMatrix Opera S&C add-on license is active, select the down arrow to choose a graphical object that will represent this item in MeetingMatrix function space layouts. See MeetingMatrix Interface for details.
Revenue Type. When the OPS<version number> Sales & Catering application license is active, select the down arrow to choose the revenue type with which this item is associated. The item's revenue type will affect revenue reporting.
Cost. When the OPS<version number> Sales & Catering application license is active, this is the cost of the item, not including any taxes, for the property to have this item. This cost is used for calculation of profit and loss margins on various system screens as well as in reports.
Discountable. Available if the item class to which the item belongs is discountable (see Item Class for details). If this check box is selected, the item may be discounted by the percentage set in the Item Discount % field on the Business Block screen Catering tab (see Business Block Catering Tab for details), or by the percentage specified on the Select Item Info screen that appears when adding items to an event (see Adding Items to an Event for details).
Department. A multi pick box asking you to select the appropriate department within the hotel's Food & Beverage structure that either provides / organizes this item or needs to know that this item has been booked for a certain function. If values have been selected for this field in the Item Class, the Item will be limited to only those choices. Also by selecting the department, this will assign the information from the Trace Text field to this department
Quantity in Stock. If you have a specific physical inventory quantity of this item in stock, enter the quantity here. This quantity is displayed in the Quantity field of the Item Setup screen Name grid. The quantity entered here will be used as a default, or baseline, on the Item Daily Inventory screen, where it will be displayed as the daily inventory quantity unless it is explicitly changed for specific dates or date ranges via the Daily Load screen. The Item Daily Inventory screen's Load feature lets you override the baseline quantity to accommodate fluctuations in inventory due to seasons, holidays, weekends, or other factors. The Item Availability screen shows both the day-to-day variation in inventory and the day-to-day availability resulting from allocation from each day's inventory quantity.
Default Quantity. Enter a quantity which will be assigned by default when this item is attached to a reservation or selected for an event. Once attached to the reservation or event, this quantity may be edited. Defaults may also be assigned to inventory item rates and attributes so that the most typical details may be auto-assigned when an item is attached to an event or reservation.
Critical. Available when the OPS<version number> S&C license is active. (The Catering>Item Inventory Warning application parameter must be set to Y to implement this feature.) Select this check box to issue a warning message to users if this item is overbooked. Un-check this check box if a warning message is not needed. When this check box is selected, the External Order check box is also available.
External Order. Select this check box if this item can be ordered externally. The external order option becomes available if the item is marked Critical. Only available when the OPS<version number> Sales & Catering application license is active.
Sell Control. Available when the Reservations>Sell Control Items application parameter is set to Y. Select this check box in order to enable a dynamic check of item inventory availability when making reservations from the Item Inventory Availability screen. If the item is not available for any or all of the dates chosen, an "Insufficient inventory" message appears and the reservation cannot be booked.
Sell Separate. Select this check box if this item may be attached to the reservation using the New button on the Item Inventory screen. Typically, items that are not "sell separate" would be included as part of a package that is attached to a rate code. When adding a new item the Sell Separate check box is selected by default. Items not marked as Sell Separate are still visible in the Inventory Item Availability screen, however because they are not marked as Sell Separate may not be selected for association for a reservation.
Print. Select this check box if this item should be printed on internal and external documents. If the box is not checked, this item will print on internal documents only. An internal report would be the Item Availability report that is only seen by the property and an external report would include a folio that a guest would view.
Vendor. Available when the OPS<version number> S&C license is active. An ellipsis field that takes you to the Account Search screen to select the company that is the vendor(s)/supplier(s) from whom you hire/rent/purchase this item. If the External Order checkbox is selected, the Vendor is required.
Set Up Time. Available when the OPS<version number> S&C license is active. How long (in minutes) does this item take to set up? Individual attributes may add to this setup time. See Item Attributes.
Set Down Time. Available when the OPS<version number> S&C license is active. How long (in minutes) does this item take to disassemble or prepare for re-use? Individual attributes may add to this set down time. See Item Attributes.
Available From/Available To. If this item is available for a certain period of time each day, enter the start time and end time in these fields. Use the time format specified for your property. For example, for a JetSki to be available from 10:00 AM until 5:00 PM daily, then the times would be entered as 10:00 to 17:00 in case of 24 hour time format or 10:00 AM to 5:00 PM in case of AM/PM format. And for a Bartender to be available from 4:00 PM to 11:00 PM, then this would be configured as available from 16:00 until 23:00 in case of 24 hour time format.
Note: When the Available From time has a value that is greater than the Available To, then Next Day is displayed in Blue letters next to the Available To field.
![]()
If the time in the Available From field is less than the Available To field, and 12:00 is entered in the Available To field, then Noon will be displayed in Blue next to the Available To field.
Trace Text. Enter a trace message that will be displayed when traces are accessed for the department(s) selected in the Department field. Select the ellipsis button to display and select from the default trace texts for these departments. (See Trace Texts for details on setting up these defaults.) Available when the OPP<version number> PMS license code is active.
Event Types. A multi pick box asking you to select the event type(s) for which this item is typically booked. This will facilitate finding items that are available for specific event types only.
Bookable via Web Site. When the license codes Webservices Sales & Catering WCS_XXX or the Webservices Conference Center WCC_XXX are active the Bookable via Web Site option is available (and selected by default) if the Bookable via Web Site option is selected for the item's class. Select this check box to indicate that this item is bookable via the website. If the Bookable via Web Site check box is grayed out and unavailable, the Bookable via Web Site option has not been selected at the item's class level.
(This feature is available if the OPP MHOT Multi-property PMS add-on license is active.)
To simplify configuration, item classes and items may be copied between properties.
Note: Before an item can be copied to another property, you must first copy the item class to the property. See Item Classes for details.
Note: Should an Item be associated to an Item Pool, and the Item is copied to another property, the item Pool attribute of the Item itself is not copied.
Highlight an item in the Item grid and select the Copy button to copy the item to one or more Items to other properties. The Property multi-select list of values appears allowing you to choose the properties to which the item should be copied.
When you copy an item to another property, you are presented with a list of options. You may choose to copy the item attributes, rates, and/or vendors to other properties as well as the item name. (These elements are copied by default.)
See Also