Item Inventory Setup - Item Classes
Items are categorized into logical entities called item classes which may be used to arrange items according to their use or application. For example, you might have an item class for different kinds of audiovisual equipment, an item class for floral decorations, an item class for recreational equipment, and so on. Item classes enable an efficient search for items when making a reservation or booking an event.
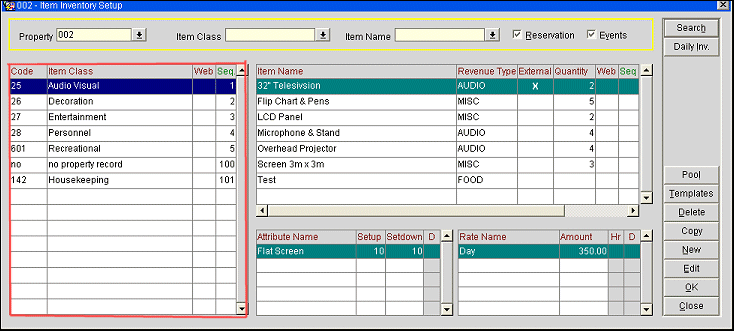
The Item Class grid on the Item Inventory Setup screen shows the item classes that have been configured. You may also add new item classes and edit existing item classes starting from this grid. The Inventory Item Setup screen displays in PMS (PMS_<version number>) and ORS (ORS_<version_number>) when you select Configuration> Reservations> Item Inventory Setup. In Sales & Catering, (OPS_<version number>) access the Item Inventory Setup screen by selecting Configuration> Catering> Item Inventory Setup.
Highlight an item class on the Item Inventory Setup screen's Item Class grid to display the items belonging to that class in the Items grid.

The following information is displayed in the Item Class grid.
Item Class. Item class name.
Web. An X in this column indicates that the code is bookable via web site. Available when the Webservices Sales & Catering WCS_XXX or the Webservices Conference Center WCC_XXX license code is active.
Seq. Number that determines the position of the item class in the Item Class list of values that is displayed when you search for an item class and the order in which the item class will print on the BEO.
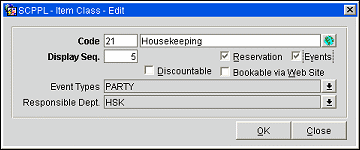
To add a new item class, click anywhere in the Item Class grid and select the New button. To edit an item class, double-click on the item class you wish to modify or highlight the item class and select the Edit button. The Item Class - New screen or the Item Class - Edit screen appears.
Note: When the license codes Webservices Sales & Catering WCS_XXX or the Webservices Conference Center WCC_XXX are active, an additional flag Bookable via Web Site is available for selection on the Item Class - Edit or Item Class - New screen. Selection of this flag will enable the configured item class to be available for booking via the website. Items configured using an item class with this option selected will inherit the selection of this option as well. When a change is made to the item class the user is prompted to also update any items linked to the item class.

Provide the following information and select the OK button.
Code. Enter the item class code.
(Description). Name of the item class.
Display Seq. Number which determines the position of the item class in lists of values and the order in which the item class will print on the BEO.
Note: The PMS and S&C check boxes are only available when both the PMS (OPP <version number>) and Opera Sales & Catering (OPS <version number>) licenses are active. They are not displayed in either standalone PMS or standalone S&C. All item classes are displayed in the configuration Item Inventory Setup screen Item Class grid, regardless of the check box selections made here.
Reservation. Select this check box to indicate that this item class should be displayed when booking items in PMS. For example, you would probably check this box if this item class included housekeeping- related items. (This check box is selected by default.)
Events. Select this check box to indicate that this item class should be displayed when booking items in Sales & Catering. For example, you would probably not check this box if this item class included housekeeping-related items. (This check box is selected by default.)
Note: Either the Reservation or Events check-box MUST be selected in order to save a new or modified Item Class.
Discountable. Select this check box if this item class is discountable. This means that if a discount percent value is entered on the Business Block screen Catering tab Item Discount % field, all items associated with the business block events that are discountable will be discounted by that percentage. You are prompted to indicate whether you want to make all items in the class discountable. If you respond Yes, the Discountable check box will be selected for all the items in the class. If you respond No, none of the existing items will be marked as discountable, although you may edit individual items to make them discountable and new items will be discountable.
Bookable via Web Site. When the license codes Webservices Sales & Catering WCS_XXX or the Webservices Conference Center WCC_XXX are active the Bookable via Web Site option is available. Select this check box to indicate that items in the configured item class are bookable via the website. A prompt asks if you wish to update all items in the item class. Respond Yes to make all items in the item class bookable via the web site. (You may unselect the Bookable via Web Site flag for individual items if you wish.) Select No to make all items in the class not bookable via the web site. (The Bookable via Web Site check box will be grayed out and unavailable on the item configuration screen.)
Event Types. A multi pick box asking you to select the event type(s) for which this item is typically booked. This will facilitate finding items that are available for specific event types only. This field is only visible when the Events check box is selected.
Responsible Department. A multi-select LOV. Select to assign a Responsible Department(s) for the items in this class. Responsible Departments will be inherited by the Items linked to the Class. If the Responsible Departments should change on the Item Class, you are prompted to update any existing Items linked to the Item Class.
(This feature is available if the OPP MHOT Multi-property PMS add-on license is active. For Sales & Catering, this feature is available if the OPS MHOT Multi-property Catering and the OPS MHT2 Multi-property Catering Cross-Selling add-on licenses are active.)
To simplify configuration, resource item classes and items may be copied between properties.
Before an item can be copied to another property, you must first copy the item class to the target property. Highlight an item class in the Item Class grid and select the Copy button. The Property multi-select list of values appears allowing you to choose the properties to which the item class should be copied.
Next, highlight an item in the Item grid and select the Copy button to copy the item to one or more other properties. The Property multi-select list of values appears allowing you to choose the properties to which the item should be copied.
When you copy an item to another property, you are presented with a list of options. You may choose to copy the item attributes, rates, and/or vendors to other properties as well as the item name. (These elements are copied by default.)
If a responsible department does not exist at the target property, Opera will default the responsible department to the first department configured at the property.
See Also