
|
|
|
Catering Package and Template Setup
Select System Configuration>Catering>Catering Packages/Templates to access the Catering Package/Template Setup screen. This screen is the starting point for setting up and maintaining both catering packages and catering package templates.
Templates and packages are alike, except that prices are not pre-assigned to catering templates. For this reason, templates are useful, for example, when you wish to use custom pricing, or when the number of attendees is uncertain. Both catering packages and catering templates can be assigned to events. Packages and templates make it easier for you to set up events because many of the typical resource items and food and beverage choices may already be part of the package or template. This saves you the work of selecting resources for the event.
Note: Catering Template Configuration (Config>Catering> Catering Packages/Templates) is also available when the Sales & Catering Express OPM_<version number> or OPL_<version number> licenses are active. The menu option to configure Catering Templates is only accessible though, when the application function Catering>Event Templates is set to Y. However, this does not grant access to configure Catering Packages.
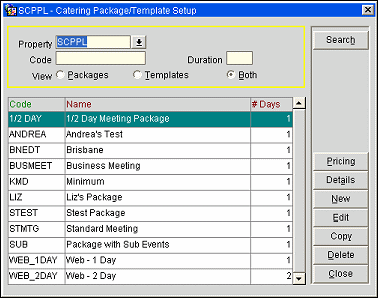
Enter your search criteria and select the Search button to locate specific packages.
Property. When the OPP_MHOT Multi-Property license code is active, select the down arrow and choose the property the catering package belongs to.
Code. Identifying code assigned to the package or template.
Duration. Number of days covered by the package or template.
View.
Code. Identifying code assigned to the package or template.
Name. Display name of the package or template.
# Days. Number of days covered by the package or template. For example, a package might include 2 days with lunch and dinner on each day.
Details. Based on whether a package or template is highlighted, this is one part of setting up a package. Select this button to go to the Catering Package/Template Details screen, where you will allocate events, times, function spaces, and resources. See Package or Template Details for additional information.
New. Select this button to create a new package/template.
Edit. Highlight a package/template and select this button to modify any existing package/template.
Copy. Highlight a package/template and select this button to copy an existing package/template. When the copy is complete the copied package/template will have a sequential number attached to ensure that there is not duplication (e.g., CBD_1, CBD_2, etc.). You may then customize the copied package or template. See Copying Templates and Packages for details.
Pricing. Available only when the Packages radio button is selected, this option allows you to set package pricing. See Catering Package Pricing List for details.
To create a new package or template, select the New button. (If the Packages radio button is selected, you will, by default, create a new package. If the Templates radio button is selected, you will, by default, create a new template.) To edit an existing package or template, highlight your choice and select the Edit button. The Template Definition - New/Edit, or the Package Definition - New/Edit screen appears.
Note: When the license codes Webservices Sales & Catering WCS_XXX or the Webservices Conference Center WCC_XXX are active, an additional flag 'Bookable via Web Site' is available for selection on the Package Definition - Edit or Package Definition - New screen. Selection of this flag will enable the configured catering package to be available for booking via the website. The flag is available for Catering Packages, not Catering Templates. When the flag is checked on the Package Edit screen, user will be prompted if the linked package pricings should also be updated. Also note that this flag will only be enabled if the Events attached to the Package have a function space and setup style attached that have been flagged as Bookable via Web site.

Note: The Package Definition screen and the Template Definition screen are nearly identical, except that the Template Definition screen has the Template check box selected.
Provide the following information and select the OK button.
Property. Available if the OPP_MHOT Multi-property license code is active. Select the down arrow to choose the property for which the package/template is being configured. This field may not be edited once the package or template is saved.
Package/Template Code. Enter the package or template code.
Description. Enter a description of the package or template.
Number of Days. Enter the duration, in days, for the package or template.
Template. Select this check box if this is a template. Once the template or package is saved, this option may not be changed.
Bookable via Web site. Select this checkbox if this package is available to be booked via a customer facing web site when the license codes WCS_XXX or WCC_XXX are active.
Note: The checkbox is only accessible if a function space has been attached that is configured as Bookable via Web site.
To set up the details for the package, highlight your choice on the Catering Package/Template Setup screen and select the Details button. The Catering Package Setup screen appears.
Note: When the Diary function is active in SFA, Catering Templates can also be configured in SFA. These Catering Templates configured in SFA however, will only have an event schedule with no resources attached, as resources are not available in SFA.
At the top of the screen you see the following view-only information.
Template Code or Package Code. Code identifying this package or template.
Duration. Number of days allotted to the package or template.
Template Name or Package Name. Description of the package or template.
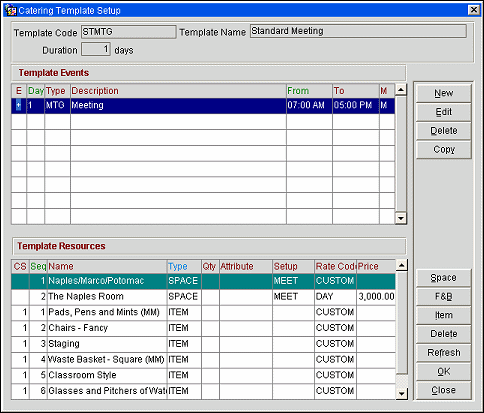
This screen consists of two grids: Events and Resources. Set up an event in the left grid, then, with that event highlighted, set up the resources for the event in the right grid.
Use this grid to create, review and edit the events attached to the template or package. The Events grid shows the following information.
E. A plus sign in this column indicates that the event has sub events. Use the plus sign to view all associated sub events.
Day. Day on which this event will be taking place within the whole package (e.g., Day 1, Day 2, etc.).
Type. Event type (e.g., Lunch, Meeting, Dinner, etc.). The Event Types need to be configured prior to creating packages.
Description. Event description. Defaults from the event type configuration; however, you may edit the event description.
From/To. Default event hours. You may edit the from/to times as necessary.
M. Indicates whether the selected event is a Master or a Sub Event. Either an M or an S will display here if a Master/Sub event is listed and left blank if just a normal event is listed.
Note: When the Catering>Event Resources application function is set to N, the configuration option for catering templates will not display the Package/Template Resources grid.
CS. This column indicates the Item Class sequence for Resource Items.
Seq. Numeric sequence order that resources listed will display in the grid.
Name. Name associated with the listed resource.
Type. Indicates the resource type, e.g. ITEM, SPACE or F&B.
Qty. Shows the quantity of the listed resource to be included in the package/template.
Attribute. Attribute for the listed resource.
Set Up. Set up style (e.g., Banquet, Theater, Cocktail, etc.) Setup style is configured as part of the function space configuration.
Rate Code. Rate Code for the listed resource. This column is only visible for Catering Templates.
Price. Price assigned to the listed resource or function space. This column is only visible for Catering Templates.
Space. Select this option to assign the function space (or spaces) that are configured for this catering package/template.
Note: When a Catering Package is booked and the events created, the function space will be automatically assigned. Opera will check first by sequence, then alphabetically for the 1st function space that is not yet assigned and assign that space. Once the event is created, the space can be updated.
For Web Bookings, the package is available if at least one space linked to the packaged event is available.
F&B. Select this option to access the Select Menu screen where Menu items can be added to the event.
Item. Select this option to access the Select Item(s) screen where non-F&B items can be added to the event.
Delete. Select this option to delete the highlighted resource from the grid.
Refresh. Select this option to refresh changes made to the listed resources.
OK. Select OK to save the package/template and exit this screen.
Close. Select Close to exit this screen and display a prompt to save or cancel any changes made to the package/template.
To add a new event, select the New button. To edit an existing event, highlight your choice and select the Edit button. The Add Event Setup or Edit Event Setup screen appears. Provide the following information and select the OK button.
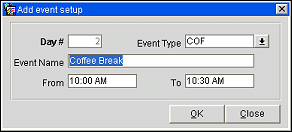
Day #. The day number the event is to occur on. For instance Day 2 or Day 3.
Event Type. Use the drop-down menu to select the appropriate Event Type.
Event Name. By default this field will populate using the description configured along with the selected Event Type. This field can be over-typed.
From/To. By default, these fields will populate using the time configured along with the selected Event Type. These fields can be over-typed.
To make a copy of an event, including its resources, if any, select the Copy button. The copied event appears below the original event. Use the Edit feature to customize the copied event.
(Available for Packages only.) Select the Pricing button to set the price structure for this package. Opens the Catering Package Pricing List screen for this package.
Select F&B or Item depending on whether you wish to add or edit a food and beverage resource (e.g., a menu) or an item resource (e.g., AV equipment, decorations, etc.). To update the grid with any changes and return your cursor to the top of the list, select the Refresh button.
Select the F&B button to display the Select Menu screen. See Adding a Menu to an Event for details.
Select the Item button to display the Select Items screen. See Adding an Item to an Event for details.
To copy a package or template, highlight your choice on the Catering Package/Template screen and select the Copy button.
Show Me
See Also