
|
|
|
OBI Setup
Note: This topic applies to OBI having OPI_<version number> OBI Enterprise (Multiple Properties), or OPI_BUIP_<version number> OBI Standard (Single) using OLAP technology and data cubes. This topic does not apply to standalone S&C Analytics whose data is accessed directly from Opera tables via OLTP. For Sales and Catering Analytics setup, see S&C Analytics Reports Setup (S&C Analytic Reports Setup, http://www.).
Before you can view Opera data within the Opera Business Intelligence (OBI) application, you must first collect specific data from the Opera database and store it in OBI data cubes The Opera Business Intelligence Setup process lets you define what OBI data cubes and cube dimensions you want used to gather Opera data that will, in turn, be used for your queries and analysis. For example, you can select the Company BI Cube for gathering information about the companies that provide maximum revenue. You can then select the company dimensions you want used to compute and store data, such as company account type, company name, market, rate, room type, source, and so on. Once a cube has been built with Opera data, it stores the precalculated, summarized, and compressed data which OBI accesses for multidimensional viewing through the OBI Dashboard. With Opera data in prebuilt cubes, data retrieval speed and accuracy is assured. The OBI setup process defines the timeframe for the data from which you want to initially build the cube, the frequency in which you want the OBI data cubes to be refreshed and maintained, and provides build and error logs, the opportunity to stop a job, and other options.
For more information about Opera Business Intelligence, see About OPERA Business Intelligence.
Note: For information on setting datamart views and BI reports for central currency, refer to the help topic Setting Central Currency Views.
Users are granted access to OBI for operation on the Employees screen (Setup>Users>User Configuration>New or Edit). Select the OBI check box to grant permissions to the OBI module. Select the button, OBI, to open the BI Options screen where you can grant permission for the Country, Region, Property, Chain, and BI Data Groups/Views. See Employees - Edit Users for more information.
Users may want to track production for profiles that are of most interest to business analysts. A new keyword type, OBI, has been added to company profiles. This keyword can be used to flag those profiles that should be included in the Company Cube for Opera BI. The creation and deletion of the OBI keyword is controlled by the permission Profiles>Maintain OBI Keyword.
To access the OBI Setup Screen, users must be granted permission to set up and maintain OBI Data Cubes through Configuration>Permission Group OBI>OBI SETUP - Business Intelligence. The OBI Setup screens are available at Configuration>Setup>Opera Business Intelligence Setup. information.
Access the Opera Business Intelligence Setup screen to begin the OBI data cube setup process by selecting Configuration>Setup>Opera Business Intelligence Setup. The OPERA Business Intelligence Setup Screen appears.
To access this screen, users must have the permission OBI>OBI Setup - Business Intelligence Setup.
Once you have activated the OBI license, and have been given the appropriate permissions to access the OBI Setup functionality:
This is the first screen that appears when you access the Opera Business Intelligence Setup process. Initially (when the license code has just been activated), this screen displays all the OBI cubes available as marked inactive, Active (N). As you set up which cubes you want to use in your BI reports, you will make them Active (Y). Then, you will access the Opera Scheduler and schedule the Active cubes to be built.
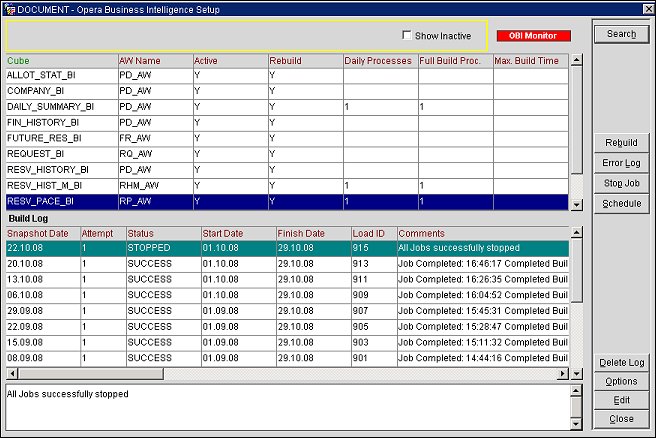
Cube. Name of the data cube as it appears in the OBI setup screens, the Opera Scheduler, and various other screens throughout Opera.
AW Name. Name of the cube in the Analytic Workspace, which is the internal storage location of the cube. The cube is either stored in the Opera schema or in a different schema appended to the Opera schema.
Active. Identifies whether or not the cube is being used by the OBI application (N=Inactive, Y=Active).
Rebuild. Indicates if the cube is scheduled to be rebuilt, using the Rebuild functionality. Specific properties, time periods, and dimensions will be recalculated, overwritten or added to the previous build.
Daily Processors. Indicates how many CPU processors you want allocated to the cube when it is being built or updated during the scheduled daily maintenance process. The default amount will be assessed and assigned by Oracle if nothing is entered.
Full Build Process. Indicates how many CPU processors you want allocated to the cube when it is being built during the scheduled full build process. The default amount will be assessed and assigned by Oracle if nothing is entered.
Max. Build Time. Indicates the amount of minutes allowed to lapse if no data is actually updating the cube (due to a possible error), before the process stops and shuts down. 180 minutes is the default time. This prevents the process from running forever if no data is actually being added. Otherwise, when the cube is being built or updated with data, there is no time limit to the process; it will run until successfully completed.
The Build Log shows the status of the highlighted cube as it is in process being built/updated by the Opera Scheduler. This can help in troubleshooting or knowing when the data is available in BI. This information in the Build Log gets updated every 10 minutes. Once the Status is Completed, the data is available for viewing in Opera BI.
Snapshot Date. Date when the cube was last built.
Attempt. The number of times the process was started.
Status. The status of the build/update for this cube. The statuses include:
Start Date. Date when the build/update started.
Finish Date. Date when the build/update finished.
Load ID. System-assigned ID for that build. The ID can also be referenced in the Error Log.
Comments. System comments about the build process.
Business Date. Business date in Opera for the data used to build the cube.
Processed Row. The number of rows in the report that were processed.
Rejected Row. The number of rows in the report that were rejected.
Build Start Time. The time when the build process began.
Build Completed. The time when the build ended.
Build Time. The amount of time the last build took to build.
Insert Date. The date the build data was initially inserted in OBI.
Update Date. The date the initial data was updated.
Dimension. The dimension rebuilt, or the dimension deleted when deleting a specific property.
Log ID. The unique identifier for this build record.
Clean Dimension. Used when rebuilding dimensions and when deleting a specific property.
Clean Attribute. Used when rebuilding dimensions and when deleting a specific property.
Command Type. Type of job being requested/performed (for internal use). Can be CUBE, DIM or INTERNAL.
Properties. List of properties being affected by the job.
Rebuild. Select this button to set up specific date ranges, properties, and other dimensions for the highlighted cube to be rebuilt since the last build. The previous build data will be overwritten or have the additional data added. See Rebuilding the Cube Manually below.
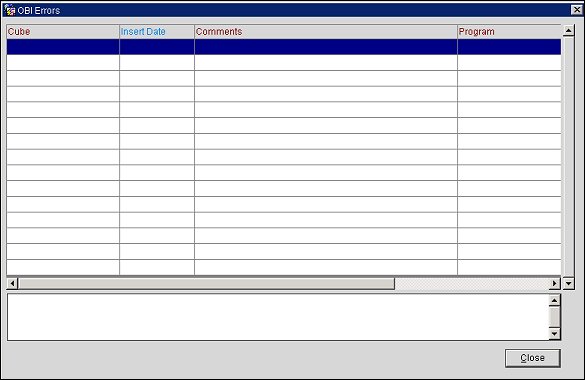
Error Log. Select this button to view process errors that may have occurred during the build. See OBI Errors below.
Stop Job. Stops the highlighted cube build job.
Schedule. Opens the Opera Scheduler screen where you can schedule the highlighted cube build. When OBI cubes are built for the first time, or completely rebuilt after an upgrade, the application setting OBI>Settings>OBI Start Year can be activated to select a specific year from when data will be used to build the cube. All cubes, except Reservation Pace Cube, can use this setting. The start date will be the 1st day of January of the year specified in this setting. If this application setting is not set, the cube activated to be (re)built through the Opera Scheduler takes data from the 1st of January of the current year, minus 2 years (e.g. if the business date is 12-Jun-08 and the parameter is blank, the start date will be 01-Jan-06).
Note: You can also schedule the active BI Cube jobs from the Scheduler screen by selecting the Schedule button (on the Scheduler screen).
Delete Log. Select this button to delete the highlighted build log from the system. Please note that this function must not be used if the job is currently running.
Options. Select this button to open the OBI Setup Options screen where you can select to stop all jobs, refresh the Build Log and BI SID, start and stop the OBI Monitor, assign OBI keywords, and map various rate codes to a single reporting code. See OBI Setup Options below.
Edit. Select this button to open the OBI Setup screen. At this screen you can select the parameters and dimensions you want used to build the cube. See Edit OBI Setup Screen, below.
The header in this screen identifies the cube being set up, the Analytic Workspace (AW) name, and the name of the Opera schema.
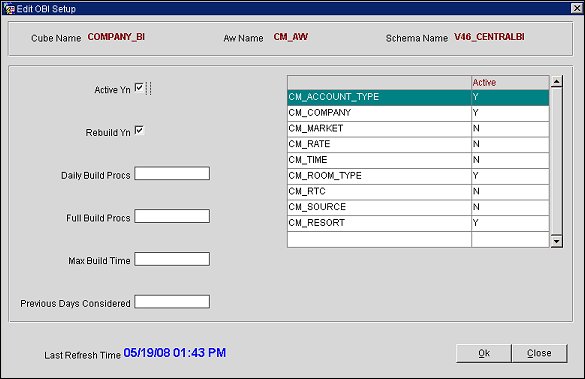
Active Yn. Select this check box to make the data cube active; this means that the cube and its parameters and dimensions will be sent to the Opera Scheduler to be built/maintained and the data used in OBI.
Rebuild Yn. Select this check box to indicate that the cube will be rebuilt.
Daily Build Procs. Enter how many CPU processors you want allocated to the cube when it is being built or updated during the scheduled daily maintenance process. The default amount will be assessed and assigned by Oracle if nothing is entered.
Full Build Procs. Enter how many CPU processors you want allocated to the cube when it is being built during the scheduled full build process. The default amount will be assessed and assigned by Oracle if nothing is entered.
Max Build Time. Enter the maximum interval in minutes where if a cube is not updated with data during the build process, the job will stop. In other words, if there are no new entries for this entered amount of time, the job is killed. The default is 180 minutes.
Previous Days Considered. Enter the number of days prior to the ending date of the last build or last update process (Snapshot date), that you want the system to go back and begin to gather data. This ensures that all data is considered during the maintenance process for the next build.
Last Refresh Time. Date and time that the cube parameters and dimensions were last updated.
Determine what dimensions you want included in the cube, considering your specific needs for OBI reports and how much space and time you want to allow for building the cube. Double-click on the dimension to make it active or inactive. When Active, the data from Opera will be gathered, summarized, and stored as scheduled through the Opera Scheduler for this cube.
The OBI Errors screen appears when the Error Log button is selected from the Opera Business Intelligence Setup screen. The system errors that have occurred during the build display. The information includes the name of the cube that encountered the error, the date the error occurred, brief description of the error, the program that caused the error (i.e. Oracle), the cause of the error (action), the dimension where the error occurred, and the Load ID. The most recent errors are displayed on the top of the list.
The Rebuild Cube Manually screen appears after the Rebuild button has been selected. You have flexibility to select specific properties (in a multiple-property environment) and a timeframe in which to build new data for the highlighted, previously built cube. Dimensions that will be used for the rebuild process will have to be activated in the Edit OBI Setup screen.
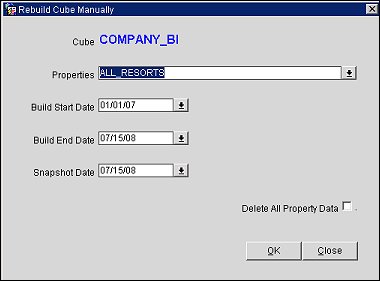
Cube. The name of the cube you have highlighted on the Opera Business Intelligence Setup screen to rebuild appears in the header.
Properties. In a multi-property environment, select the LOV to mark the properties whose data you want to use to rebuild the cube.
Build Start Date/Build End Date. Select the timeframe for the data you want to use for the new rebuild (Build Start Date and Build End Date). This will be prepopulated with default values.
Snapshot Date. Select the Snapshot Date (date of the build you are going to overwrite), if desired. Otherwise, a default date of today's date is entered.
Delete All Property Data. Select this check box if you want to delete all the data for the selected properties. This will build all of the data from scratch as opposed to adding to the existing full build.
OK. Select OK and accept the confirmation. A job name will be displayed, which is the Cube name followed by a sequence number. This is the Opera Scheduler job which is building the cube and can be found in the Opera Scheduler screen. Double-click on the Load ID column of the Status grid to see the progress of the Build job.
Snapshot Date. Enter the date of the build (snapshot) you want to use as the basis.
This screen appears after the Options button has been selected from the Opera Business Intelligence Setup Screen.
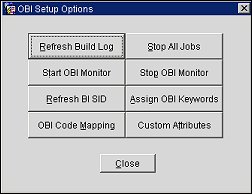
The following options are available:
Refresh Build Log. Selecting this button immediately refreshes the Build Log.
Stop All Jobs. Stops all jobs through the Opera Scheduler. You may want this option to free up system resources.
Start OBI Monitor. Select this button to start the OBI Monitor (monitoring and managing communications between the OBI and Opera). The Green status lamp displays on the Opera Business Intelligence Setup screen.
Stop OBI Monitor. Select this button to stop the OBI Monitor. The Red status lamp displays on the Opera Business Intelligence Setup screen.
Refresh BI SID. This may be selected if changes have been made to the cube parameters and dimensions and you want to synchronize data.
Assign OBI Keywords. Select this button to display the Profile Distribute screen. See Assign OBI Keywords below.
OBI Code Mapping. Select this button to display the Opera BI Code Mapping for BI Reporting screen where users can consolidate and create custom groupings for existing codes. See OBI Code Mapping for more information.
Custom Attributes. This option is used when the OPI_<version number> OBI Enterprise (Multiple Properties - OBIEE) license code is active. Select this button to open the Opera BI Custom Attributes Setup screen. Here you can begin to set up a maximum of 10 customized attributes to be displayed in BI cube reports. See OBI Custom Attributes for more information.
OBI keywords can be assigned to important Companies, Travel Agents, and Guests so that these profiles and keywords will be included in BI cubes for analysis. When the OBI license code is active: OPI_<version number> OBI Enterprise (Multiple Properties), or OPI_BUIP_<version number> OBI Standard (Single) users can access the Profile Distribute screen by selecting the Opera Business Intelligence Setup>Options>Assign OBI Keywords menu option.
Using the Profile Distribute screen, OBI users can create new OBI keywords or delete existing OBI keyword criteria for the profile types of Company, Travel Agent or Individual. The keywords are assigned to the profiles and accounts based on the filter and criteria you selected. This enables the accounts and profiles to appear in specific OBI reports. You will need to build (or rebuild) the cubes after these new OBI keywords are assigned. Then, you will need to schedule the BI - Cube Maintenance so that the profiles and keywords are constantly updated for the BI cube dimensions.
Note: When a Master Company Profile has subsidiary companies, and the subisidiaries have been assigned a keyword, the Master Company is also assigned the keyword. The Master Company appears on subsequent profile screens for identification. When you select Preview, you will only see the Master Company listed on the Profile Search screen. When you complete the BI- Company OBI Keywords job, you will see that the Master Company has the keyword applied. This implies that the subsidiaries also have the keywords assigned.
Creating and deleting OBI keywords on the Distribute Profile screen is controlled by the permission: PROFILES>MAINTAIN OBI KEYWORD.
You can search for profiles having OBI keywords already assigned to them by accessing the Profile Search screen. In the Keyword field, enter the prefix of the OBI_ and the keyword.
See Also