|
|
|
Room Grids
To access the Rooms Grid for a business block, select Reservations>Blocks>Business Block to access the Business Block Search screen. To access the Business Block Search screen when the OPC<version number> Opera Sales and Catering license is active, select Business Management>Business Block. From the Business Block Search screen highlight the business block for which you wish to see the room grid and select Edit to display the Business Block screen.
From the Business Block screen, select the Grid button to display the Room Grid screen.
Use the Room Grid screen to:
The title bar shows the block code, the dates covered by the display, the status of the Business Block Rooms section, and the property name.
Date. Enter the starting date for the display. By default, the grid display starts with the arrival date of the business block and ends with the departure date of the business block. If the business block includes a shoulder period prior to the arrival date, the grid display starts with the beginning date of the shoulder period. If the business block includes the current business date, however, the default start date is the current business date.
Display. Select the down arrow to choose the information that you wish to display. See Grid Views, below.
Currency. The currency of the primary rate code associated with the Rooms section of the business block. Available when the General>Multi Currency application function is set to Y.
Date. The specific date within the date range of the business block.
If the block is marked as Elastic or Sell Limits in the Inventory Control field of the Business Block screen Rooms tab, shoulder dates may be added to the block prior to the arrival date and/or following the departure date of the business block. These dates are shown in yellow type on the Rooms Grid.
Note: A number appearing in the Date row indicates the rooms left to sell of the daily allowance if a sales allowance applies. Sales allowance information only displays if the property is using the Sales Allowance feature (Blocks>Sales Allowance application function set to Y).
Room Type. Room types are shown across the top of the grid. When the OPC <version number> Sales and Catering license code is active you may display the S&C room types only, or both the S&C room types with the corresponding PMS room types below. (Use the right mouse click options to toggle between the two displays.)
Plus (+) Column. If the Blocks>Occupancy Split Per Room Type application parameter is set to Y, you will be able to split a given day for a specific room type into multiple occupancies, each with its own rate, if applicable. If this parameter is set to N, the plus (+) sign will not be visible, meaning this property does not allow splitting rates for business blocks by occupancy.
Total Rooms for Date. Following the date is the total number of rooms booked in the grid for that date. This number changes as you change the number of rooms blocked in each Room Type for each date.
TR. For sub-blocks only. The total number of rooms for the date for all sub-blocks belonging to the master block or tour series.
Room Types. A listing of all the room types within the property. The specific (number of rooms or room rate) data in the grid cells for each room type changes depending on which radio button is selected in the lower portion of the screen.
Note: In SFA, it is possible to configure S&C room types in central for remote properties. To gain access to this configuration option, an SFA user with access to all remote properties should log into the system and accessConfiguration from the Splash page. Rather than selecting SFA as the module, S&C should be selected, and then the appropriate remote property. Once logged in, go to Reservations>Room Classifications>S&C Room Types to configure and map the required S&C room types for the selected property. The property filter can then be used to switch to any other remote property and repeat the configuration process until S&C room types and mappings are completed for all properties that require this configuration.
The S&C room grid will now always be shown from SFA and S&C for properties that have S&C room types configured and mapped, even if no active S&C license exists for these properties (e.g. for remote properties with S&C room types configured and accessed from SFA). ORS and PMS continue to show the PMS room grid by default but with an option to switch to the S&C room grid, if S&C room types are configured.
Right/Left Scroll Arrows. The grid scrolls in all directions. If you have more room types than fit on the screen, the grid scrolls right to left. If the block is longer than two weeks, the grid scrolls up and down. If the block is longer than two weeks, Opera prompts you at which date to start viewing the block.
Refresh Grid. Refresh the grid that you are displaying.
Room Type Selection. Access a grid where you can select other room types that currently are not displayed on the room grid.
Reservations. Access the Reservation Listing for this Block if one exists. If one does not exist you will be given a message.
Show SC/PMS Room Block. Toggle that display the PMS Room Types and their corresponding S&C Room Types. If no S&C Room type has been associated with a PMS room type, then only the PMS room type will be displayed.
Copy Current Grid to Contract. Opera prompts Would you like to copy current grid as contract grid?Yes/No If you select Y, the latest Original grid will be copied to the Contract grid. You can manipulate the Contract grid without changing the Original grid.
Snapshots. Automatic Snapshots can be setup on a room grid. The first snapshot can be based on the Room Grid creation date or when the booking status turns from a Non-Deduct to Deduct from inventory status based on the application parameter defined below. The second automatic snapshot is taken on first pick-up. Select a snapshot type from the drop down list created in Configuration>Database>Snapshot Types or create a new snapshot on the fly. If the property will be using the automatic snapshot, when the Blocks>Block Snapshot Status setting is defined as a specific <grid view snapshot> status the system will automatically take a snapshot of the room grid.
The application parameter Blocks>Initial Snapshot Logic can be used to determine which logic Opera should use for creating a snapshot. When this parameter is set to N, Opera will create a snapshot based on the creation date of the Room Grid. When this parameter is set to S, Opera will create a snapshot based on when the booking status is changed from Non-Deduct to Deduct.
A few differences exist between the room grid for a Sub-Allocation (Business Block Search>Master Allocation>Sub Alloc. button) and the room grid for a regular Business Block. Though many of the features and functions remain the same for both types of room grids, this section will define only those features that pertain to the Master/Sub-Allocation room grid.
The majority of the differences between the Master Allocation room grid and the Sub- Allocation room grid exist within the Date field. Because of the number of similarities between room grids for Master and Sub-Allocations, only the differences will be defined in this section.
Date. This column contains the following data, for the selected date, each of which will be outlined in this section: Current, Allocated, Sell Limit, and Resv. Pickup.
As with a normal room grid, the title bar shows the block code for the selected Master or Sub-Allocation, the dates covered by the display, the status of the business block Rooms section, and the property name.
Date. Enter the starting date for the display. By default, the grid display starts with the arrival date of the Sub-Allocation business block and ends with the departure date of the business block.
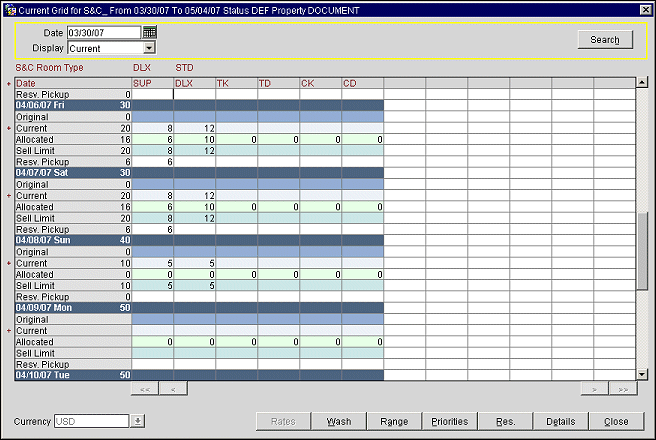
Sub Block. Use this menu to switch between different Sub-Allocations of the same Master Allocation. Once a block code is selected, the display immediately changes to reflect the selected Sub-Allocation.
Note: This option displays only on Sub-Allocations and not the Master.
Date. The specific date within the date range of the business block.
If the block is marked as Elastic or Sell Limits in the Inventory Control field of the Master Allocation Business Block screen Rooms tab, shoulder dates may be added to the block prior to the arrival date and/or following the departure date of the business block. These dates are shown in yellow type on the Rooms Grid. Rates may be added to the Shoulder Date, but rooms cannot be allocated to Shoulder Dates.
Note: A number appearing in the Date row indicates the rooms left to sell of the daily allowance if a sales allowance applies. Sales allowance information only displays if the property is using the Sales Allowance feature (Blocks>Sales Allowance application function set to Y).
Room Type. Room types are shown across the top of the grid. When the OPC <version number> Sales and Catering license code is active you may display the S&C room types only, or both the S&C room types with the corresponding PMS room types below. (Use the right mouse click options to toggle between the two displays.)
Plus (+) Column. If the Blocks>Occupancy Split Per Room Type application parameter is set to Y, you will be able to split a given day for a specific room type into multiple occupancies, each with its own rate, if applicable. If this parameter is set to N, the plus (+) sign will not be visible, meaning this property does not allow splitting rates for business blocks by occupancy. Additionally, when this parameter is set to N, you may still enter rates for the different occupancies, but you may not allot rooms to different occupancies.
Total Rooms for Date. Following the date is the total number of rooms booked in the grid for that date. This number changes as you change the number of rooms blocked in each Room Type for each date.
Avail. This field represents the total number of available rooms for Master Allocation on that date.
Room Types. A listing of all the room types within the property. The specific (number of rooms or room rate) data in the grid cells for each room type changes depending on which radio button is selected in the lower portion of the screen.
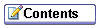
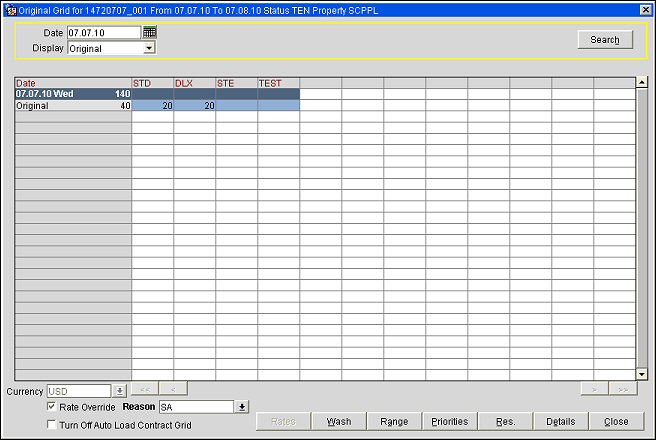
Opera offers several different displays, or views, of the block. The specific displays that are available for viewing and/or editing will depend on the status of the business block. The Original grid displays first by default. Other grids may be available to you by making a selection from the drop down list in the lower left portion of the screen.
Note: When the Original or Current view is displayed, Sell Limits and Pickup information (if applicable) are available simultaneously under the Original or Current data.
Original. The first action you take for a new block is to enter the room block in the Original Block Grid. This is usually at a Non-Deduct From Inventory status. The date range of the Business Block will be on the left hand side if the Blocks>Occupancy Split Per Room Type application parameter is set to Y, and you'll see plus (+) signs next to each date. The S&C Room Types display on the top of the grid, with the number of rooms left to sell in the Sales Allowance column next to each date as well as the total of rooms allotted to the block for each day. The grid scrolls in all directions. If you have more room types than fit on the screen, the grid scrolls right to left. If the block is longer than two weeks, the grid scrolls up and down. Furthermore, in the case that the block is longer than two weeks, Opera prompts you at which date to start viewing the block.
The first time you look at the Original Block Grid all cells are blank. You need to position the cursor on a date and room type for which you wish to block rooms. To enter the number of rooms to block for that room type on that day, enter them in the grid cell.
Note: When the application function Blocks>Master Sub Allocations is active, no Original grid is recorded. The Master Allocation room grid will always start with the Current grid - no matter what the booking status is. This is because pickups are not allowed against the Master Allocation.
Current. This grid is the second grid that is populated once a booking has turned to a status that is Open for Pickup. When this happens, the Original grid is in display mode. Placing the cursor in a cell and entering a value there allows you to change the contents of a cell. The Current Block grid shows the number of rooms currently blocked. This figure includes both picked-up and non-picked-up rooms. Any figures in red mean that all the rooms that have been booked for that room type on that day have been picked-up. You can block rooms in the Current grid by placing the cursor on a particular cell and entering a value. It is not possible to reduce the size of the actual block to a number lower than the number of rooms already picked up for that room type on that day. Any changes to the Current Block grid will be recorded in the block changes log. To edit the Current grid, use the Range or Wash functions, or when your mouse is positioned in the cell, enter a value.
Available. This grid is active when the Current grid is populated and displays the number of rooms per type that are available and remaining to be picked up in this block. As long as you have not picked up any rooms, the Available grid will be identical to the Current Block grid. You can also reduce or increase the block using the Available grid. Changes to the Available grid will affect the Current Block grid as well. For example, if you have eight rooms blocked in a given cell in the Current Block grid and five rooms available in the same cell in the Available grid, if you then change the number of available rooms from five to four, Opera will automatically change the number of rooms in the Current Block grid from eight to seven.
Pickup. (View Only) Displays the number of rooms picked up per Room Type per day. If Opera PMS is being used, this grid is automatically populated from the reservations that are made against this Business Block. Two shares count as one room. It is not possible to change the numbers in this grid. The numbers change only when you make a reservation through the regular or group reservation modules. In certain cases where a guest arrives more than seven days before the date which you are looking at but stays through that day, Opera will not show this reservation. If you add the numbers in the Pickup grid to the numbers in the Available grid, you will get the numbers in the Current Block grid.
Note: When an active OXI interface is present, and the OXI parameter OXI Blocks>Handle Block Sold is set to OPERA->EXT_SYS or TRANSMIT_BOTH_WAYS, picked up counts by occupancy made to the Block Grid will be transmitted via OXI in an outbound message in the following tags for the InventoryNode of the allotment schema:
<mfPickedUpOcc1>
<mfPickedUpOcc2>
<mfPickedUpOcc3>
<mfPickedUpOcc4>
Inbound allotment messages containing this data are ignored.
Contract. Displays the room grid matrix for the Contract. This grid does not deduct from inventory but is used in conjunction with the Sales Contract and can be manipulated without affecting any other grid. Click the right mouse button while you are in the grid and a pull down menu appears. Select the Copy Original Grid to Contract option. The latest Original grid will be copied to the Contract grid. You can manipulate the Contract grid without changing the Original grid. When the Blocks>Autoload Contract Grid application parameter is set to Y, the contract grid will be loaded automatically with the original grid information. Changes to the original grid will also apply to the contract grid until the Turn Off Autoload check box is selected. This flag will be automatically checked by Opera when the booking turns to a Deduct from Inventory status.
Rates. Displays the rates for each occupancy (1 through 4, plus additional person) for the rate code. As the cell can only show up to four digits, all rates of more than 9,999 are displayed in thousands followed by a K (i.e., a rate of 24,000 is displayed as 24K). As soon as you double-click on such a rate, the full rate is displayed. Rates for Leads can also be updated using this feature. Once they are updated, the information can be sent back to SFA.
Note: If you have entered a rate code in the block header, it is not possible to modify the rates using the rate grid. Opera will insert the correct rates for you automatically. If you want to modify the rates. You must first remove the rate code from the block header.
Sell Limits. Available when the Blocks>Sell Limits application function is set to Y, this option displays the number of sell limit rooms. During the block pickup process reservations will pick up against the allotment rooms first. If no allotment rooms are available, the pickup will draw from the sell limit rooms. Sell limits represent a maximum number of rooms that can be picked up against the block, even if the block is elastic. The sell limit can be equal to the allotted rooms or higher, but not less. If the sell limit is equal to the allotted rooms, the block is not elastic for the specific date and room type and pick-up can only be done until the allotted number of rooms is exhausted. If the sell limit is higher than the allotted rooms, the difference between sell limit and allotted rooms is the number of rooms that can be picked up from house against the block on top of the allotted rooms. The sell limit is a cap on the number of rooms that a block can be elastic by for any date and room type. The difference between allotted rooms and sell limit will not be deducted from inventory regardless of the booking status.
Booking Position. Available when the Blocks>Booking Position application function is set to Y, this option displays the booking position total per day. A booking position represents the number of guaranteed tour reservations without a rooming list (guaranteed reservation commitments that are not counted as picked up). You can access the Booking Position when you are in PMS Room Types by selecting ‘Booking Position’ from the Display LOV.
You can enter additional rooms or change the number of rooms in the grid for one room type on one day only. The method for doing this will depend on whether your property has the Blocks>Occupancy Split Per Room Type parameter is set to Y and/or whether the grid belongs to a Master/Sub- Allocation. Grids showing Occupancy Splitting can be printed on rooms Contracts and Offers, giving the client detailed information on room types, rates etc.
On the field you would like to enter or change, type in the number of rooms and then press Enter to confirm. Repeat this step to make changes to other room types if appropriate.
With Occupancy Splitting
Press Enter on the field to be changed to display the Occupancy/Rates screen.
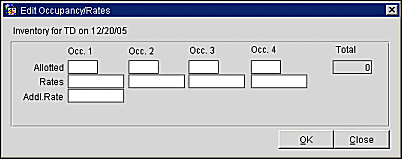
In the top row, enter the number of rooms for single, double, triple or quadruple occupancy for the date indicated. The total of these 4 fields will be displayed in the Total field and in the Occupancy Screen for the date.
You may enter rates for each occupancy in the Rates fields. These will be displayed on the Room Grid when you select the Rates option from the Display list of values.
Note: When you apply manual rates to a room from the Room Grid, then later change that manual rate to a rate code attached to the Posting Master Reservation, you must use the Ellipsis button next to the Rate Code button to select the correct rate code for the reservation. See Room Grid Reservation for more details.
If the Blocks>Sell Limits application parameter is set to Y, you may enter a sell limit. During the block pickup process reservations will pick up against the blocked rooms first. If no blocked rooms are available, the pickup will draw from the sell limit. Reservation pickup cannot exceed the sell limit if Inventory Control field is set to Sell Limit on the Business Block screen.
Highlight a record in the Room Grid and select the Range function button to display the Block Range Setting screen. Ensure that the date range and days of the week are correct.
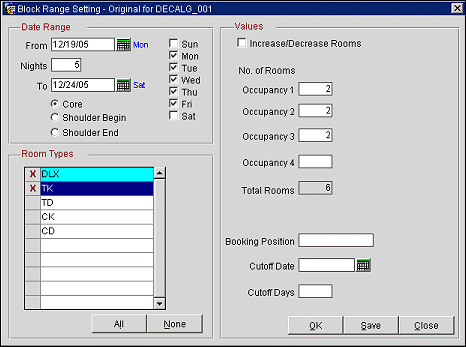
Mark the desired Room Types and type in the number of rooms required per day per occupancy level if the Blocks>Occupancy Split Per Room Type parameter is set to Y and the Sell Limit number of rooms if the Blocks>Sell Limits application parameter is set to Y.
Rates may be set for each occupancy level provided that a rate code has not been specified on the Business Block screen Rooms tab.
Select the OK button. A message will appear, asking confirmation since the Original grid will be altered. Select Yes to save changes and return to the Room Grid.
If the Increase/Decrease Rooms check box is selected, the number of rooms typed into the occupancy 1 – 4 fields will be added to the existing number of rooms, or deducted from the existing number of rooms if a negative number has been typed.
It is also possible to set a cutoff date or cutoff days per room type per day from this screen. An entry here will override the cutoff date or cutoff days for that room type that might have been set from the block header level.
Note: The Block Header will NOT be updated with the values entered here, but the user will be prompted to update these values when the cutoff date is changed from the Block Header.
Rate Override/Reason. Available when the application parameter Blocks>Allow Rate Editing with Rate Code is set to Y. Selection of this option allows you to manually update rates by occupancy on the grid even if a Rate Code is already attached to the booking. When this option is used, you must also select an override reason before proceeding.
Note: Any manual change to the rate amounts that are made through Rate Override are reset when Refresh Rates is executed. Refresh Rates can be manually selected from Options, but will also automatically execute every time the rate code or a profile link is changed.
When attaching a profile that uses Profile Discounts to a block, the rate amount will be reset to the associated discounted amount, and the Rate Override flag will not be available.
Turn off Auto Load Contract Grid. Available when the application parameter Blocks>Autoload Contract Grid is active. Select this option to prevent the Contract Grid from loading with the Initial grid.
Rates. To apply the rates attached to a specific rate code to all of the inventory in the grid at once, select the Rates button. (This will not attach the Rate Code to the block header.)
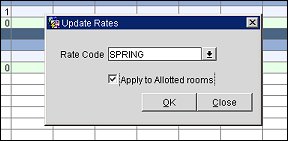
On the Update Rates screen, select the down arrow to choose the rate code whose rates you want to apply to the grid. Select the Apply to Allotted Rooms check box if you wish to apply the rate only to room types that have been booked.
The Rates button will not be available on the grid if the business block already has one or more rate codes attached to the block header. See Select Rate Codes for details.
When the application parameter Blocks>Autoload Contract Grid is set to Y, both the Wash and Range functionality will use the following logic when applied to a Block with a Status of TEN (tentative):
Wash. Remove either a percentage or a fixed number of rooms from the rooms block grid for any number of days, dates, and room types. It is used by hotels that do not routinely hold the same number of rooms out of inventory as are contracted, based either on past experience, the type of business, or industry trends. See Wash for details.
Range. Load the entire block of Room Types with number of rooms and (optionally) rates if they are the same each night. Even if they are not, it is recommended that you use this functionality to load the grid and then edit each date / Room Type as required. See Range for details.
Priorities. Change the Room Types display order on the grid. You would use this feature to re-order Room Types when you have many Room Types and the group may only be using a few of these which are at the end of the listing. Selecting the Priority button displays a message prompt asking, "Would you like to see minimum available rooms?" Selecting Yes loads the maximum and minimum available room numbers, but selecting No does not load the numbers and quickly allows the user to prioritize the room types. See Priorities for details.
Res. The Room Grid Reservation List screen displays a list of reservations that have already been picked up from this block. The list is comprised of those reservations for which the arrival/stay dates include the date where your cursor is positioned, and for which the room type is the same as the room type where your cursor is positioned in the Grid. The PM reservation for the block is also displayed. (If there are no picked up reservations for the room type and arrival/stay date where your cursor is positioned, a message appears: "There are no reservations for block <block name> room type <room type> on <date>.") The Room Grid Reservations List screen lets you create a new reservation for this group or edit an existing one. See Room Grid Reservation for details.
Note: When the Reservation button is selected and a room type with pickup is highlighted, but no post master reservation exists for the block, a message displays, "Post Master reservation will be created. Would you like to continue?" Select Yes to proceed with the creation of the post master reservation. Select No to remain on the Room Grid screen.
Details. View the specific information for the cell/field you have highlighted in your Room Grid. See Details for details.
See Also