|
|
|
Promotion Codes
Promotion Codes are used to configure, identify, and track promotional opportunities. This option is available when the Rates>Promotions application parameter is set to Y. When the OPI<version number>OCIS license code is active, promotion codes generate OCIS membership points. Two types of promotion codes can be configured and applied, those attached to reservations and those attached to profiles.
Profile promotion codes can be configured globally, per property, or for multi- properties and can be attached to different membership types. Profile promotion codes also provide members the opportunity to enroll themselves in a promotion program over the web, through APIs, without the need of an agent.
Application Settings.
Promotion Group Setup. A promotion group (also referred to as a marketing program) is first created, then promotions are created to tie in with the promotion group. Because there are two types of promotions, there are two types of promotion group setups: reservation-based and profile-based.
Creating and applying promotion codes includes the following steps:
Note: You can create both reservation and profile promotion codes if you have the appropriate license codes (ORS/OCIS). Only three promotion codes can be stored on a Stay Record, however. One promotion code is reserved for a Reservation Promotion and the remaining two are for Profile Promotions.
To begin creating promotion codes, select Configuration>Rate Management>Promotions>Promotions Codes. The Promotions Codes - Template screen appears. At the Promotion Codes screen, you configure the promotions and copy them to a property. When the screen first appears, all promotion codes and promotion group codes already configured appear (in ORS, all promotion group and promotional codes for properties within the CRO appear). This screen has typical template functionality. The Template radio button is selected by default.
Promo. Group. The associated promotion group that the promotion code belongs to. (Note that those promotion group codes for profile promotion are identified as having the promotion group of PROFILE. These were selected during promotional code setup.)
Promo. Code. The alphanumeric code identifying the promotion.
Name. The name of the promotion.
Booking Start Date/End Date. The selling start and end dates for this promotion code.
Stay Start Date/End Date. The stay dates for which this promotion code may be used.
Select All/None. (Available at the Template - Promotion Codes screen.) Select all promotions codes on the list or have all promotion codes unselected, where you can begin to select the codes individually. The selected promotions are used in conjunction with the Copy button.
Copy. (Available at the Template - Promotion Codes screen.) Select this button to copy a promotion code to the appropriate property. When ORS is active, you can select multiple properties from the multi-property list or the ORS option to copy to all properties in the CRO.
New. (Available at the Template - Promotion Codes screen.) Select this button to create a new promotion code.
Edit. Select this button to edit an existing promotion code.
Delete. Select this button to delete a promotion code.
To create a new promotion code, select the New button. (New promotion codes may only be created from the Template - Promotion Codes screen. Once the template promotion code is copied to a property, it may be edited for that property.) To edit an existing promotion code, highlight your choice and select the Edit button. The Promotion Codes - New or Promotion Codes - Edit screen appears.
Provide the following information and select the OK button.
Promotion Group. Select the down arrow to choose the promotion group that the promotion code belongs to. (If the promotion group will be associated with a profile promotion, the promotion group is identified as PROFILE. When creating a new profile promotion code, select the PROFILE promotion group from the SID data in the drop down list.)
Promotion Code. An alphanumeric code for the promotion. This code may not be changed once the promotion code is saved.
Limited Use. Only available when the Rates>Parameters>Promotion Coupon Codes application parameter is set to Y. When coupons are linked to a promotion code, select this check box to make the use of the linked coupons "limited" by the number of coupons that are generated. Selecting this check box will also make the Coupons button available.
Name. The name of the Promotion.
Instructions. Enter one line of information. This information is available from the Promotion Details screen that is accessed from the Promotion List screen. If you wish to enter long information, use the Information field. This is also only displayed when the promotion code is viewed.
Category. Enter a category for the highlighted promotion code. You may enter any information, such as the membership program or level. This field is informational only and the system does not perform any validation.
Description. Enter the description of the promotion.
Membership Type. (Available only for profile promotions.) From the drop down list, select the membership type that this promotion code will be associated with. Once selected and copied to the property, the membership type cannot be changed.
Booking Start Date/End Date. (Available only for reservation promotion codes.) Define the selling start and end dates to determine the time frame this promotion code is active.
Stay Start Date/End Date. Define the stay dates for which this promotion code may be used.
Check In/Check Out Time. (Available only for reservation promotion codes.) Enter the times of check in and check out (for information purposes only).
Upgrade Allowed. (Available only for reservation promotion codes.) Select this checkbox if the promotion signifies a room upgrade (for information purposes only).
Authorizer. (Available when the OPP_GCA Comp Accounting add-on license code is active. Available at the Property level only.) Select the down arrow to choose a default Authorizer for the specific promotion code. Only authorizers that have a Status of Active are displayed in this list. The authorizer set in this field will automatically populate to the Authorizer field when the specific promotion code they have been assigned to is selected on the Reservation screen.
Information. Select the down arrow to enter free text comments that further describe the promotion code. This information is available from the Promotion Details screen that is accessed from the Promotion List screen.
Coupons. Only available when the Rates>Parameters>Promotion Coupon Codes application parameter is set to Y and the Limited Use check box is selected. Select this button to generate unique coupon codes based on the promotion code and batch export them as a file. The coupons can be distributed to guests so that they can use them when making a reservation through the Web or directly with central reservations or the hotel. To learn how to setup and generate coupons for promotion codes, see Generating and Exporting Coupon Codes.
Only available when the Rates>Parameters>Promotion Linked to Payment Methods application parameter is set to Y for a property. Select the Payment button from the Promotion Codes New or Edit screen to open a Payment Types list of values and choose one or more payment types to link to the promotion code. When a reservation is made using the promotion code, only the payment types linked to the code will display in the Payment field of the Reservation screen. When a credit card interface is installed, if a front desk agent swipes a different credit card from the one linked to the promotion code (e.g., a Visa instead of an AMEX), a warning message will display. Multiple payment types can be selected and linked to the promotion code.
Example:
Promotion Code SPECIAL AMEX is created and linked to payment method AMEX. When a user creates a reservation using this promotion code, the Payment field on the Reservation screen will only show AMEX payment method as available for selection. If the wrong payment type is swiped (e.g., Visa instead of Amex), the system will still validate the payment type but a "wrong payment type" warning will be displayed to the user.
Use this feature to make specific rates available when a promotion code is attached to the reservation.
Note: If a rate code has been attached to a promotion code and you perform a Rate Query (F5) in PMS and select this promotion code, only the rate code(s) attached to the promotion will be displayed.
To view, add, and edit the rate codes associated with the promotion code, select the Rate Code button from the Promotion Codes New or Edit screen. (This button is available for reservation promotion codes only.) The Promotion Rate Codes screen appears showing a list of the rate codes already associated with the promotion code.
Select the New button to add a new rate code to the promotion code. Make your choice from the Rate Codes LOV that appears. In the Use Description field, enter the description of this rate code that you want to appear when you view the details of the promotion from the Promotion List screen. To edit the rate code Use Description, highlight your choice and select the Edit button.
Select the Routing button to implement promotion code routing for this promotion code. (This feature is available when the OPP_GCA Comp Accounting add-on license code is active and the Cashiering>Routing application function is set to Y.) With promotion code routing, default comp routing instructions can be automatically added to the reservation when the promotion code is selected.
Note: Comp window routing (see Routing Transactions for details) may be applied to a reservation along with promotion code routing provided there is no overlap of transaction codes between the two routing instructions. Promotion code routed charges will be sent to the next available comp window (101 - 108) on the Billing screen; if no new comp window is available (i.e., if 101 through 108 are already defined), the default routing will not populate.
If promotion code routing has already been set up for this promotion code, the Promotion Routing screen appears. (Otherwise, the Promotion Routing - New screen appears.)
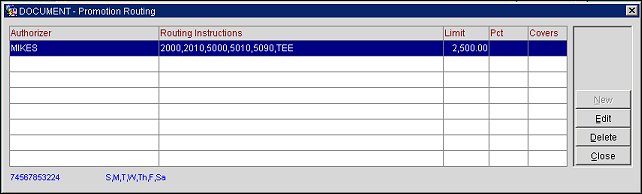
Note: Only one routing instruction may be configured per promotion code. Therefore, the New button is not available on this screen.
If the highlighted promotion routing details include a generic membership number, it is displayed at the bottom of the screen. The days of the week when the highlighted routing is available is also shown
To edit the existing routing for this promotion code, highlight your choice and select the Edit button. The Promotion Routing - Edit screen appears.
The Comp radio button is selected by default when the Promotion Routing screen is accessed. This selection may not be changed.
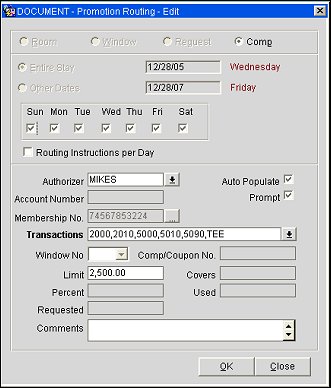
Provide the following information and select the OK button.
Entire Stay. By default, the Entire Stay radio button is selected and the routing instruction will be in-effect for the entire stay of the current guest. The start date and end date of the guest's stay are shown in the Begin Date and End Date fields. These fields cannot be edited.
Other Dates. Restricts the transaction routing to a certain range of dates during the guest's stay or sets up daily routing instructions and routing limits for a reservation. This field may not be edited.
Days of the Week. Select the check box(es) for the days of the week on which the routing instruction should be active. The default is all days of the week. Promotion Routing is effective for a guest's Entire Stay and this may not be modified here, but can be changed when the routing is attached to a reservation.
Routing Instructions per Day. Select this check box if you wish to generate a separate routing instruction for each day of the stay. This may be useful, for example, when you want the routing limit to apply to each day of the stay rather than to the entire stay or to a range of dates. See Routing Instructions Per Day in Routing Transactions for more information. This option is available when the Cashiering>Routing Limits application function is set to Y. The check box is selected by default if the Cashiering>Default Routing Instructions Per Day application setting is set to Y.
Authorizer. Select the down arrow to choose a default authorizer for this promotion code routing. If no authorizer is selected here, you will be prompted to select an authorizer when this promotion code routing is applied to a reservation.
Account Number. The AR account number attached to the authorizer selected in the Authorizer field appears here. This field may not be edited.
Auto Populate. Available if the Reservations>Autopopulation of Routing Instructions application parameter is set to Y. Select this check box to automatically add this promotion code routing to a reservation without prompting for a selection from the Routing Instructions screen unless there are other default routings available (e.g., default routings attached to a Company of Agent). If other default routing is available, or if the Auto Populate check box is not selected, the Routing Instructions screen appears, allowing you to select the routing you wish to apply to the reservation.
Prompt. Select this check box if you wish to display the Routing Instructions screen when the reservation having this promotion code routing assigned is saved. The authorizer and other features of the routing instruction may be edited from this screen. See Routing Transactions for details.
Membership No. Available only when the Comp Accounting>Generic Comp Member No application parameter is set to Y. Select the ellipsis button to choose a generic membership number. Only generic profiles that have a membership number belonging to the member type defined in the Comp Accounting>PTS Membership Type can be used to provide generic membership numbers.
Transactions. Select the down arrow to choose the Comp Accounting transaction codes and/or routing codes that will be covered by this promotion code routing. If you have selected an authorizer, only the transaction codes/routing codes configured for that authorizer are available for selection.
Note: The number of transaction codes that can be selected can't exceed a total of 32767 total characters.
Window No. Select the down arrow to choose the comp window to which the transactions will be routed.
Comp/Coupon No. Identifying number for comps or coupons; when a charge is posted for this routing instruction, the number can be used to identify the charge on the guest's folio. In addition, the patron tracking system (PTS) can post against this number if the Opera Gaming Interface license (e.g., OPX_BALL, OPX_ACRS, and others) is active. This field may not be edited.
Note: Only one routing limit feature may be set up for a given date or range of dates: either a routing limit amount (entered in the Limit field), or a routing percentage (entered in the Percent field), or a number of covers (entered in the Covers field).
Limit/Used. Available when the Cashiering>Routing Limits application function is set to Y (the default when the Comp Accounting OPP_GCA license code is active). In the Limit field enter the total amount that you wish to comp for the transaction code(s) and/or routing code(s) selected in the Transactions field. The Used view-only field shows the amount (if any) the guest has already charged that is associated with the transaction code(s) and/or routing code(s) you have selected for this comp instruction.
The amount entered in the Limit field may not exceed the per-instance credit limit on the transaction code or codes configured for the authorizer who is approving this routing instruction. The authorizers limit for the selected transaction codes appears in this field by default. The Limit amount may be set lower than the authorizers per instance credit limit, but may not go over it. (See Configuring Authorizers.)
When charges for which a comp routing instruction applies are made to the guests bill, the comped amount is automatically transferred to the comp window identified by the comp routing instruction. Should the charge exceed the amount specified by the Limit field on the Routing Instructions screen, the overage will automatically be routed to the guest's window 1 (also called the cash window).
Percent/Used. Available when the Cashiering>Routing Limits application function is set to Y (the default when the Comp Accounting OPP_GCA license code is active). Use this field to comp a percentage of the transactions associated with this routing instruction. For example, enter 10 in this field to comp 10% of each transaction. Generates such as taxes and service charges are also split by the designated percentage. The Used view-only field shows the amount (if any) the guest has already charged that is associated with the transaction code(s) and/or routing code(s) you have selected for this comp instruction.
Note: If a routing Percent is entered (rather than a Limit amount), the authorizer's per-instance limit is ignored. For example, assume comp routing is set up for transaction code 2000 and that the authorizer's limit for this transaction code is $100. Also assume that the routing Percent is set at 50%. If $400 is posted to the guest's bill, $200 will be sent to the comp window specified by the routing instruction.
Covers/Used. This field is available when the Cashiering>Routing Limits application function is set to Y. For interface (e.g., POS) postings only. Specify the number of covers the value of which is to be routed by this routing instruction.
When charges are made via an interface against any of the transaction codes included by the routing instruction, Opera divides each charge by the number of covers specified by the interface. If the number of POS covers is greater than or equal to the number of covers specified here on the routing instruction, the per-cover charge is multiplied by the number of covers on the routing instruction and that amount is routed. If the number of POS covers is less than the number of covers on the routing instruction, the charge will not be routed.
Requested. When converting a comp request to a comp instruction, the requester's name appears here. If the authorizer has initiated the comp instruction, this field is not available.
Comments. Enter any relevant comments here.
To copy a promotion code and associate it with a property(s), select the Template radio button. The Template - Promotion Codes screen appears.
Note: When the OPR<version number>ORS license code is active, you can copy the selected promotion codes to all properties in the CRO by selecting the ORS option from the LOV.
See Also