
|
|
|
Post-It
Post-It functionality provides a convenient interface for posting charges for transaction code articles that have been configured for your property. Articles might include snacks, drinks, sundries, toiletry items, and so forth. (See Articles Setup for details on article configuration. You will also need to set up a print task to handle printing of folios and receipts for Post-It transactions. See Print Tasks for details. ) The Post-It feature is available when the Cashiering>Articles application function is set to Y and the Cashiering>Post It application parameter is set to Y.
Note: When the Cashiering>Post It application parameter is activated, an Opera profile is created for "Post It". The Post It profile is not accessible via the Profile Search screen and may not be edited or deleted.
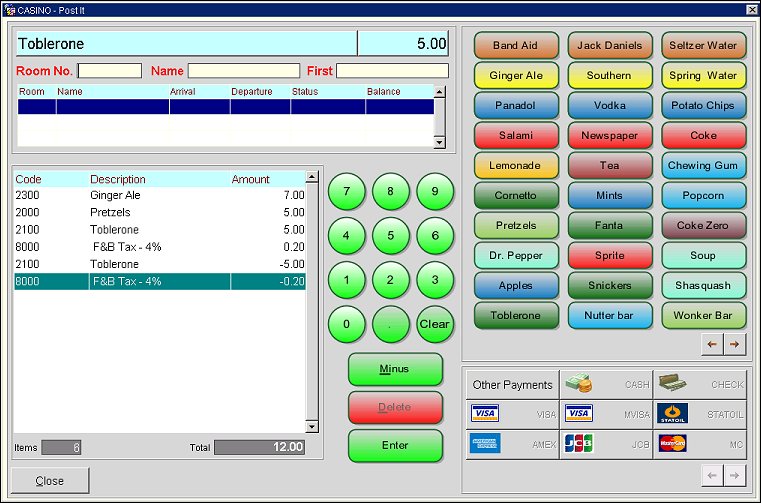
Select Cashiering>Post-It to access the Post It feature. The Post-It screen appears. (The Cashiering>POST IT user permission controls access to the Post-It feature.)
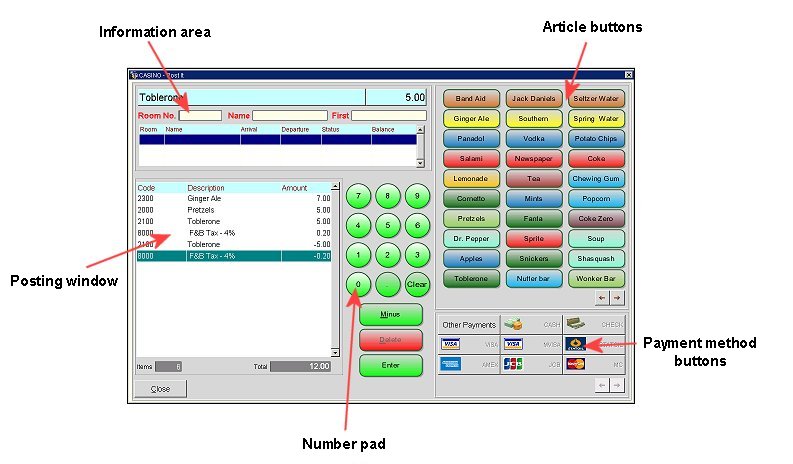
The screen has several functional areas.
Article buttons. The article buttons represent the items that can be charged using the Post It screen. When you select an article button, that article, and its price (and associated taxes) appear in the posting window. Use the arrow buttons to display additional article buttons, if available. A maximum of 90 articles can appear on the Post-it screen. The article appears on the Post-It screen only when a default price is configured for it in Articles Setup.
Posting window. The posting window displays the articles and related charges and transaction codes, as they are posted. Below the list of articles and related charges are two fields:
Note: The list of posted articles and the Items and Total fields are read only and may not be directly edited. See Reversing a Posting, below, if you wish to reverse a posting or make a refund.
Information area. The function of the information area changes depending your activity. For example, when you are posting articles, the article name and price appears in this area. When you are posting charges to a room, the information area allows you to search for the room number and the guest's name. When you are accepting payment by credit card, the credit card number and expiration date are entered into the information area.
Payment method buttons. When the guest is ready to pay for the articles that have been posted, the payment method buttons allow you to select the way the guest will pay for these charges. There are separate payment method buttons for different types of credit cards, for cash, check, and for posting the charges to the guest's room. Use the arrow buttons to display additional payment method buttons, if available.
All payment methods that are to be displayed on the Post-It screen must have a display code assigned to their respective transaction codes on the Transaction Code Setup screen. Unless there is a display code assigned, the payment method will not display on the Post-It screen. The order of the payment method buttons is determined by the sequence number assigned to the payment method. (See Payment Type screen for details.) If no sequence number has been assigned to the payment method, the payment method's transaction code sequence number will be used.
Note: The Chip and PIN payment method is not available for Post-It.
Number pad. The number pad appears when you need to enter alphanumeric information, for example, when you have selected the Room Charge payment method button or when you have chosen a credit card payment method button.
Close button. After charges are either paid or settled to a room, select the Close button (in the lower left hand corner of the screen) to close the Post-It screen. If Close is selected while there are still unsettled charges on the screen, you are prompted: "Sale has not been completed. Would you like to cancel this sale and exit?" Respond Yes to reverse all posted charges (so that no posting takes place)and close the screen. Select No to continue working with the Post-It screen.
The sections which follow provide information on the major functions available from the Post It screen.
To post an article, simply select the appropriate article button. The article and its price appear in the information area and are added to the list of posted articles in the posting window. The article button may be selected multiple times to post more than one of the same article.
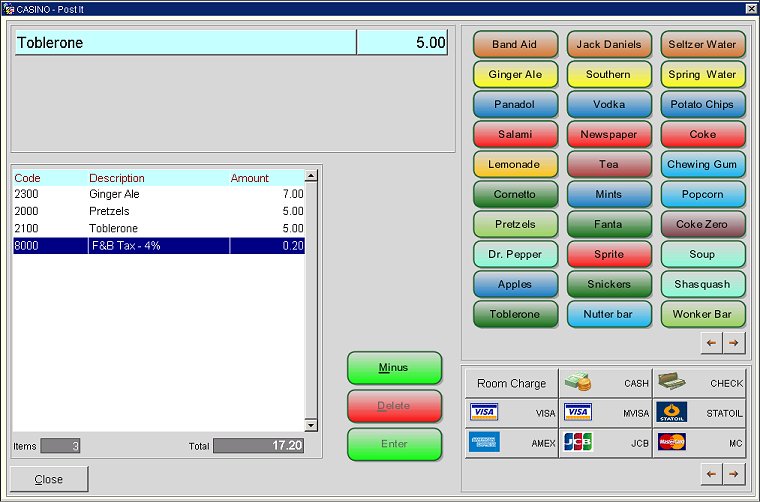
Once an article has been posted on the Post-It screen, you may reverse the charge (post a negative amount) by selecting the Minus button, then again selecting the article button. You may use this method to post a refund whether or not the article being refunded has previously been added to the posting window (for example, if the guest wishes to obtain a refund on an article purchased during an earlier visit to the property). When you use the Minus button to reverse a charge the article is posted in the posting window with a negative amount (including related taxes, if any).
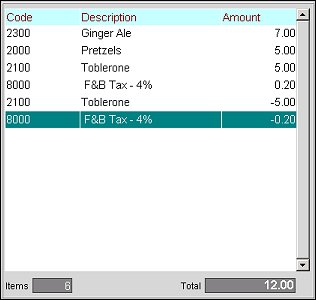
To delete a posting from the posting window and remove the associated charge (and taxes, if any), highlight the item in the posting window and select the Delete button. The charge will be removed from the posting window and the total of the posted charges will be reduced accordingly.
Note: When a tax is associated with a posted article that you wish to delete, highlight the article posting, not the tax posting, in order to delete the article posting and the associated tax. The Delete button is not available when a tax transaction is highlighted/selected in the posting window.
To complete the sale, select a payment method button. For cash and check payment methods, selecting the payment method button completes the sale.
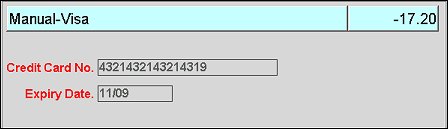
For credit card payment methods, use the number pad to enter the credit card number and expiration date in the information area. When you have done so, press the Enter button to complete the sale. The Clear button on the number pad will clear the credit card number and expiry date or the room/first/last name, if entered. When the ![]() icon is displayed at the end of the Credit Card No. field, this means the Credit Card Vault functionality is active. See Credit Card Vault for details.
icon is displayed at the end of the Credit Card No. field, this means the Credit Card Vault functionality is active. See Credit Card Vault for details.
Once the Sale Completed message appears, select the OK button to clear the Post It screen for the next transaction.
The payment receipt for Post-It transactions is the same as the sample.payment.receipt used from the Billing screen. This receipt is configured in the Payment Receipts report group as usual. (The POST_IT print task must be configured in order to access the Post-It screen.) The number assigned to this receipt is based on a separate sequence that is used specifically for receipts generated from the Post-It screen. The Cashiering>Print Receipt application setting controls receipt printing as follows:
A record of the receipt is saved in Receipt History (Cashiering>Cashier Functions>Receipt History) with a receipt number. The Name field on the Receipt History screen shows "Post-It" followed by an internally-generated reference number (e.g., Post It No. 16502).
Note: When the Cashiering>Permanent Folio Storage application parameter is set to Y, the Cashiering>Folio Printing (1-8) application setting is set to ALWAYS or YES, and a folio is printed, an exact copy of the folio that is generated is stored in a subfolder of the Export folder at a location, for example D:\micros\opera\export\<schema_name>\<resort>\folios\<business date>, and will be titled by the business date in which the folio was generated. But if the Cashiering>Folio Printing (1-8) is set to NO and the folio is printed, then the folio will not be printed or stored.
Note: When the Cashiering>Fiscal Folio Printing application parameter is set to Y, a fiscal folio xml file is sent to the fiscal folio printer for Post-it transactions. The internal Opera "Post-It" profile is used for these transactions.
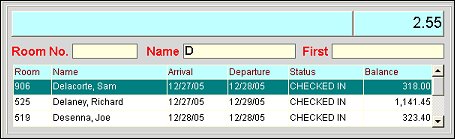
Instead of paying for the charges immediately at the time of purchase, the guest may wish to charge the posted articles to a room. This way, the article postings will appear on the Billing screen for the reservation associated with that room; the charges will be handled through interim billing or settlement at check out. To post charges to a room, select the Room Charge button in the payment method buttons area. When you select Room Charge, the information area displays search fields that allow you to search for the room to which the charge will be posted. In addition, the number pad buttons appear so that you may enter the room number for which you wish to search.
Note: When you select the Room Charge button, the button label changes to Other Payments. Select Other Payments if you wish to choose a payment method other than Room Charge.
To search for a room, use the number pad to enter the room number (or first part of the room number) in the Room No. search field. Alternatively, you may use your keyboard to enter the guest's name in the Last Name and First Name search fields. Select the Enter button on the Post-it screen, the Tab key on your keyboard, or the Enter key on your keyboard to display a list of possible matches below the search fields in the information area. To help you make your selection, the list includes the room number, guest name, arrival and departure dates, reservation status, and balance.
When you tab out of the search fields, the Enter button toggles to become the Select Guest button. Highlight your choice and select the Select Guest button to post the charges to the selected room and complete the sale.
Once the Sale Completed message appears, select the OK button to clear the Post-It screen for the next transaction. No folio is generated if the charges are posted to a guest's room.
See Also