
|
|
|
Merge Profiles
To keep the Opera database trim and up-to-date, to ensure accurate profile statistics, and to reduce staff confusion, use the Merge Profiles feature to combine (merge) duplicate profiles. See Merge Rules, below, for information on how profile data is managed in the merge process.
There are two basic ways to go about merging profiles.
Using the Profile Search screen, search for the profile that is to remain in your system (the original profile).
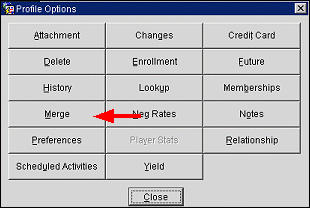
Highlight the original profile in the search grid and select the Edit button to display the original profile. From the Profile screen, select the Options button. The Profile Options screen appears. Select the Merge button.
The Profile Search (Merge) screen appears. (For more information on the search criteria and field descriptions of this screen, refer to the Profile Search Screen topic.)
Note: If the Profiles>Restrict Profile Name Change After Folio Creation application parameter is set to Y and a folio or invoice has been generated for the Payee and/or Guest, the Merge button will not be active as a Profile name can't be modified.
The Profile Search (Merge) screen appears after the Merge button has been selected from the Profile Options menu. Use this specialized Profile Search screen to locate the profile that you want to merge into the original profile. (If there are multiple profiles that you wish to merge into the original profile, each one must be merged separately using this process. Alternatively, see Merging One or Multiple Profiles into the Original Profile, below, for details on how to merge multiple profiles into the original profile.) When the Profiles>Advanced Profile Merge application parameter is set to Y, users will be taken directly to the Profile Merge - Advanced screen.
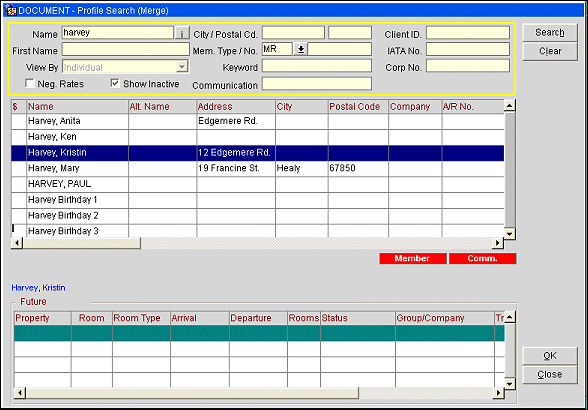
Highlight the profile that you want to merge into the original profile and select the OK button. The merge process begins by displaying the Profile Merge screen.
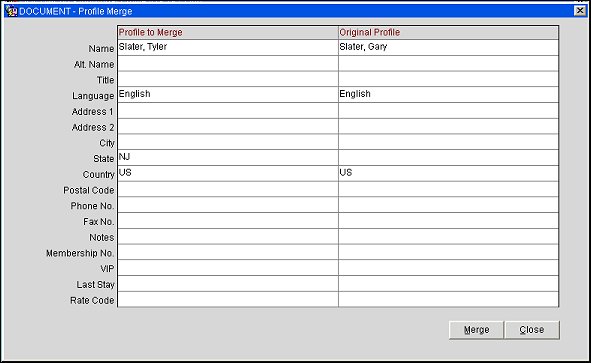
This screen shows the information from the original profile in the right (Original Profile) column and the profile to be merged into the original in the left (Profile To Merge) column. Following the merge, the merged profile in the left column will be deleted. Compare the information in both columns to make sure that you have selected the correct profiles for the merge before proceeding. (The merge action cannot be undone.) Following is a description of the Profile Merge screen fields. (See Merge Rules, below, for an explanation of how profile data is handled in the merge process.)
Profile to Merge. This profile will no longer exist after the merge process.
Original Profile. This profile will continue to exist and will absorb all the contacts, activities, business blocks, reservations, stay details, and statistical information from the profile to merge.
Following is a description of the Profile Merge screen fields. (See Merge Rules, below, for an explanation of how profile data is handled in the merge process.)
Note: When an Account or Contact profile is merged, the following fields will also be merged with duplicates being discarded:
Owner
Rooms Potential
Scope
Scope City
Action Code
Business Segment
Source
Industry Code
Competition Code
Name. Profile name.
Note: When the application parameter Profiles>Extended Account Name Search is set to Y an additional field, Name 2, is also available for a merge and displays directly under the Name field.
Alt. Name. When the General>Alternate Name application function is set to Y, the alternate name field appears and displays the alternate name for the profile, if previously entered in the profile.
Title. Title attached to this profile if it is an individual profile type.
Note: When merging profiles, if the Original Profile has a title, the Merged Profile will take the title of the Original Profile. However, if the Original Profile does not have a title and the Profile to Merge does have a title, the Merged Profile will take the title of the Profile to Merge. If neither the Original Profile nor the Profile to Merge has a title, then the Merged Profile will not take a title. In addition, if an Envelope Greeting and/or a Salutation is configured for the title, the Merged Profile will inherit this from the title.
Language. Language attached to this profile if it is an individual profile type.
Address 1. First line of the address for this profile's primary address.
Address 2. Second line of the address for this profile's primary address.
City. City for this profile's primary address.
State. State for this profile's primary address.
Country. Country for this profile's primary address.
Postal Code. Postal code for this profile's primary address.
Phone Number. Primary phone number for this profile.
Fax Number. Primary fax number for this profile.
Notes. Most recent note entered for this profile.
Membership No. Loyalty program membership number for this profile.
Note: When the OPP_GCA Comp Accounting license code is active, profiles may have a player ID (PTS membership ID) assigned. The PTS membership type is designated by the Comp Accounting>PTS Membership Type application setting. The fact that one or both of the profiles being merged have a player ID will not prevent the profiles from being merged.
VIP. VIP status of this profile.
Last Stay. Arrival date of this profile's last stay.
Rate Code. Negotiated rate(s) attached to this profile.
Select the Merge button to complete the merge.
Note: You cannot stop the merge process once you select the Merge button. You cannot undo a merge.
(If you decide not to perform the merge, select the Close button.) A screen displays messages as profile information is merged.
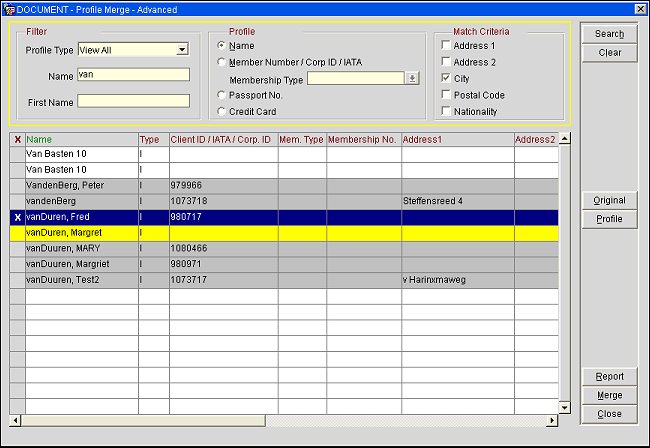
This option is available when the Profiles>Advanced Profile Merge application function is set to Y. Select the Miscellaneous>Profile Merge option from the menu bar options. The Profile Merge - Advanced screen appears.
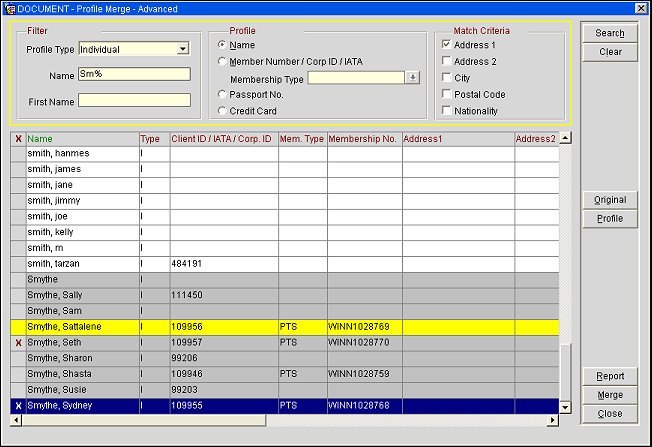
Search for a list of the profiles that will be candidates for the merge by entering your search options and selecting the Search button. All profiles that meet your search criteria will be displayed in the search results grid. Possible duplicates are highlighted in gray/white.
(See Merge Rules, below, for an explanation of how profile data is handled in the merge process.)
Profile Type. Select the down arrow to choose a profile type: Individual, Company, Travel Agent, Source (available when the Profiles>Source application function is set to Y), Group, Contact, or View All. View All displays all profile types grouped by profile type.
Name. Enter the name you wish to search for. (Enter the last name for Individual or Contact profile types.) If you access the Profile Merge - Advanced screen by selecting the Merge button from the Profile Options menu for a given profile, the name of the profile appears here by default. You may change the name if you wish. Opera will search on partial names as well as complete names. A partial name consists of one or more of the beginning characters of the name. (E.g., S, SM, SMI, and SMIT are all partial names for Smith, Smithe, Smithers, and so on.)
Use the % wildcard to stand for any one or more characters or spaces. (E.g., SM%TH represents Smith, Smythe, Smithe, Smithers, Smathers, Smithson, Smoothey, and so on.) Opera ignores case in this field so you may use upper case, lower case, or a mix.
Example:
Assume all the following profiles have the same address:
1. Smith-Peterson Wedding
2. Smith-Petersen Wedding
3. Smith Wedding
4. Smith-Peterson's Wedding
The following advanced searches with Postal Code as the match criteria would have the following results:
Smith-Peterson% would return profiles 1 and 4 as possible duplicates
Smith%wedding would return profiles 1, 2, 3, and 4 as possible duplicates
%wedding% would return profiles 1, 2, 3, and 4 as possible duplicates
Smith-Peters% would return profiles 1, 2, and 4 as possible duplicates
First Name. Enter the first name of the Individual or Contact profile you wish to search for. (This field is not available for View All, Company, Travel Agent, Source, and Group profile types.) If you access the Profile Merge - Advanced screen by selecting the Merge button from the Profile Options menu for a given Individual or Contact profile, the first name of the profile appears here by default. You may change the name if you wish. Opera will search on partial names as well as complete names. A partial name consists of one or more of the beginning characters of the name. (E.g., J, JO, and JOH, are all partial names for John, Johnathan, Johan, etc.) Use the % wildcard to stand for any one or more characters or spaces. (E.g., J%N represents Jan, Jean, Joann, John, Jonathan, and so on.) Opera ignores case in this field so you may use upper case, lower case, or a mix.
Name. Select this radio button to search for profiles having the same name along with any one or more options in the Match Criteria section. (At least one Match Criteria option must be chosen.)
Member Number/Corp ID/IATA. Select this radio button to search for profiles having duplicate membership numbers (or for company and travel agent profiles, duplicate corporate ID numbers or IATA numbers). When you select this option, the Membership Type field becomes available. The options in the Match Criteria section become unavailable.
Membership Type. Available when the Member Number radio button is selected. Select the down arrow to choose the membership type(s) you wish to use to control the search for duplicate membership numbers.
Passport No. Select this radio button to search for profiles having duplicate passport numbers. The options in the Match Criteria section become unavailable.
Credit Card. Select this radio button to search for profiles having duplicate credit card numbers. The options in the Match Criteria section become unavailable.
These options work in conjunction with the Name selection in the Profile section of the search criteria. One or more of these options may be chosen.
Address 1. Select this check box to search for profiles with duplicate Address 1 information (first line of the address) for the primary address.
Address 2. Select this check box to search for profiles with duplicate Address 2 information (second line of the address) for the primary address.
City. Select this check box to search for profiles with duplicate City information on their primary address.
Postal Code. Select this check box to search for profiles with duplicate Postal Codes on their primary address.
Nationality. Select this check box to search for profiles with duplicate Nationality information.
The following columns are included in the search results grid. You may click on a column header to sort the display by that information. The column header is shown in green when it has been chosen as a sort option.
You may double-click on any record or highlight the record and select the Profile button to display the complete Profile screen.
Note: If you edit a profile which has been displayed by double-clicking on a profile record in the search results grid or by selecting the Profile button, the search results grid refreshes to reflect the change. Such changes will be taken into consideration by the matching criteria and the record may no longer be visible.
X. Click in this column to mark an X next to the profiles you want to have merged into the profile you select as the original profile. You may mark as many profiles as you like to be merged into the original profile. The profile(s) you mark with an X will be absorbed into the original profile and will no longer exist following the merge. Profiles can only be marked once an original profile has been selected. Only profiles of the same profile type may be marked.
Name. Profile name.
Type. Profile type. I = Individual, C = Company, G = Group, T = Travel Agent, CT = Contact, S = Source.
Mem. Type. Membership types associated with the profile.
Membership Number. Membership number for profiles associated with a loyalty, frequent flyer, or gaming program.
Client ID/IATA/Corp. No. Client ID, IATA number (for travel agent or source profiles) or Corporate number (for company profiles) associated with the profile.
Address 1. Address 1 information (first line of the address) for the primary address.
Address 2. Address 2 information (second line of the address) for the primary address.
City. City information on this profile's primary address.
Postal Code. Postal code for this profile's primary address.
State. State for this profile's primary address.
Country. Country for this profile's primary address.
Last Stay. Arrival date of the profile's last stay. (This information can help you identify the most up-to-date profile information when there are duplicates.)
Passport. Passport number associated with the profile.
Note: When the Passport/ID Number View permission is not granted to the user, then the Passport/ID Number will be masked with X's except for the last two numbers.
Credit Card Number. Credit card number associated with the profile.
Nationality. Nationality associated with the profile.
Original. This button is available when the search results grid has been populated. To designate the original profile for your merge, highlight the profile record and select this button. The profile you designate as the original profile will have a yellow background. (In addition, when the original profile is highlighted, the word "Original" appears in blue text in the lower left-hand corner of the screen, below the grid.) Only one profile may be selected as the original profile. If you change your mind and wish to choose a different original profile, highlight your new choice for the original profile and again select the Original button.
Note: When you change your choice of the original profile, the last-selected original profile is no longer selected to be merged.
Note: When the profile you have chosen as the original is highlighted, selecting the Original button again undoes your selection of that profile as the original. Because an original profile must be selected in order to mark other profiles to be merged into the original, in this scenario any profiles you may have chosen to be merged into the original will be automatically unselected.
Merge. When you have selected an original profile and one or more profiles to merge into the original profile, this button becomes available. Select the Merge button to complete the merge process.
Report. Select this button to prepare a Duplicate Profiles Report (prduplicateprofile.rep). The search criteria specified on the Profile Merge - Advanced screen are carried over to the report options screen. If no search criteria have been defined, the report options screen opens with the default values selected. You may change these options before running the report.
To merge one or more profiles into the original profile, use the search criteria on the Profile Merge - Advanced screen to list the candidates for merging. You may click on the search results grid column headers sort the results.
Once the search results have populated the search results grid, the Original button becomes available. Highlight the profile that is to be the original profile (the profile that will remain after other profiles have been merged into it) and select the Original button. The profile record you have chosen as the original profile will be highlighted in yellow to set it apart from the other profiles in your search results.
Note: An original profile must be selected before you can select other profiles to be merged into the original.
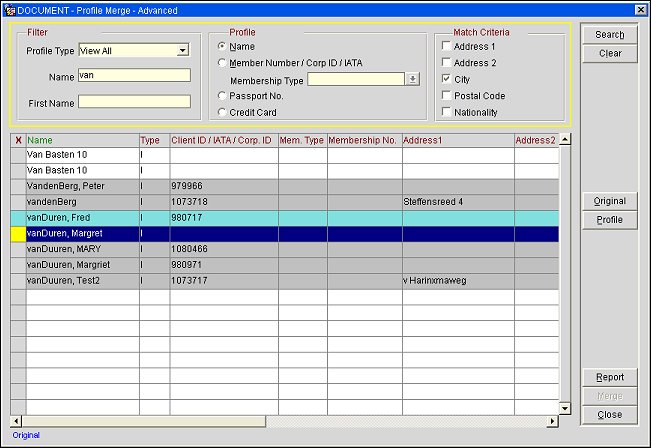
Now mark an X in the X column next to the one or more other profiles that you wish to merge into the original profile. The original profile, which is highlighted in yellow, may not be marked. You may scroll left and right to see the details associated with each profile, or you may double click on a profile record to display the complete profile. (See Merge Rules, below, for an explanation of how profile data is handled in the merge process.)
When you are ready, select the Merge button to complete the merge process. The profiles marked with an X will be absorbed into the original profile and will no longer exist following the merge.
Note: You cannot stop the merge process once you select the Merge button. You cannot undo a merge.
Messages will display as the merge progresses.
Following the merge, the profile record designated as the original profile will remain highlighted in yellow, and the profiles you selected to merge into the original profile will be highlighted in cyan (light blue).
You may select additional profiles to be merged into the original profile if you like. However, the already-merged profiles (in cyan) cannot be selected for merging and, if these profiles are highlighted, the Original button and the Profile button are unavailable.
The Merge button will become available once you have selected one or more still-existing profiles to be merged into the original.
If no additional matches were found after the initial merge, the original profile will no longer be displayed.
![]()
The following rules govern how data is merged in the profile merge process:
Note: In the case where the Advanced Profile Merge feature is used in PMS or S&C (see Merging One or Multiple Profiles into the Original Profile, above), and if there are multiple duplicate profiles being merged into the original profile, the selected duplicate profiles will be merged into the original profile in the order in which they are displayed on the search results grid.
For Name, Title, Language, and VIP, if the original profile has data in a compared field, it is kept and the corresponding data in the merged profile is disregarded. If the original profile does not have data in the compared field, and the merged profile does have data, the merged profile data is copied to the original profile. (When the General>Alternate Name application function is set to Y, the alternate name field appears and displays the alternate name, if previously entered in the profile. The alternate name helps identify the profile and is also merged).
For Address, Phone, Notes, and Rate Codes, more than one entry of each type can be stored for the profile. Therefore, information in the merged profile will be carried over to the original profile where it will join the data belonging to the original profile.
For Memberships, a profile can have multiple membership types associated with it. Therefore, if the merged profile has information for a membership type that is different from any of the membership types on the original profile, information in the merged profile will be carried over to the original profile where it will join the data belonging to the original profile. However, the following rules take effect if the original profile and the merged profile have the same membership type attached.
For Last Stay, the most recent stay date is kept. Stay details from both profiles are merged.
Note: Profiles cannot be merged if one of the profiles has an outstanding AR balance. In addition, travel agent profiles and source profiles cannot be merged if the two profiles have different bank accounts or if one or both profiles have pending unreconciled commission payments.
Note: In PMS environments where the OPX_ORS license is active, Opera allows the merging of two travel agent or source profiles that have identical IATA numbers (assuming all merge criteria are met) regardless of the Profiles>Allow Duplicate IDs application parameter.
Example: Profile 2 is being merged to Profile 1 so that the name_id of Profile 2 will be changed to the name_id of Profile 1.
Profiles will not be merged if the following conditions exist:
When the Profiles>Allow Profile Merge with AR Accounts or Commissions application parameter is set to Y, merging profiles that have AR accounts or commissions in a single property or in different properties in a multi-property environment is possible. In order for the merge to complete, one or both of the profiles must meet certain criteria.
![]()
In ORS (when the OPR<version number>ORS license code is active), if certain settings are enabled, the system will accept duplicate profile name codes across chains. The Chain Ownership and Chain Ownership Profiles Types application settings must be defined, as below:
In ORS, users can merge individual (guest profiles) with contacts when the parameter Global>Profiles>Parameters>MERGE CONTACT WITH DIRECT GUEST is set to Y. The system will display contacts and merge the contact with the direct guest profile. When set to N, contacts will not display and a contact and guest profile cannot be merged.
Profiles created through Opera or the web, which have a Web User account attached to the Opera profile, may now be merged as well through this process.
This screen contains three panels and is similar to the ORSMERGE Suspended Profiles three panel screen.
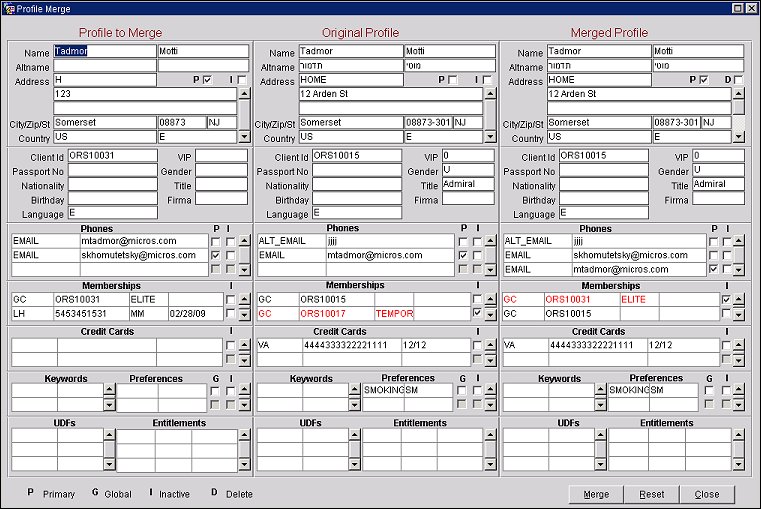
The center panel shows the information from the original profile (Original Profile). The column to the left of the Original Profile contains the profile that was merged (Profile To Merge) into the original. Compare the information in both columns to make sure that you have selected the correct profiles for the merge before proceeding. (The merge action cannot be undone.) The column on the right displays the results of the merged profile. You may make changes to the Merged Profile for standardization or corrections (with the exception of fields that are LOV-based, as Opera does not validate against those fields). When you are confident you have the correct information in the Merged Profile fields, select the Merge button to insert the final data into the ORS database. You are returned to the newly merged profile.
Enter the guest's address (mailing address, city, postal code and extension, country, and state. Please note that if postal codes for the city, state, and country have been configured in Configuration>Profiles>Geographic Data>Cities and Postal Codes, if you enter an existing postal code the city and state will automatically populate. If you enter an existing postal code that exists for more than one city or state, the first city or state configured automatically populates; you can then change to the other configured city or state, if necessary. If you enter an existing postal code, but it doesn't match the current state, a message displays such as "Postal Code is not in the valid range." If you enter a postal code that has not been configured, you may enter any state and city without an error message.
Following is a description of the Profile Merge screen fields. (See Merge Rules, above, for an explanation of how profile data is handled in the merge process.)
P Checkbox. Indicates Primary address or Primary phone, where appropriate. For example, if you want the primary address in the Merged Profile to be that of the Profile to Merge or Original Profile address, select the P check box on either the Profile to Merge or Original Profile, and then on the Merged Profile.
I Checkbox. Inactive. Select this checkbox if the profile (or phone, or credit card, or other) is inactive.
G Checkbox. Indicates if the preferences are Global.
Profile to Merge. This profile will no longer exist after the merge process.
Original Profile. This profile will absorb all the contacts, activities, business blocks, reservations, stay details, commissions, and statistical information from the profile to merge. The results of the Profile to Merge and the Original Profile is the Merged Profile.
Merged Profile. This profile is the result of the merge process, and will appear in the database for the profile.
Merge. Select the Merge button to complete the merge. (If you decide not to perform the merge, select the Close button.) When complete, you will be returned to the profile containing all the merged data. If there is an overlapping negotiated rate between the PMS and ORS profile records, the Overlapping Negotiated Rate screen will open after the Merge button is selected. See below for more information on this screen.
Reset. Select this button to reset the data in the fields that you may have changed in the Merged Profile. The fields are restored to their status of when the screen first displayed (after the Merge button had been selected from the Profile Options menu).
Close. Select this button to close the Profile Merge screen without saving the Merged Profile.
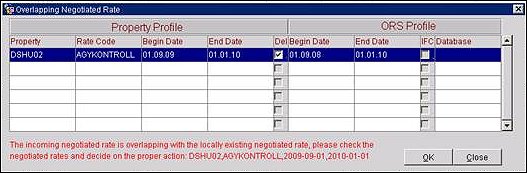
After the Merge button is selected, the Overlapping Negotiated Rate screen opens whenever the incoming PMS profile has a negotiated rate that overlaps with the existing profile record in ORS/OCIS. From this screen, users can choose to either delete the PMS profile's negotiated rate and keep the ORS profile's negotiated rate (accomplished by selecting the Del. check box, which is selected by default) or keep the PMS profile's negotiated rate (accomplished by selecting the IFC check box). The negotiated rate that is selected will be the one on the merged profile. Users can select OK to complete the action.
Note: When the IFC check box is selected and a database ID does not exist, the database ID subscribed to the ORS profile will auto populate on the merged profile.
See Also