|
|
|
Data Extraction
The Data Extraction feature is a flexible tool that allows you to find and extract information from the Opera database for a variety of purposes. For example, using Data Extraction you can:
To access the Data Extraction feature, select Miscellaneous>Data Extraction>Data Extraction Query. The Data Extraction Query Search screen appears.
To find a query that has been saved, enter the query's description, or first part of the description, in the Description field. Select the Search button. To list all queries, leave the Description field blank and select the Search button.
To process an existing query, highlight your choice and select the Process button. The Data Extraction Query Results screen appears.
To edit an existing query, highlight the query in the search results grid and select the Edit button. To create a new query, select the New button. The Data Extraction Query screen appears.
Note: To create, edit or delete an existing query, your must first be granted the appropriate permissions; QUERY_NEW, QUERY_EDIT and/or QUERY_DELETE.
The Data Extraction Query screen is the starting point for creating and editing queries.
When you create a new query, the Query Name field displays the default name assigned to the new query. You may change this name if you like, but each query should have a unique name to make it easy to identify the query later.

Once you save the query, the query name is displayed in blue text at the top of the screen and may not be changed. In the future, if you wish to reuse or edit the query, this name will assist you in locating this query using the Query Search screen.
Designing a data extraction query is a step-by-step process. The Data Extraction Query screen guides you through the steps. As you complete each step, appropriate choices become active in the following steps, based on your previous actions and choices. When you complete the all steps and select the Add button, the query statement you composed appears in the text box in the lower part of the screen.
Although some simple queries consist of a single statement and can be built in a single pass through the Data Extraction Query steps, you may need to go back and repeat the steps one or more times if you wish to construct complex queries that contain multiple (and possibly nested) query statements.
Following is a description of the basic steps for building a query.
Step 1. Select a Data Source. Select the down arrow to choose the data source for your query. From the list of Data Sources, make your choice based on what you want to accomplish with your query.
It is a good idea to put what you are looking for into words — a short statement that can guide you in constructing your query. For example, you might say, "I want to find all contacts associated with active accounts in Illinois." A statement like this makes it clear what data you are seeking (contact names) and what filters you need to apply (a filter for accounts whose active flag is equal to Y, and a filter for State addresses equal to IL). Based on this information, you would also know that you need to select a data source that gives you contact names and account information — All Contacts With or Without Primary Accounts. Each of the data sources listed may pull data from several database tables behind the scenes. This choice — All Contacts With or Without Primary Accounts — will give you access to several Opera database tables at once, specifically, the Contacts table and the Accounts table. If you only wanted information about contacts or about accounts but not both, you might choose All Contacts or All Accounts as your data source.
Note: Select Configuration>Setup>Data Definition for information about which fields are available from the Opera database tables.
When you only want guest profile stay data extracted, such as for ORS/OCIS Campaign Management, select the data source option All Profiles.
The data sources available to you will depend on the license codes and application functions that are active at your property. See Notes on Data Sources, below.
Step 2. Select a Field for Filter Condition. Based on your choice of data source, you may now select from the fields in the table or tables that are available to you. Select the field that contains the data you want to find or that you wish to use as a filter for further queries. For example, if you want to consider only active accounts in your query, you might choose Active Flag Accounts as your filter field in this query. Notice that the list of Data Source Fields that appears when you select the down arrow identifies the Field Name and the Table Name where the field is found to help you in making your choice.
Note: In order to extract guest profile stay data from the correct property and date range (such as for what may be required for ORS/OCIS Campaign Management), one of the following fields for the filter condition must be selected. These required fields for filtering are property and reservation-specific records, which enable the mail filter (Totals Range Screen) to identify the correct property and date range information.
- Cancellations
- Cancellations – Last year
- Total Day Use Rooms
- Total Day Use Rooms – Last year
- Total Nights
- Total Nights – Last year
- No Shows
- No Shows – Last year
- Total Revenue
- Total Revenue – Last year
- Total Stays
- Total Stays – Last year
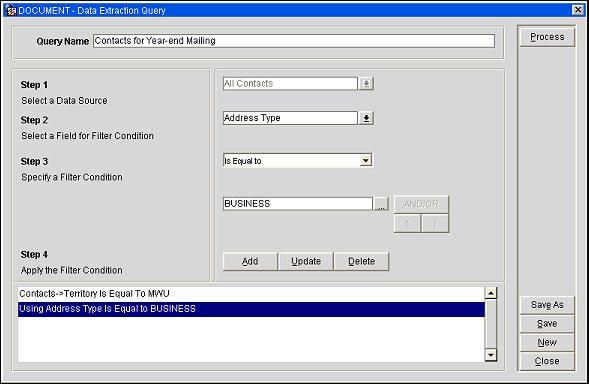
Step 3. Specify a Filter Condition. Based on your choice in step 2, various filter conditions will be available for you to choose from when you select the down arrow. For example, when you are looking for active accounts you want to find those whose Active Flag field contains a Y; therefore, you would select Is Equal To as the filter condition. In the field underneath, enter the value you are looking for (in our example, Y).
Notice that the extra field for the entry of a value appears only if a value is required. For example, if you selected Is Empty for the filter condition rather than Is Equal To, there would be no need for you to enter a value and the data entry field would not appear.
Or, if in Step 2 you selected a filter condition field that calls for a date or range of dates (for example, an arrival date), the filter condition options available in Step 3 might include Is After or Is Between and date entry fields would appear underneath rather than a text entry field.
Step 4. Apply the Filter Condition. Now, select the Add button to copy the query statement you created into the text area.
Repeat these steps to add follow-on statements, if they are required by your query. In our example, where you are looking for contacts in Illinois, you would add another query statement that selects the account address State field as the filter field in Step 2, and Is Equal To IL as the filter condition in Step 3.
By default, as you add new statements they are combined with those that went before using the AND operator. If you want to change an AND operator to an OR operator, highlight the AND statement, click the AND/OR button, and then click the Update button. The AND operator changes to OR. You can also change an OR operator back to an AND operator using this same process: Highlight the OR statement that you want to change to an AND statement, click the AND/OR button, then select the Update button. The OR operator changes back to AND.
To nest statements, place them in parentheses. Highlight the statement where you want the nesting to start and click on the open parens (() button. Select the Update button. Next highlight the statement that you want to be the last statement inside the parens. Click the close parens ()) button. Finally, select the Update button. When you are nesting statements, the number of open parens must equal the number of close parens.
Note: Although both AND and OR are logical operators, AND is "stronger". It binds the logical expressions on either side of it more tightly than the OR operator does (technically, AND is said to have a "higher precedence" than OR). For example, in this clause:where Accounts->Industry Code = 'A' OR Accounts- >Industry Code = 'B' AND Accounts- >Country = 'ITALY'
the AND is always acted upon first. You can break this bonding by using parentheses to enclose those expressions you want to be interpreted together. Parentheses override the normal precedence:where (Accounts->Industry Code = 'A' OR Accounts- >Industry Code = 'B') AND Accounts- >Country = 'ITALY'
Or, to get the same result the query could be written like this:where Accounts->Country = 'ITALY' AND (Accounts->Industry Code = 'A' OR Accounts- >Industry Code = 'B')
To process the query, select the Process button. The Data Extraction Query Results screen appears.
To edit an existing query, highlight the query in the Data Extraction Query Search grid and select the Edit button. The Data Extraction Query screen appears.
In the text area in the lower part of the screen, highlight the statement you wish to edit. When you do so, the elements of that query appear in the Step 2 and Step 3 fields, where you may change the filter field and filter condition as necessary.
Note: You may not change the data source for a query (Step 1). If you need to change your data source, you must create an entirely new query.
When you have made your changes, select the Update button to record the modified query statement in the text area.
To remove a statement entirely, highlight the statement in the text area and select the Delete button.
To process the query, select the Process button. The Data Extraction Query Results screen appears.
The query statements you see in the Data Extraction Query screen text area are not "real" SQL statements. These statements are pseudo-SQL statements that are easier to read and understand for most users. If you have a need to see the actual SQL code behind the query statements you see on the Data Extraction Query screen, select [Alt + W]. The SQL statement appears in a box like this:
The SQL statement in the box is in text format and can be cut and pasted into other programs, such as SQL Navigator, should you need to do so.
Data Sources for FIT Contracts
The data source - Contracts with Accounts and Contacts is only available when the application parameter Contracts>FIT is set to Y.
Following is a listing of all available fit contracts fields extracted as part of this data source:
Note: All calculations, such as those for Actual Room Nights at Contracted Rates, will match those on the Contract Overview screen.
Following is a list of existing data sources with the view that they use (the fields that are available for mailing from the mentioned views are filtered to only show mailing fields in these listings.)
Table Name |
Available Fields Listing |
All Accounts (ACCOUNT_VIEW) |
|
All Contacts (CONTACT_VIEW) |
|
All Accounts with or without Contacts (ACCOUNT_VIEW and CONTACT_VIEW) |
|
All Contacts with or without Primary Account (ACCOUNT_VIEW and CONTACT_VIEW) |
|
Activities with Accounts and Contacts (ACCOUNT_VIEW and CONTACT_VIEW and ACTIVITY_VIEW) |
|
Business Blocks with Accounts and Contacts (SC_BUSBLOCK_INFO) |
|
Events with Accounts, Contacts, and Business Blocks (SC_BUSBLOCK_INFO and GEM_EVENT) |
|
Reservations with Profiles [Last Name] (NAME_RESERVATION) |
|
All Profiles (NAME_VIEW) |
|
Reservations History with Profiles [Last Name] (PROFILE_HISTORY_RESERVATIONS) |
|
Profile Requests (PROFILE_REQUEST_VIEW) |
|
Guest Profiles (NAME_VIEW) |
|
General Stay Records Extract (GEN_STAYREC_VIEW) |
|
General Stay Records Revenue Extract (GEN_EXT_STAYREC_REV) |
When Business Blocks with Accounts and Contacts is selected as a data source, the Lost to Destination and Lost to Property fields may be selected as filters. These fields are useful when querying for information on business block cancellations. Lost to Destination filters on the Destination (e.g. competitor's chain) code specified when a business block is cancelled. Lost to Property filters on the free form text specified in the Property field when a business block is cancelled. Lost to Property information might include the name of a specific property to which the business was lost, or the city to which the business was lost, etc. See Business Block Cancel Tab for additional details.
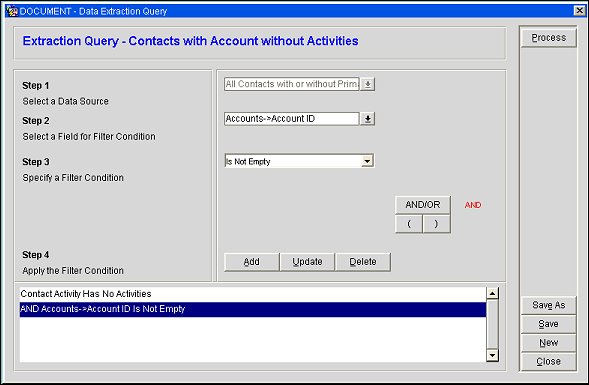
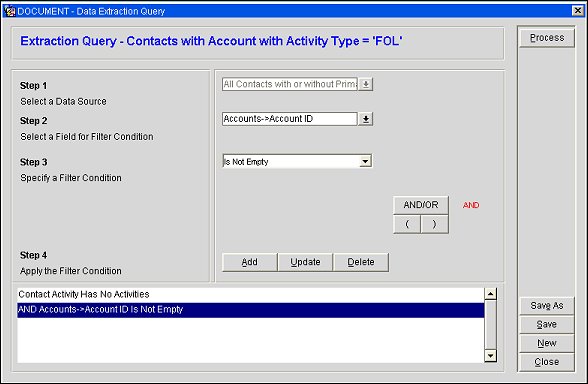
It is possible to create data extraction queries to identify contacts with or without activities based on a specific activity type and activity start date range.
Here are some examples of how to set up these kinds of queries:
1. Find all contacts with an account who do not have any activities
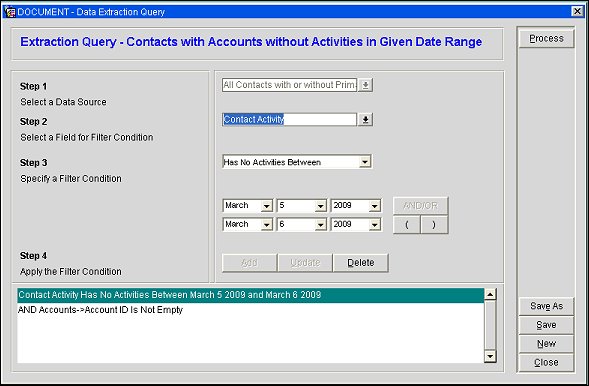
2. Find all contacts with an account who do not have any activities that start within a given date range.
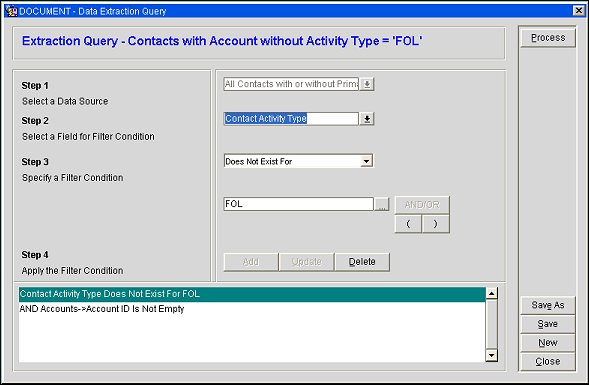
3. Find all contacts with an account who do not have any activities of a specific activity type.
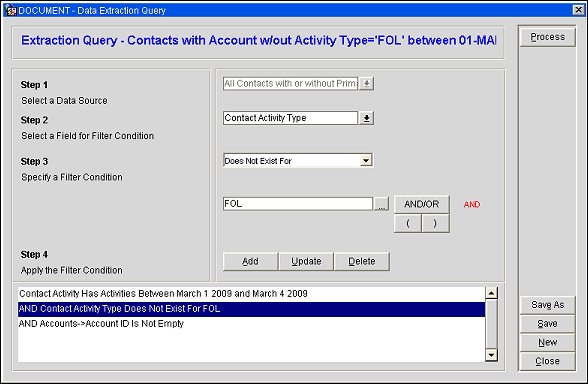
4. Find all contacts with an account who do not have any activities of a specific activity type that start within a given date range.
5. Find all contacts with an account who have a specific activity type.
It is possible to create data extraction queries to identify accounts or contacts with or without activities based on a specific activity type and date range.
1. Find all contacts who do not have any activities:
2. Find all contacts who do not have any activities since a specific date:
3. Find all contacts who do not have any activities of a specific activity type:
4. Find all contacts who do not have any activities of a specific activity type since a specific date:
5. Find all accounts which do not have any activities:
6. Find all accounts which do not have any activities since a specific date:
7. Find all accounts which do not have any activities of a specific activity type:
8. Find all accounts which do not have any activities of a specific activity type since a specific date:
For a given individual, the contact profile and the individual profile are interlinked and share the same primary email address. The following query setup procedure is available for those properties that wish to use a separate email address for mailings directed to contact profile recipients and for mailings directed to individual profile recipients.
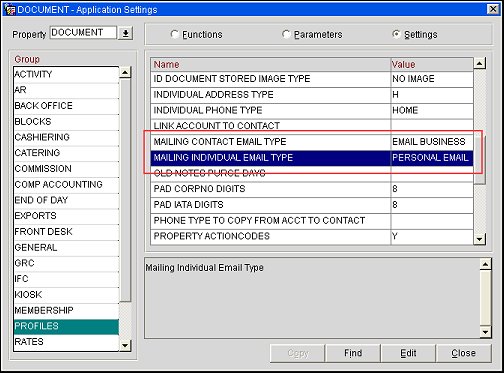
1. Set up an individual email type and a contact email type for the EMAIL communication role. (Email types are configured in Configuration>Profiles>Communication Types. See Communication Types for details.)
2. Use the Profiles>Mailing Individual Email Type and the Profiles>Mailing Contact Email Type application settings to identify the email type for individuals and the email type for contacts.
Note: When no value has been selected for the Profiles>Mailing Individual Email Type and/or for the Profiles>Mailing Contact Email Type, the email address flagged as Primary on the profile will be pulled by data extraction queries based on individual or contact data sources. An exception to this is the Profile Requests data source which will pull the email selected for the request if no value has been set in the application setting.
3. Set up email address(es) of the appropriate email type(s) — individual email type email address and/ or contact email type email address — for each profile.
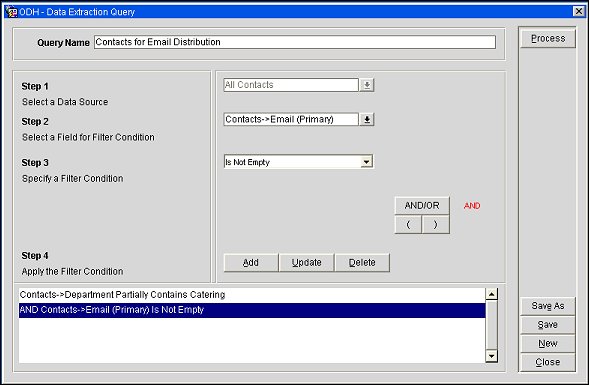
4. Create the data extraction query.
For a given individual, the contact profile and the individual profile are interlinked and share the same primary mailing address. The following query setup procedure is available for those properties that wish to use a separate mailing address for mailings directed to contact profile recipients and for mailings directed to individual profile recipients.
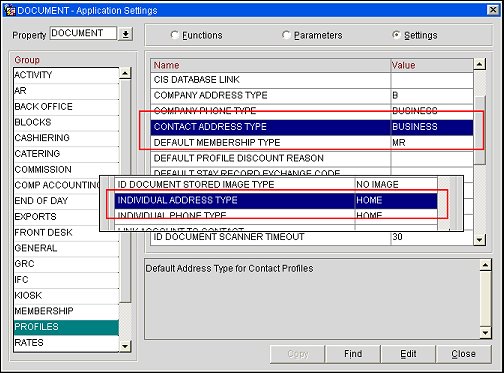
1. Set up an individual address type and a contact address type. (Address types are configured in Configuration>Profiles>Address Types. See Addresses for details.)
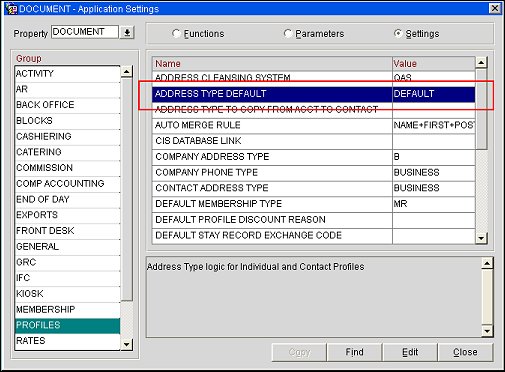
2. When the Profiles>Address Type Default application setting is set to Default, you may use the Profiles>Contact Address Type and the Profiles>Individual Address Type application settings to identify the address type for contacts and the address type for individuals. See Contact Address Type Application Setting, Individual Address Type Application Setting, and Address Type Default Application Setting for details.
Note: When no value has been selected for the Profiles>Contact Address Type and/or for the Profiles>Individual Address Type, the mailing address flagged as Primary on the profile will be pulled by data extraction queries based on individual or contact data sources. An exception to this is the Profile Requests data source which will pull the mailing address selected for the request if no value has been set in the application setting.
3. Set up mailing address(es) of the appropriate address type(s) — individual address type mailing address and/ or contact address type mailing address — for each profile.
4. Create the data extraction query.
Show Me
See Also